Sure, sorry for being so vague!
In the post here Share your work here ✅ you refer to a paper about TS to image transformations.
I hope the link works!
I’ve tried to edit the link in my previous post, but for some reason I can’t.
Here’s a new link to the Encoding Time Series as Images for Visual Inspection and Classification Using Tiled Convolutional Neural Networks paper.
1 Like


Thanks @hwasiti,
I’ll recheck this.
Butch
Your drawing is amazing… What software/hardware did you use?
2 Likes
Thnx @hwasiti !
I use paper app on an old iPad since a lot of years: it’s the fastest way I found to materialize my ideas 
I’ll post a blog in my workflow soon.
4 Likes
Predicting Hotel 1-star to 5-star from an image.
Then compare the model performance by quizzing a “hotel expert” on 25 images from the validation set. The model’s performance is slightly better than the expert’s on MSE.
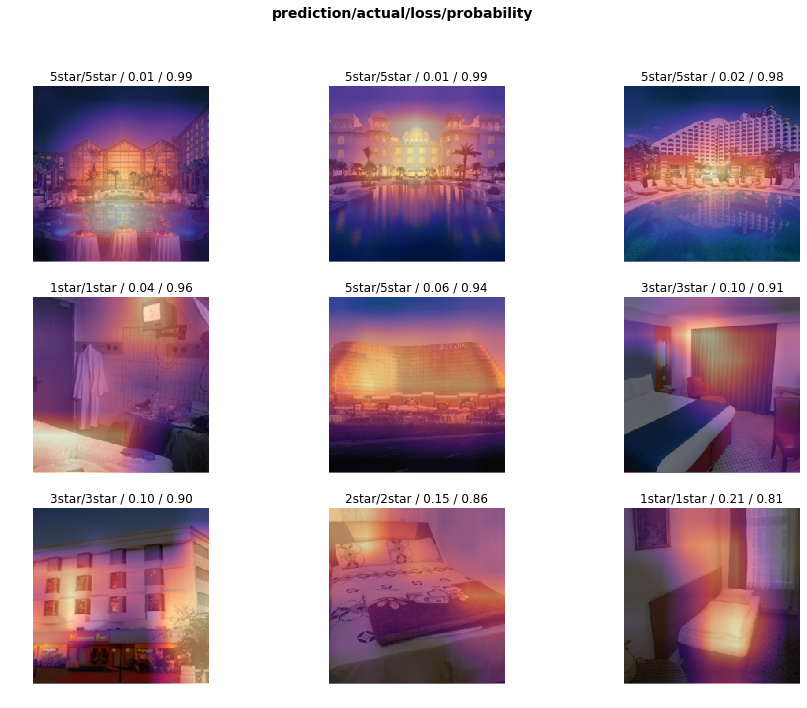
https://github.com/sutt/fastai-tmp/blob/master/hotel-star-ratings.ipynb
Some interesting features the model picks up:
3-star: has folded cloth curtains
5-star: has lots of contiguous glass windows
1-star: the bedding only has white sheets; also, has a visible text sign (if exterior)
13 Likes
Hey there @javiber , I had a look at your code- very interesting  Thank you for sharing it. I tried to work with the code and dataset directly in kaggle kernels, but the pictures were broken, I guess that’s because kaggle kernel does not deal with large image data sets ( >500 pics, I think?). So I was wondering: Which platform did you build your code on? I would love to use it as a starting point to better understand multilabel-classification. Thank you very much.
Built a Pokemon image predictor using fastdotai and KaggleDatasets (https://www.kaggle.com/thedagger/pokemon-generation-one#dataset.zip) . The docker image is deployed on heroku (https://salty-headland-83874.herokuapp.com/ ). You can find the docker image here https://hub.docker.com/r/vardhanapoorv/pokemon-predictor . If anyone knows a better dataset for Pokemon, let me know. I have built it using what I have learned till lesson2. Would soon be writing a deployment guide. If anyone needs any help or want to share what they think would love to hear it.
Would like to get feedback about this . You can find the code here - https://gist.github.com/vardhanapoorv/30bdd984f9e8d59ea1af203882f085b6 , will write a article about deployment also soon
2 Likes
I live in Asia and thought this would be an interesting first project. I’ve trained two models to predict which traditional East Asian dress a female is wearing. Feedback is greatly valued. Thanks in advance.
Hanfu

Kimono

Hanbok

- Hanfu (Chinese) vs Hanbok (Korean) vs Kimono (Japanese). Based on feedback I received here
- Qipao (Chinese) vs Hanbok (Korean) vs Kimono (Japanese)
I would like to increase the accuracy but I have only watched lesson 1 so far. Any tips is greatly appreciated.
1 Like
Hi @piaoya I have access to a server at work and it’s what I’ve been using. Did you downloaded the images yourself? I downloaded a zip that someone posted on the dataset’s discussion and had to do some cleanup after that, you can find that on the my notebook.
I haven’t used kaggle kernels so I’m not sure of the limitations but 500 pics seems quite limiting.
Glad you liked it, please let me know if you find anything more about it or have any questions or suggestions about my work.
cheers
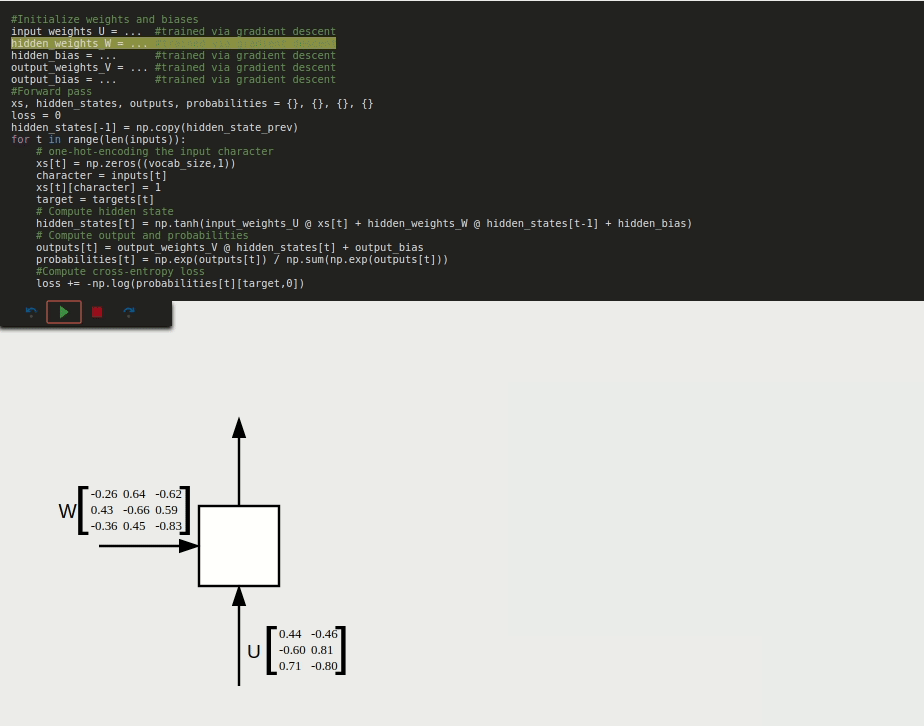
I recently created a blog post that animates and annotates each step of the forward pass for recurrent neural networks. I think many people here will find it interesting if they’re trying to understand exactly what’s going on under the hood with RNNs.
http://joshvarty.github.io/VisualizingRNNs/
Here’s a quick preview of one of the animations. You can hover over the code and see exactly what corresponds to what in the diagram.
25 Likes
I put together a tiny notebook to illustrate the absolute basics of CUDA in pytorch. I.e. when does a tensor operation happen on the GPU? How do you tell? etc. Mostly made to cement my own understanding but I figured it might be worth sharing.
5 Likes
How to run Pytorch 1.0 and Fast.ai 1.0 on an Nvidia Jetson Nano Board:
The Nvidia Jetson Nano is an incredible value for an ARM Cortex A57 processor board with 4GB of RAM and that runs both CUDA and pytoch. Here’s how you can also make it run the latest and greatest (as of April 2019) version of pytorch and fast.ai. This install is for Python3 only . This install is NOT recommended if you don’t have much linux experience, don’t know how to use ssh, or have no idea how IP networking works or what an IP address is.
What You Need:
- A ($99) Nvidia Jetson Nano development board – These can be ordered from many places, I got mine from SparkFun. My only comment is that if you order one, pay extra for fast shipping as these are in limited supply and take over a week to ship using their Fedex/Post Office shipping method.
- A (~$15) Class 10 64GB Micro SD Card . – Make sure it’s class 10 or higher speedwise.
- A USB Keyboard – Got a PC? Use that one.
- A (~11$) 2.5Amp power cable that has a micro-usb plug.
- An HDMI or DisplayPort cable and monitor – note that some monitor’s won’t work, so if your cool new 4K monitor doesn’t work (like mine), hook up a 1080p TV using HDMI.
- An Ethernet cable , a Wireless router or HUB on your network . This box has no native wireless support, so make sure you have a viable wired network.
- A PC that you can plug the Micro SD card into to flash it. If you only have USB ports, that’s fine. Spend the extra $10 and buy a USB to SD card adapter .
- Software for your PC that can create an SSH terminal , and software that can transfer files using SSH . For Windows I recommend Tera Term (free) and WinSCP (free). Use google to find where you can download these if you don’t have them already.
-
Download This Zip File to your PC which contains the scripts I’ve written and remember where you put it. It contains these files:
setup_swapfile.sh
fastai_jetson.sh
setup_jupyter.sh
jetson_headless.sh
jupyter_notebook_config.py
What to do first:
After you shiny new box arrives, ignore their stupid paper stand and find yourself some anti-static foam or similar material and put your new board on. Go to the Nvidia developer website and follow These Instructions to get started. Be sure you do all of the following:
- Download the Nvidia zip file with the SD card image.
- Flash it to the SD card using their instructions.
- Put the SD card into the Nano, plug in the USB keyboard, monitor and Ethernet cable attached to the router (must have internet access).
- Boot the machine, accept their license, etc.
- Pick a machine name that works on you network, pick a user name and password you can remember, you’ll need it!
Once it boots up and you’ve verified it’s on your network and the Internet:
- Go to the Network Settings and find the IP V4 address of your machine, write it down , or if you understand IP networking set up a fixed IP address .
- Use the PC terminal program to open an SSH session with your Jetson Nano.
- Use your file transfer program to transfer the files in the zip File to your Nano’s user home directory.
- From your PC ssh into the IP address in step 1 above.
- From either the console or via an SSH connection, set execute permissions on the scripts you’ve just downloaded:
chmod +x fastai_jetson.sh
chmod +x jetson_headless.sh
chmod +x setup_swapfile.sh
chmod +x setup_jupyter.sh
Set up a Swap File:
The Nano has only 4GB of RAM (which the GPU shares), you’re going to need to setup up a swap file. If you already have one, skip this step. You can just run the setup_swapfile.sh from your terminal session:
./setup_swapfile.sh
Be sure to ONLY DO THIS ONCE, as it has nothing in the script to check if it was already setup. Verify you swap file is setup by doing:
free
you should see an 8GB swap file created
Install pytorch and fast.ai:
If at this point you want to try the standard fast.ai and pytorch install, go right ahead, it will fail. For a bunch of reasons I’m not going to go into now, the standard pip commands simply won’t work for this. But if you just run the fastai_jetson.sh script you downloaded it will install both. Now this will take a couple of hours at best, so don’t hold your breath.
./fastai_jetson.sh
Install jupyter notebook:
After fast.ai is installed, it tells you:
Done with part1 – now logout, login again and run setup_jupyter.sh
This is because the jupyter install doesn’t export the shell variables it need to run. So shutdown all your terminals, SSH sessions etc. and just reboot the Nano from the GUI. Once it comes back up. Open up a terminal from the GUI and :
- Make sure that the jupyter_notebook_config.py file you downloaded is in the nano’s home directory.
- run ./setup_jupyter.sh
./setup_jupyter.sh
This also takes a while, so again don’t hold your breath . The last step of this script asks for your jupyter password. This IS NOT your login password, this is a separate password you can use to log into jupyter notebook from any PC on your network, so pick an appropriate password and write it down. The default jupyter notebook install only lets you log in from the console or GUI, the modified jupyter_notebook_config.py file you downloaded and the script installs allows you to login from any machine on your network. To run jupyter notebook you will have to open a terminal or ssh instance and run:
jupyter notebook
If it doesn’t run, it’s probably because you didn’t log out and in again.
That’s it. Your done, You can now run pytorch and fast.ai. But if you’re like me, you don’t need a GUI on the nano, and want all the memory you can get to run programs.
A Note about Python, Pip and VirtualEnv:
Some experienced python users are used to a virtual environment (virtualenv, conda) which requires you to activate it ‘source activate’ before you install or run software you’ve installed in that environment. We haven’t installed that (Yes we probably should have), one of the side effects of this is that the pip and python commands will run python3 or pip3 automatically, if that’s the active environment.
You must use pip3 and python3 to run pip and python respectively. So if you’re running some notebook that uses !python xyz, it won’t work unless you change it’s code to !python3 xyz.
Memory isn’t everything, but it’s definitely something:
Back in the old days (of say 2010), 4GB was a lot of memory. And If you’re not using the GPU on this board, it is enough to get your notebooks running well (the 8 GB of swap file helps quite a bit). But if you’re using CUDA, it doesn’t run on the swap disk, so you need each and every byte of that 4GB. To get that, it’s time to jettison the GUI and run via a remote console using SSH. Running the jetson_headless.sh script will uninstall the GUI, and purge a couple of unnecessary packages that take up over 300MB of RAM. So after you run this and reboot, you’ll only have console access to the Nano, but you’re the machine will start using only about 378MB of RAM, leaving you with 3.6GB for pytorch and fast.ai.
1.run:
./jetson_headless.sh
2. reboot and ssh into your nano.
A Note about changes:
As of April 2019, this hacky install method works and installs the latest versions of both pytorch 1.0 and fast.ai 1.0, but things change. In the future you will have to update one or more packages or fast.ai itself. Hopefully some clever soul will figure out how to do that and maybe even build a git repo. My work here is done.
41 Likes
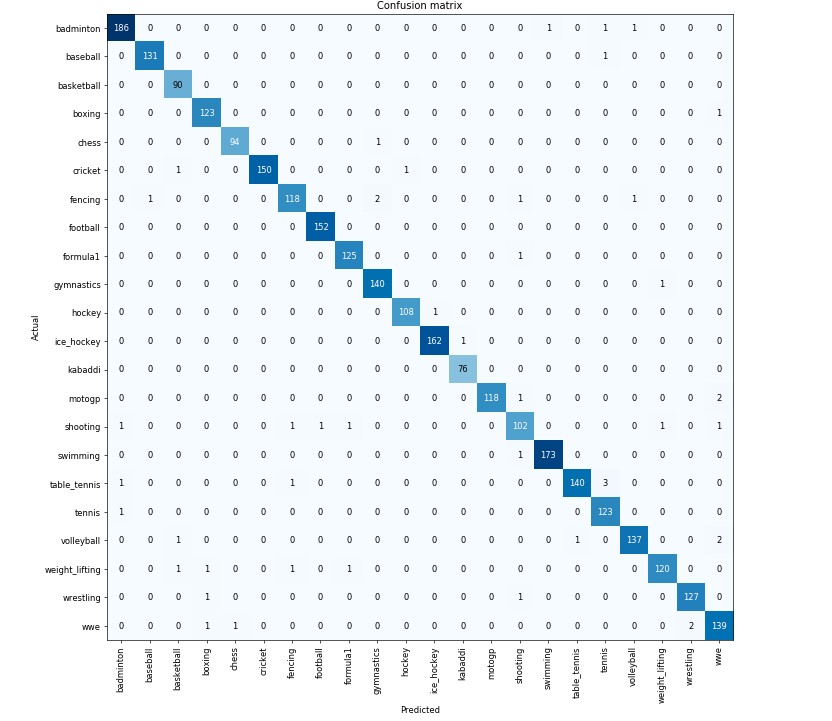
Hi,
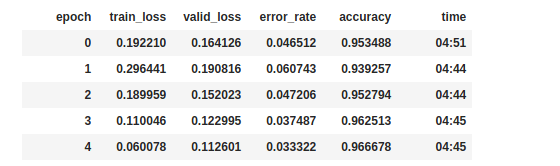
I tried sports classification over 22 types of sports.
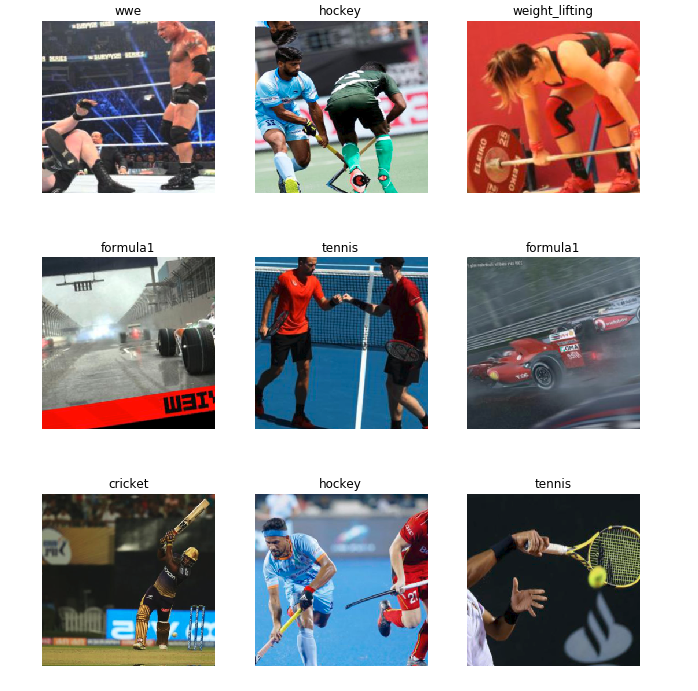
I got the following confusion matrix and accuracy of 97%
To play with the model, I tried predicting the sport type of Jeremy’s twitter wallpaper
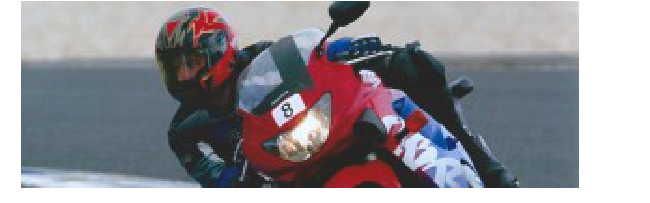
And I got the classification as Category motogp
You can find the repository here
5 Likes
Very cool! The question we all want to know - how’s the performance?
I’m working on a side project parsing python repos off github to find the most common libraries and functions. I think it would be awesome to be able to see the functions of each library listed from most to least used, especially for new students. I’m a bit stuck because of python’s dynamic typing, so if anybody here has experiencing using Abstract Syntax Trees or parsing source code and wants to help, please let me know!
This is a quick writeup that covers python’s builtin functions and special dunder methods (e.g. __len__) showing them in order of most used to least used, along with some visualizations. Hope you enjoy.
6 Likes
That’s amazing @Interogativ
btw, are you Tilii?
Thanks! Sorry, Not Tilli, just me.
1 Like
Hello. Fast.ai is a cool thing for quick solution of problems on images, texts, etc.
And when I needed to play with sparse 3D data such as point cloud, depth maps and even mesh - to process data from LIDAR - I was terribly short of such a library.
In short, I implemented another application (in addition to visual, text, collab, tabular) - sparse - a wrapper around Benjamin Graham’s SparseConvNet. I.e. new DataBunch, DataSets, Items, Transforms compatible with fast.ai learner are implemented.
Here is an example of a solution to the problem of 3D segmentation of indoor scenes.
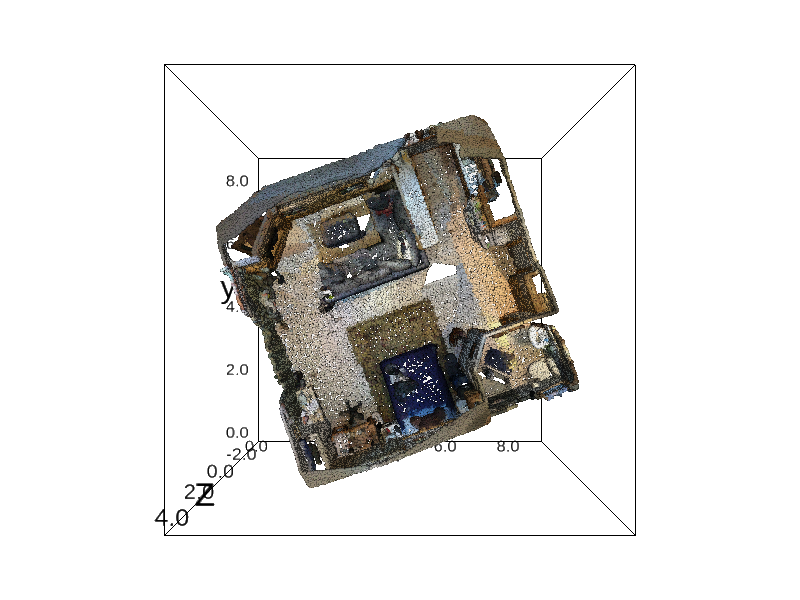
And this is the result of the transformation chain (point sampling, affine transformations, elastic transforsm, voxelization, color noise):

Github repository.
Now you can quickly explore models and try out ideas on SparseConvNet and go beyond the 2D world
21 Likes