Trying to K.I.S.S the fast.ai DataBlock api is not that simple… But I’ll do my best!
The purpose of DataBlock api is abstracting in a very clean and flexible way the whole workflow of transforming your data (images, text, audio…) into a batch (X,Y tensors) that can be used to train a model.
A CLOSER LOOK AT THE WORKFLOW
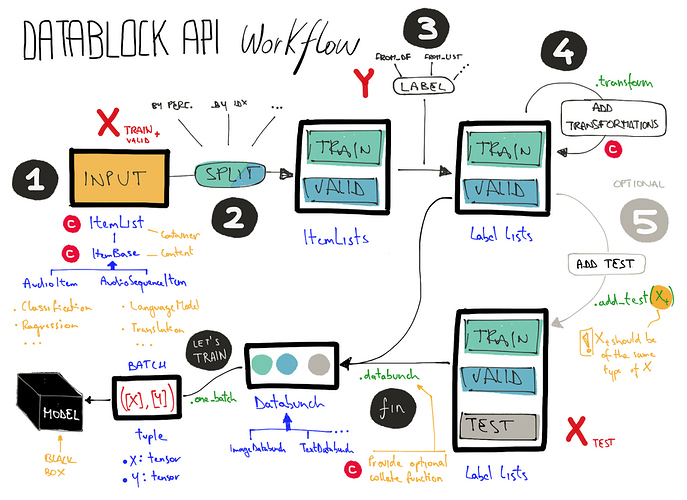
The following drawing is an attempt to capture in one Big Picture the main components of DataBlock api, focusing on:
- The main steps: big black and gray circles.
- X,Y: in red.
- Train, Valid, Test: track them in the pipeline of transformations.
- The type of data involved: in blue.
- Calls to api: in green. I’ve only highlight some of them…
- Customizations: what you usually do to customize the pipeline… Red circle with “C”.
NOTE: In the AUDIO sections, I’ve summarized the kind and the extent of modifications that we made to to work with audio data classification, to give you an idea of what to change in case you need to work with custom data types.
THE MAIN STEPS
1) COLLECT THE DATA:
This is the first and most important step. Here you’ve to specify what kind of data you’re going to process and provide a way to create a “ItemList”. For example: if you’re going to process a list of images stored in a folder, you’ll create your ItemList as ImageList.from_folder(…).
NB: in this step your train and validation workflow are still together, we’ll split them later.
AUDIO: in this step we’ve customized:
- AudioItem(ItemBase) adding some custom property and the logic to show itself.
- AudioList(ItemList): the two main reason we’ve created this class are to provide a custom “get” method and to specify the type of “DataBunch” we’re going to create (AudioDataBunch).
2) SPLIT TRAIN AND VALID:
This step lets you split your “ItemList” into train and validation and create a new object “ItemLists” that holds them.
By default the library provide a lot of pre-defined methods that cover the vast majority of situations.
3) LABEL:
Here we tell the system what is the “Y” for each of our “X”, for both train and validation sets.
Even in this case the library itself provide a number of ready to use methods to label your data from a list of values or from a column in your DataFrame.
4) TRANSFORM: DATA AUGMENTATION & MORE:
In this step we’ll specify the list of transformations that will be applied to our original data before to collate them in the final batch.
Customizing and tuning the transformations according to our training distribution is one of the most critical parts of the whole process, because if you don’t do it correctly you’re going to ruin your data.
AUDIO: we’ve debated and put a lot of effort on transformations while working on the audio project. Eventually we realized that this transformation step could be used not only for classical data augmentation, but also for changing the “nature” of your signal (ie: from 1D audio signal to 2D mel spectrogram). This gave us a new and interesting point of view on what you can do in the “transformations step”.
5) OPTIONALLY ADD A TEST SET:
You can optionally specify a test set and leverage the power of your transformations with TTA, while trying to beat the leaderboard on a kaggle competition.
DATABUNCH:
Choose a BATCH SIZE and go! Now you you can train a model with your fresh new DataBunch!
NB: if you’re going to use a very peculiar kind of ItemData that after all your transformations doesn’t become a tensor, you’ll probably need a custom “collate function” to eventually group and transform your data into a batch.
AUDIO: we’ve created an AudioDataBunch only to provide a function that lets you “HEAR” some original samples. For the AudioItem we doesn’t need a custom collate function because the last step of our transformations pipeline returns a 2D tensor.
REFERENCES
CREDITS
A Great Thanks to @zachcaceres, @ThomM, @simonjhb, @aamir7117 for all the patience, support and the great job on “the audio thing”.


