I was interested in the fast.ai library and decided to watch the first lesson. I haven’t had so much fun with playing with a library in a while In just an hour I understood how to use the library and get some results out of it*
My topic was of course cats: In what posture is a cat? Sitting, lounging, curled up or walking. The error rate was 17%, which is quite ok considering the bad figures and my own confusion on the definition of the poses
Given sufficient free time I’ll see if I can improve it. The final goal is to use a RaspberryPI and a camera to track my own cat and see how it actually spends it day.
*totally incomparable to the time it took me to get useful things out of other libraries and visualize it.
Hello everyone, I wanted to share work I did using FastAI library (0.7) at my company and this is also my first blog post! I am now working my way through 2019 version of part 1
TL;DR
Area: AdTech
Dataset: Tabular / Structured data
Problem: Binary Classification
Architecture: Two Layer Neural Network with Embedding for categorical data (with Negative Log Likelihood loss function)
I’ve made a blog post on creating a custom image dataset of African antelope and trained a classifier to distinguish each species. Learned some interesting things about antelope, and the intricacies of building your own dataset:
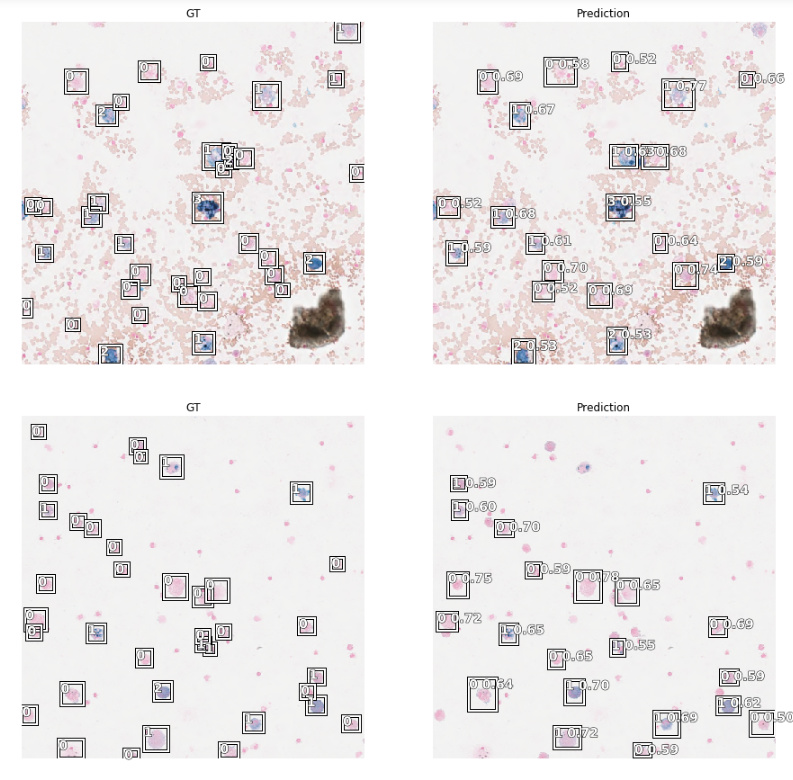
I used fast.ai V1 with Retina-Net for cell detection on microscopy images and the COCO_SAMPLE dataset.
I have to thank @sgugger for his brilliant pascal VOC starter notebook.
Well, as I said on my post, if you take non overlapping windows, it takes around 1 second on GPU(Geforce 1070) to process a 30 sec audio file. So it depends of what you mean by real-time. It’s probably possible to do upscaling with less than 1 second delay, but I’m not sure of how fast we can get. This is a very intersting question though, and I would be happy to make some tests once everything runs smoothly
Hi, dear @oguiza Would you please, share how did you encode time series in an image of a polar coordinate transformation called the Gramian Angular Field (GAF).
Hey @nialloh23 , I just read your post. I cannot access your colab files since I don’t have the permission to. But really nice work. Can you tell me how did you fine tune learning rates. Whenever I work on a project I use the tips Jeremy mentions in the videos like choosing the steepest downward slope and so on. Did you try learning rates before or after them? Or did you increase the size of your slices? What kinds of things did you do?
How i built an image classifier using Fast ai with small datasets - India is a diverse country with many different regional languages. During my recent visits to Hyderabad and Bengaluru, I was a bit surprised to see buses with name boards in regional languages alone . As a tourist, it is very hard to use public transport in these cities. I was interested in solving this particular problem using Deep Learning with fast ai. I wanted to build a mobile app which can identify the bus routes and give more information - source , destination, time etc.
Newcomer to fastai here. Just went through lesson 1 + 2 and thought I’d share what I have been working on recently. I’ve been working with the dataset on Kaggle to predict cancer from pathology scans in this competition: https://www.kaggle.com/c/histopathologic-cancer-detection/overview. It’s a playground competition, and I missed the deadline by a few weeks, but thought I’d finish the project anyway and blog about it. I’ve only gone through a few fastai lessons, but I found that I learnt a lot by just completing the project end to end.
I manage to get 98.6% accuracy which I think would have placed at about 10th place at the time so I was pretty happy about that even though I missed the actual competition.
I blogged about it here on my site which also happens to be my first blog post on machine learning, and also contains a link to download the notebook if anyone is interested : )
EDIT: just removing the line about placing 10th on Kaggle, thanks @stephenjohnson for pointing that out Kaggle’s calculating scores via the ROCAUC method so I need to do a late submission to find out what my actual Kaggle score would be.
Hi Antonio,
Great work and nice write up. However, it looks like that Kaggle competition used “area under the ROC curve” as the evaluation method and not accuracy metric as you’ve used in your blog, so I’m not sure you can make the claim that your results would have finished in the top 10 of the competition. Have you done a late submission to the competition to see what your results would have actually obtained?
Submissions are evaluated on area under the ROC curve between the predicted probability and the observed target.
Hi @stephenjohnson thanks, and yep I don’t think I can make that claim, someone else pointed that out to me in another channel I was using the accuracy scores from fastai and assumed thats what Kaggle would use too. Working on submitting a late submission over to them and seeing what I get and updating my post. Thanks for your feedback and for checking it out!
I reimplemented the DARTS algorithm (Differentiable Architecture Search). This helps to search for rnn cell. I use fastai callbacks to make the code clearer so it is also useful if anyone is interested to learn more about callbacks.
Thank you for your feedback and questions.
Of course, not only for segmentation, but also for regression, classification, and even, perhaps, GAN. Segmentation is only an example. It is planned to prepare an example of regression.
Roughly speaking, SparseConvNets realizes the same types of layers (Convolution, Pool, etc) as the classic CNN for 2D, but it exploits the fact that the voxels (3D pixels) occupy only a small part of the spatial space.
However, according to the tests, the Multi-View 2D CNN approach works more precisely for the classification problem.
The author of SparseConvNet (repo) has detailed articles. The purpose of fastai_sparse is to make use of fastai’s capabilities and simplify the development of transformations.
Great job James
Please I checked your code on Github and want to run it. Any guide as to how to run it would be well appreciated especially setting up the environment, library dependencies etc…
I see this is your first post here, so I would suggest 4 (rather lengthy) steps.
Install Fastai- Everything was done with fastai. There are several good guides on this site depending on the platform you are using.
To make sure everything is running properly, I would test by going through the “tabular” notebook under examples.
Then look through Rossman. It has a “data cleaner” file and then the file that does training. My code does something similar.
Once you have done that you should have everything to run my code. Start with the dataloader so that you are able to save the information and then go back and run through the main notebook.
As long as you have a big enough GPU (8gb), you should be able to run everything. If your GPU is smaller, you need to go back through and remove some features.
I finally got around working on the notebooks. Following lesson 3, I managed to easily get a classifier for emotion classification on text. Then I deployed it using Flask + nginx + uWSGI on a server provided by https://www.bw-cloud.org.
You can check it out here: http://ims-seat.de
I’ll write soon a longer post about the whole process and put the whole code on github. This was lots of fun!
I’m still trying to improve the classifier… emotions are difficult.
 In just an hour I understood how to use the library and get some results out of it*


 on a server provided by
