I encountered the missing one line item (could be the first or last item) when running learn.TTA(is_test = True) from various notebooks. This is from the (replicated) Dogs Breeds notebook.
At 1:39:55 Jeremy said that he is not going to be using any images bigger than int(sz * 1.3) = int(64 * 1.3) = 83
But later he has used sz = 128 and sz = 256 and never has called data.resize function ever again. Are the images in this case scaled down from the original sizes to 128 and 256 pixels respectively, or scaled up from 83 pixels to 128 and 256?
Why has he not used a bigger coefficient than 1.3?
I suppose that he uses the data.resize when size is 64 because it takes too much time for the data loader to perform an on-demand scaling with a target dimension of 64.
On the other hand, on-demand data loader scaling from the original size to 128 or to 256 may take less time, so it’s pointless to do a pre-scale of all the images with data.resize. However, nothing prevents to do that. The resize it’s just to speed things up.
So, in the end, images are scaled by the DL from the original sizes to 128 and 256. As for the coefficient, I think it’s try and test to find a balance between quality and speed.
(These are my opinions, bear in mind I could be totally wrong )
Thought I’d share my notes for this lesson. These contain some screenshots from videos and a few notes/explanations from other sources I found useful. I also tried to make variable naming a bit easier to understand too (e.g., instead of “y” use “target_values”, instead of “lrs” use “differential_learning_rates”, etc.).
Minimum code to run image prediction:
Dogs vs. Cats implemented in Keras:
How to download data from Kaggle, run image recognition, create a submission:
Do I need to execute the line 31 then jump over 54, execute all sortings, reindexings, mergings, then save result in feather for train data, then go again to the line 54, execute it, and do the same operations for the test dataset. Am I understand this correctly?
in the otavio demo, after the (first) maxpool layer, it overlays 2 (8x8?) images and then runs filters over that combination.
Can someone confirm how the images are combined, e.g. added? multiplied? (edit: jeremy adds in excel afterwards, so thats most likely the same)
thanks in advance
SOLVED: I got this working. I believe the code below is correct, but apparently you also need to make sure to call learn.predict() at least once BEFORE using learn.predict_array()? Otherwise the predictions from learn.predict_array() seem to be totally incorrect.
I’m playing with the dog breeds data, and specifically trying to make an individual prediction on a single file as described in the video around 00:39:30. I was having some problems getting the code in the video to work, but after searching the forums, I’ve come up with this (had to convert the image to np.array and make sure precompute=False):
im = val_tfms(np.array(Image.open(PATH+file_name)))
learn.precompute = False
preds = learn.predict_array(im[None])
np.argmax(preds)
What I really want is the name of the breed of the prediction, instead of just a number. Is the code below a correct way to get the breed name for the predicted value?
learn.data.classes[np.argmax(preds)]
That returns a label, such as ‘chihuahua’, but I’m not sure it is the correct way to get the breed name? Especially since when I’ve been playing with this I’ve tried about 20 different images, and NONE of the dogs in any of the images I’ve tried are actually of the breed that the above code predicts, even though the reported accuracy is greater than 0.924. So what am I doing wrong?
I think I could benefit from some general understanding of application. I understand (I think) pulling in the training and test data, fitting the model to the training data and verifying the model with the test data. What I am missing is how to take it to the step of taking the trained model and using it (applying it to a new image). For example, we have a cat/dog image classification model - I take a new photo - How do I pass the new image to the model and get back if it is a cat or a dog?
And, What if it was a picture of a horse? Will the model incorrectly classify as a dog or cat (with a low probability) or will it say ‘this is not a cat or dog’?
Hi!
I got stuck in the satellite notebook, can anybody tell me how the sigmoid works for multi-label problem?
As Jeremy mentioned, we have to replace the softmax of the last layer with a sigmoid function, but what I don’t understand is, how could a sigmoid output a N-d vector? Or we have to train N sigmoids, each for one of the N labels?
So the question is how to calculate the loss of multi-label classification?
If you got any clue about this, please tell me some about the details, thanks!
Or we have to train N sigmoids, each for one of the N labels?
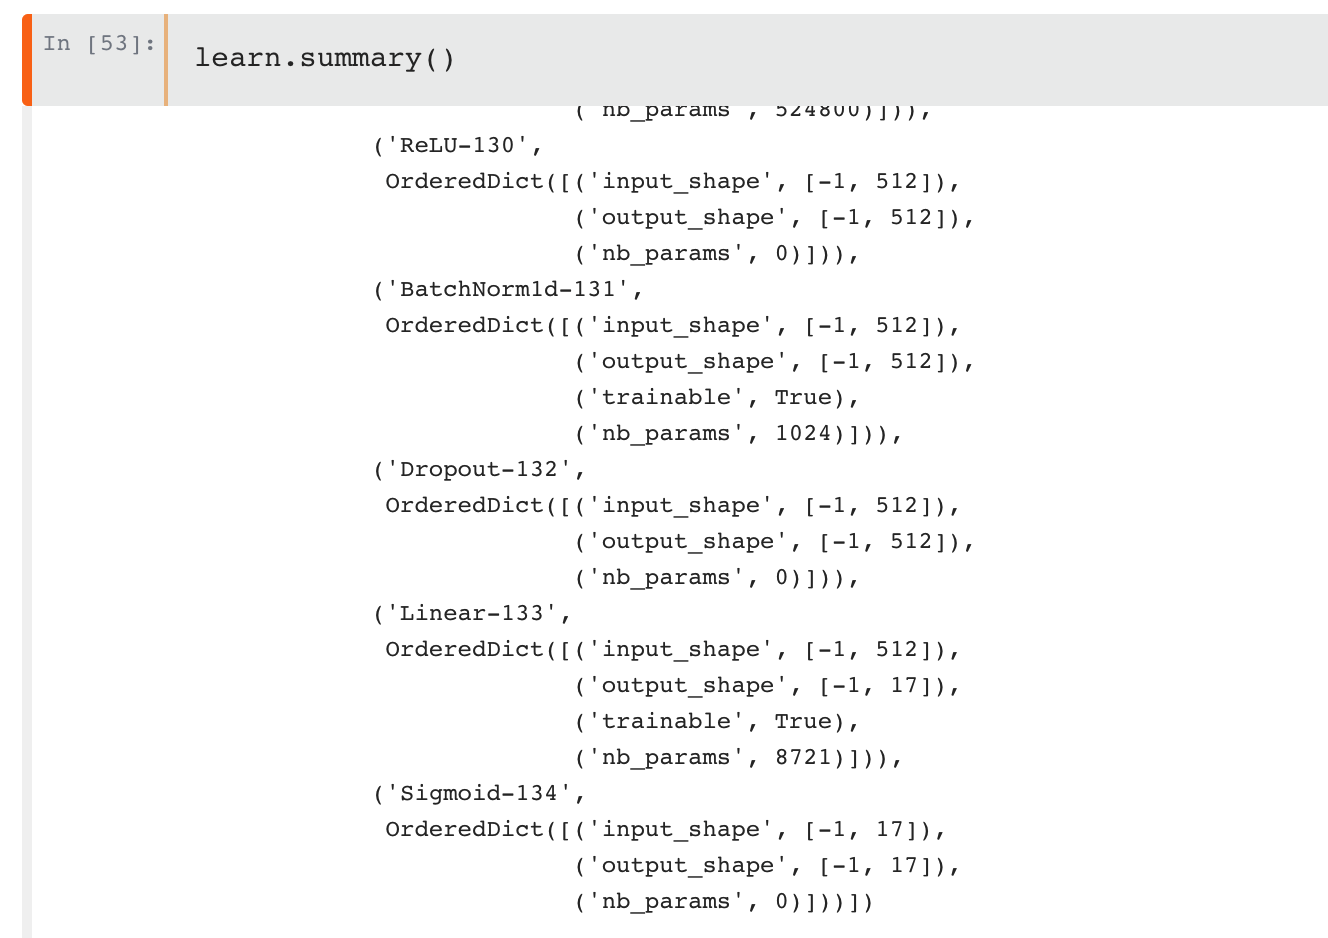
For multi-label problems (is_multi=True in ConvnetBuilder), fastai/pytorch automatically sets up N sigmoid activations in the final output layer training against data.classes (i.e. (‘agriculture’, 1.0), (‘artisinal_mine’, 0.0), (‘bare_ground’, 0.0),…).
Note that we also switch to F.binary_cross_entropy as the loss function vs negative log likelihood loss (F.nll_loss) since it’s a binary classification task for each label class:
class ConvLearner(Learner):
    def __init__(self, data, models, precompute=False, **kwargs):
        self.precompute = False
        super().__init__(data, models, **kwargs)
        if hasattr(data, 'is_multi'):
            self.crit = F.binary_cross_entropy if data.is_multi else F.nll_loss
            if data.is_reg: self.crit = F.l1_loss
            elif self.metrics is None:
                self.metrics = [accuracy_thresh(0.5)] if self.data.is_multi else [accuracy]
        if precompute: self.save_fc1()
        self.freeze()
        self.precompute = precompute
so does that mean we have 17 sigmoids, and we separately train them, for example, if the real label is: [1, 0, 1, 1, ....] and the sigmoid output is [0.8, 0.2, 0.7, 0.6, ...], so the loss for the 1st sigmoid is -(1*log0.8+0*log0.2) , and the loss for the 2nd sigmoid is -(0*log0.2+1*log0.8), and so on… and we just use the binary_cross_entropy for each sigmoid to train them separately? Or we have to add the loss up?
Good idea to look at the NN final layer outputs - confirms that it’s creating 17 sigmoids (for the 17 different label classes in the Planet dataset).
I believe pytorch automatically calculates the loss of each sigmoid output separately, takes the average of the 17, and displays that average value as trn_loss and val_loss. Looks like you can set it to sum losses instead of averaging them based on my reading of the pytorch 0.3.1 docs for binary_cross_entropy, size_average=True/False setting: http://pytorch.org/docs/0.3.1/nn.html#binary-cross-entropy
In the newest pytorch 0.4, looks like there’ll be a new parameter (reduce=True/False) that would “returns a loss per input/target element instead” of averaging or summing the losses: http://pytorch.org/docs/master/nn.html#binary-cross-entropy
 Thanks
  )
)