Wiki: Lesson 2

This is a forum wiki thread, so you all can edit this post to add/change/organize info to help make it better! To edit, click on the little pencil icon at the bottom of this post. Here’s a pic of what to look for:

<<< Wiki: Lesson 1Wiki: Lesson 3 >>>

General resource

How to Ask for Help

Lesson resources

Video timelines for Lesson 2

  • 00:01:01 Lesson 1 review, image classifier,
    PATH structure for training, learning rate,
    what are the four columns of numbers in “A Jupyter Widget”

  • 00:04:45 What is a Learning Rate (LR), LR Finder, mini-batch, ‘learn.sched.plot_lr()’ & ‘learn.sched.plot()’, ADAM optimizer intro

  • 00:15:00 How to improve your model with more data,
    avoid overfitting, use different data augmentation ‘aug_tfms=’

  • 00:18:30 More questions on using Learning Rate Finder

  • 00:24:10 Back to Data Augmentation (DA),
    ‘tfms=’ and ‘precompute=True’, visual examples of Layer detection and activation in pre-trained
    networks like ImageNet. Difference between your own computer or AWS, and Crestle.

  • 00:29:10 Why use ‘learn.precompute=False’ for Data Augmentation, impact on Accuracy / Train Loss / Validation Loss

  • 00:30:15 Why use ‘cycle_len=1’, learning rate annealing,
    cosine annealing, Stochastic Gradient Descent (SGD) with Restart approach, Ensemble; “Jeremy’s superpower”

  • 00:40:35 Save your model weights with ‘learn.save()’ & ‘learn.load()’, the folders ‘tmp’ & ‘models’

  • 00:42:45 Question on training a model “from scratch”

  • 00:43:45 Fine-tuning and differential learning rate,
    ‘learn.unfreeze()’, ‘lr=np.array()’, ‘learn.fit(lr, 3, cycle_len=1, cycle_mult=2)’

  • 00:55:30 Advanced questions: “why do smoother surfaces correlate to more generalized networks ?” and more.

  • 01:05:30 “Is the Fast.ai library used in this course, on top of PyTorch, open-source ?” and why Fast.ai switched from Keras+TensorFlow to PyTorch, creating a high-level library on top.

PAUSE

  • 01:11:45 Classification matrix ‘plot_confusion_matrix()’

  • 01:13:45 Easy 8-steps to train a world-class image classifier

  • 01:16:30 New demo with Dog_Breeds_Identification competition on Kaggle, download/import data from Kaggle with ‘kaggle-cli’, using CSV files with Pandas. ‘pd.read_csv()’, ‘df.pivot_table()’, ‘val_idxs = get_cv_idxs()’

  • 01:29:15 Dog_Breeds initial model, image_size = 64,
    CUDA Out Of Memory (OOM) error

  • 01:32:45 Undocumented Pro-Tip from Jeremy: train on a small size, then use ‘learn.set_data()’ with a larger data set (like 299 over 224 pixels)

  • 01:36:15 Using Test Time Augmentation (‘learn.TTA()’) again

  • 01:39:30 Question about the difference between precompute=True and unfreeze.

  • 01:48:10 How to improve a model/notebook on Dog_Breeds: increase the image size and use a better architecture.
    ResneXt (with an X) compared to Resnet. Warning for GPU users: the X version can 2-4 times memory, thus need to reduce Batch_Size to avoid OOM error

  • 01:53:00 Quick test on Amazon Satellite imagery competition on Kaggle, with multi-labels

  • 01:56:30 Back to your hardware deep learning setup: Crestle vs Paperspace, and AWS who gave approx $200,000 of computing credits to Fast.ai Part1 V2.
    More tips on setting up your AWS system as a Fast.ai student, Amazon Machine Image (AMI), ‘p2.xlarge’,
    ‘aws key pair’, ‘ssh-keygen’, ‘id_rsa.pub’, ‘import key pair’, ‘git pull’, ‘conda env update’, and how to shut down your $0.90 an hour with ‘Instance State => Stop’

AWS:

AWS fastami GPU Image Setup - detailed write-up

You can search for the AMI by name: fastai-part1v2-p2. You must choose one of the regions below (top right of AWS console to select region). Choose the region closest to where you are working from. The ID of the AMIs are:

  • Oregon: ami-8c4288f4
  • Sydney: ami-39ec055b
  • Mumbai: ami-c53975aa
  • N. Virginia: ami-c6ac1cbc
  • Ireland: ami-b93c9ec0

The fastai repo is available in your home directory, in the fastai folder. The dogscats dataset is already there for you, and the data folder is linked to ~/data.

Accessing the repo

Crestle

If you created your Crestle account in the last week, you’ve already got the current repo in the data/fastai2/ folder.

If you created a Crestle account early (e.g. at the workshop) then the latest fastai repo wasn’t included in your account, so you’ll need to grab it (if you haven’t already) by doing:

git clone https://github.com/fastai/fastai.git

Updating the repo

Regardless of whether you’re using crestle, AWS, or something else, you need to update the repo to ensure you have the latest code, by typing (from the repo folder):

git pull

It’s a good idea from time to time (including the first time after you’ve created a new instance) to also ensure all the software libraries are up to date, by typing:

conda env update
19 Likes

I post some information concerning prediction on a test set I’ve gathered from delving a bit into the fastai library. I think they could be useful since Jeremy started talking here about Kaggle competitions.
Nothing fancy and nothing new, but maybe helpful for somebody.

Here we get an ImageClassifierData object by calling the method from_paths.

data = ImageClassifierData.from_paths(PATH, tfms=tfms_from_model(arch, sz))

By taking a look at the method’s arguments (shift+tab), we see there is a test_name argument, which is the name of the folder that contains test images. Let’s place the test folder in PATH, and then we can call from_paths like this:

data = ImageClassifierData.from_paths(PATH, tfms=tfms_from_model(arch, sz), test_name='test')

Now we can further explore the data object to get a list of valid attributes by using the following function:

dir(data)

Among them, I focused on these:

  • classes classes names
  • val_y class labels for validation data
  • trn_y class labels fo training data
  • val_ds validation dataset
  • trn_ds training dataset
  • test_ds test dataset

If we use type() on val_ds, trn_ds and test_ds, we find that these are objects of type ‘FilesIndexArrayDataset’.
Delving a bit into the library, we find the following inheritance path:

FilesIndexArrayDataset --> FilesArrayDataset --> FilesDataset --> BaseDataset --> Dataset

Where ‘Dataset’ is a PyTorch abstract class representing a Dataset.

Then, we can also take a look at the corresponding files in each dataset by printing the ‘fnames’ list. For the first 10 files we have

data.val_ds.fnames[:10]

data.trn_ds.fnames[:10]

data.test_ds.fnames[:10]

Now, since we’ve loaded the test dataset too, it’s possible to make prediction on it. After training, take a look at learn.predict(). In the learner.py file from the fastai library, you can see that this method takes an optional ‘is_test’ argument.

predict() calls predict_with_targs(), which finally checks whether is_test is True or False. If True use the test dataset, otherwise use the validation dataset (to be more precise it chooses between data.test_dl or data.val_dl, which are ModelDataLoader objects, but I haven’t dug deeper yet).

It’s also possible to call learn.TTA() with the is_test argument set to True if you want to do test time augmentation.

32 Likes

Where is the dogbreed notebook that Jeremy showed in the class? can’t locate it in the data folder

1 Like

Something I noticed while watching the lecture video for Lesson 2 v2. Jeremy mentioned that he starts with a small image size when he is first starting out on a new project (sz=64). Does the fastai library dynamically build the model using the pre-trained weights (arch) with whatever image size we specify? I guess I’m used to thinking about classic pre-trained models like VGG and Resnet having a specific input image size associated with them. I know that convolutional filters allow for flexibility in the image size, but I’m wondering how a dynamic input size works when you get down to the last layers which are a specific size of fully connected layers.

5 Likes

I’m about to ask the same things

I have found a useful practice to create new ipynb notebook and write code from video by myself - got better understanding whats going on

10 Likes

When I run lesson1-rxt50.ipynb I got the error about missing resnext_50_32x4d.pth file (I am using my PC for learning). Where can I download this file?

P.S. Found it: http://files.fast.ai/models/weights.tgz

20 Likes

Do we have some kind of homework assignments for this lessons?

2 Likes

It’s there in the fast ai lessons folder when you clone the repo from github.

Ive been following the videos… but any update on what the homework is for this week?

In another post Jeremy mentioned the homework for Lesson 2 v2: Clarity on homework / "what's due"

1 Like

Not sure if this is the right place to raise a question / observation - if it’s wrong, point me in the right way please!

This is the results I get when running the “differential learning rate” section from lesson 1 (shown around 45m, lesson 2).

learn.fit(lr, 3, cycle_len=1, cycle_mult=2)
[ 0. 0.04332 0.02481 0.98975]
[ 1. 0.04008 0.02324 0.99268]
[ 2. 0.03363 0.02141 0.99316]
[ 3. 0.03325 0.02021 0.99121]
[ 4. 0.02273 0.0233 0.99072]
[ 5. 0.02452 0.02243 0.99268]
[ 6. 0.0247 0.02174 0.9917 ]

I notice the training loss drops every epoch … is this a sign of over-fitting? Notice in the video Jeremy’s training loss seems to go even lower, lower than the validation loss even. Over-fitting?

If the training loss is very much lower than the validation loss i.e the difference is notable, then we can say the model is overfitting…

And if we have them nearby, then the model is still underfitting…

I have studied this from the famous repo…

@ratio_an

1 Like

Hi, I’m new to this course. I got some trouble when I try to understand the parameter transforms_side_on of the function tfms_from_model. Since I’m not very familiar with English, so I didn’t quite understand the difference between the parameters : side on and top down. Can anybody do me a favor to understand it ?

Like just flipping the image right to left and vice versa…?

Thanks! So side_on means flipping horizontally, and top_down means flipping vertically? Is that right?

Sounds perfect…
It can be verified on a image if you want…
Just collect the pixel values in the left and right by dividing them in between and reverse them to create a new image and then plot them…

I guess this will do what we want…

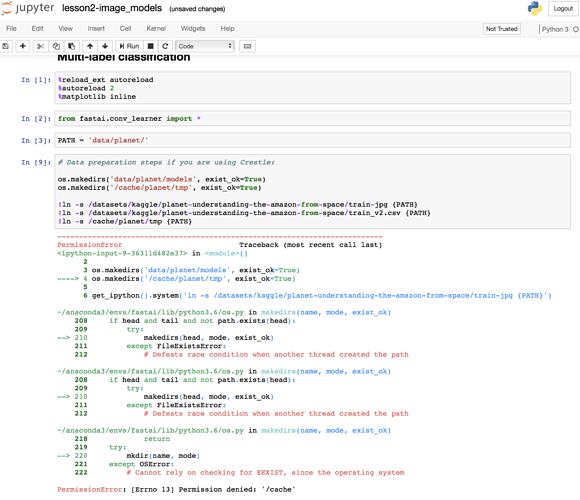
Hi to everyone! Please, help me with some error with notebook lesson2 “Multi-label classification”.

I am using a paperspace, so run cell

# Data preparation steps if you are using Crestle:
os.makedirs('data/planet/models', exist_ok=True)
os.makedirs('/cache/planet/tmp', exist_ok=True)
!ln -s /datasets/kaggle/planet-understanding-the-amazon-from-space/train-jpg {PATH}
!ln -s /datasets/kaggle/planet-understanding-the-amazon-from-space/train_v2.csv {PATH}
!ln -s /cache/planet/tmp {PATH}

Here is error output.

Any ideas? Thank you in advance!

2 Likes

@GregFet
if you’re not using crestle, you dont need to run that block…you can safely ignore it :slight_smile:

Thanks for your patience, got it !