Fastai v2 Recipes (Tips and Tricks) - Wiki

Note: I Updated the Tips and Tricks list to reflect the new added tips (Inference and Production entries)

I would like to start a Wiki topic where everyone interested in sharing her/his knowledge can post her/his recipes (tips and tricks) that she/he discovered while learning fastai v2. I suggest we separate them in different categories in order to ease both navigation and discovery of all tips. The categories I proposed should be considered as a suggestion. They may also be separated in different module: vision, tabular, text, etc. All input that may help improving this wiki are very welcome.

To kick start this exercise I’m posting some stuff that I learned during my journey. I hope other will soon share theirs, and all the fastai community will benefit from them. Hopefully, this wiki will ease the fastai v2 learning curve for all of us.

Since this topic is a Wiki, anyone can add, or correct the information that is gathered here.

Thank you for sharing!

General

- Expand condensed code snippet for v2 new users

Sometimes, we encounter a code snippet (like the one here below). For a v2 new user, this may be intimidating .

planet = DataBlock(blocks=(ImageBlock, MultiCategoryBlock),
                   get_x=lambda x:planet_source/"train"/f'{x[0]}.jpg',
                   splitter=RandomSplitter(),
                   get_y=lambda x:x[1].split(' '),
                   batch_tfms=aug_transforms(flip_vert=True, max_lighting=0.1, max_zoom=1.05, max_warp=0.))

It may be helpful to expand the code (mentally or in writing) as follow in order to grasp what are the key components of this new API:

def get_x(x): return planet_source/"train"/f'{x[0]}.jpg'
def get_y(x): return x[1].split(' ')
batch_tfms=aug_transforms(flip_vert=True, max_lighting=0.1, max_zoom=1.05, max_warp=0.)

planet = DataBlock(blocks=(ImageBlock, MultiCategoryBlock),
                   get_x=get_x,
                   splitter=RandomSplitter(),
                   get_y=get_y,
                   batch_tfms=batch_tfms)

Live example: 50_datablock_examples.ipynb . Search for Multi-label - Planet

Datasets

Please add your tips here

DataBlock

- Use getters = [ItemGetter(0), ItemGetter(1)] when your items are a list of tuples (x,y).

Example:

getters = [ItemGetter(0), ItemGetter(1)] 
tsdb = DataBlock(blocks=(TSBlock, CategoryBlock), 
			get_items=get_ts_items, 
			getters=getters, 
			splitter=RandomSplitter(seed=seed), 
			batch_tfms = batch_tfms)

NB: get_items=get_ts_items is the key information. get_ts_items returns a list of tuples (our (x,y) tuples). In this case a list of (2D numpy array, label). Hence the use of [ItemGetter(0), ItemGetter(1)].
- ItemGetter(0) will return the 2D numpy array : the x
- ItemGetter(1) will return the label (string) : the y

Thread: post
Live example: index.ipynb. Search for 2nd method : using DataBlock and DataBlock.get_items()

- Why, in some cases, we don’t need a get_x

Example:

pets = DataBlock(blocks=(ImageBlock, CategoryBlock), 
                 get_items=get_image_files, 
                 splitter=RandomSplitter(),
                 get_y=RegexLabeller(pat = r'/([^/]+)_\d+.jpg$'),
                 item_tfms=Resize(128),
                 batch_tfms=aug_transforms())

NB: get_items=get_items is again the key information. Also, one has to remember that both get_x and get_y are methods that are applied against the list returned by the get_items method (in this case, get_image_files) . Both get_x and get_y are initialized to noop

get_items (i.e. get_image_files) already returns a list of image filenames which corresponds to our x, and therefore we don’t need to add get_x in our DataBlock declaration. If we really insist in having get_x then we can add get_x=noop which means “Please, don’t do anything!”.

How about get_y=RegexLabeller(pat = r'/([^/]+)_\d+.jpg$')? . get_items again returns a list of image filenames. So, get_y loop through the list of the image filenames and returns the corresponding pet name. The latter is our label and corresponds to the y variable.

Thread: post
Live example: 50_datablock_examples.ipynb. Search for Pets section

- How can make sure my Datablock object has been properly built?

Let’s use the pets object created above as an example. Once pets object is created, call its summary() :

pets.summary((untar_data(URLs.PETS)/"images"))

The summary() method provides very useful information like:
- How the samples are built,
- Input and output types, and real samples extracted from the underling dataset,
- Show the different pipelines (of transfoms) at different stages (after_item, before_batc, after_batch)
- Build a mini batch of 4 samples
- Show a batch if you set show_batch=True. You can even pass kwargs (figsize for example) to the show_batch() method

Live example: 50_datablock_examples.ipynb. Search for Pets section

DataLoaders

Extracting the number of classes from DataLoaders

dls= pets.dataloaders(…)
c_out = dls.c

Live example : To be added

Learner

Useful information that you can extract from Learner

train and valid datasets

train = learn.dls.train
valid = learn.dls.valid

# get items
train.items
valid.items
# get a batch
valid.one_bacth
# iterate 
next(iter(learn.dls.valid))
first(learn.dls.valid)

Thread : post

Inference (Predictions)

Please, check out this post here below

Production

Lambda function and Serialization

Please, check out this post here below
30 Likes

Lambda function and Serialization

After lesson 3, the Deployment Season is official open. Deployment means exporting a Learner object with involves object serialization.

Here is a useful tip that comes straight from the fastbook chapter 6:

In the example, here below, both get_x and get_y are using lambda functions.

dblock = DataBlock(get_x = lambda r: r['fname'], get_y = lambda r: r['labels'])
dsets = dblock.datasets(df)
dsets.train[0]

We can also define them as regular function like this:

def get_x(r): return r['fname']
def get_y(r): return r['labels']
dblock = DataBlock(get_x = get_x, get_y = get_y)
dsets = dblock.datasets(df)
dsets.train[0]

So, which one should we choose?

If we are exporting our Learner object that is internally using a DataBlock object similar to one of those defined above, it is better to use the second approach (def get_x(r) …) because lambda function are not compatible with serialization. The latter is used when exporting a Learner object. On the other hand, if we are quickly experimenting, we can use the lambda version.

6 Likes

Inference (Prediction)

This post describes how to get predictions from a test dataset, pretty-printing them, and plotting its corresponding confusion matrix when a test dataset has labels.

First of all, I would like to point out that this post is a summary of several posts that I gathered in the forum. Therefore, the credit goes to the original contributors being: @sgugger, @VishnuSubramanian, @sut , @chengwliu, @LessW2020 , @vijayabhaskar, @muellerzr If I missed any other contributor, please DM me and I will update that list.

The Learner's get_preds(dl=dl_oject) method expect a DataLoader object. Therefore we need to create a test_dl Dataloader object. There are 2 options to create that one:

Option 1: Creating a test loader at the same time as the train and valid DataLoaders object
Splits are used in Datasets, TfmdLists, and DataBlock. They allow to split a dataset (or a list of items) in several chunks called subsets. If we split our dataset in 3 subsets, we will end up having 3 following subsets:

1- subset(0): the train dataset, and has the alias name `train`
2- subset(1): the valid dataset, and  has the alias name `valid`
3- subset(2),  the test dataset, and that one doesn't have a name 

If we create a DataLoaders object called dls, the latter will be an array object with the following elements:

1- dls[0] which has an alias name `dls.train`, and is the 'train` Dataloader
2- dls[1] which has an alias name `dls.valid `, and is the 'valid` Dataloader
3- dls[2] has not any alias name and is the 'test` Dataloader

Therefore, we have the following test Dataloader : dls[2]

Option 2: Creating a test loader after creating the DataLoaders dls object
In this case, we assume having 2 splits, and therefore having the train and valid DataLoader objects as described here above.
In this example, we will use the vision module to illustrate how to create a test Dataloader (let’s assume that our test data have labels, hence the use of with_label=True argument):

test_files = get_image_files('/path/to/test/data') 
test_dl = learn.dls.test_dl(test_files, with_label=True) # check the **Note** here below

Once we have a test Dataloader object (either dls[2] or test_dl), we can inject it in the Leaner get_preds() method. In the following case, we are using test_dl object (obtained in Option 2). We could have used dls[2] had we opted for Option 1

In this example, we are getting the prediction and we are pretty-printing them by displaying: the prediction, the confidence percentage, and the image name:

preds = learn.get_preds(dl=test_dl)  
for index, item in enumerate(preds[0]): 
	prediction = dls.categorize.decode(np.argmax(item)).upper() 
	confidence = max(item) 
	percent = float(confidence) 
	print(f"
	"Prediction: {prediction} - Confidence: {percent*100:.2f}% -
	 Image: {test_dl.items[index].name}")

As a bonus , we can also store the test_dl object in the DataLoaders dls object as a second validation DataLoader like this:

dls.loaders.append(test_dl)

and then use it to display the corresponding confusion matrix like this:

interp = ClassificationInterpretation.from_learner(learn, ds_idx=2)
interp.plot_confusion_matrix()

Note: test_dl can be created using these 2 equivalent methods:

test_dl = learn.dls.test_dl(test_files, with_label=True)

or

test_dl = test_dl(learn.dls, test_files, with_label=True)

we can do that because test_dl() uses the following @patch annotation (source code):

@patch
def test_dl(self:DataLoaders, test_items, rm_type_tfms=None, with_labels=False, **kwargs):
20 Likes

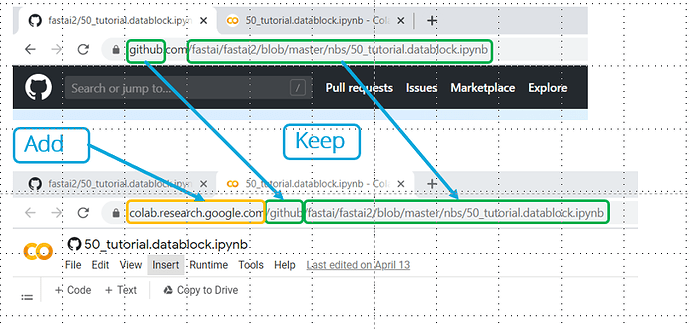
How to quickly open any GitHub Notebook in Google Colab

As an example, let’s open the 50_tutorial.datablock notebook located at: https://github.com/fastai/fastai2/blob/master/nbs/50_tutorial.datablock.ipynb.

As highlighted in the picture above, to open the notebook we delete the .com from the link, and perpend colab.research.google.com/. The corresponding notebook will be open in Google Colab.

https://colab.research.google.com/github/fastai/fastai2/blob/master/nbs/50_tutorial.datablock.ipynb

If you would like to play with a notebook and save your changes, don’t forget to create beforehand a copy of the notebook in your Google Drive by clicking on Copy to Drive as highlighted by the green box:

3 Likes

I think this would be a good trick to be added here.
Callback to Notify you over any messaging service

1 Like

Another trick I often use:
This is useful if you have a long running cell in Jupiter/Colab you would like to get notified when the cell finishes running. I figured out you can autoplay an audio file using IPython library.
For Colab just copy paste the below code snippet once, and simply put notify in the last line of the all the cells to play the notification audio.

import IPython
!wget https://notificationsounds.com/notification-sounds/eventually-590/download/mp3 -O notify.mp3
notify=IPython.display.Audio("./notify.mp3",autoplay=True)
notify

You can use any audio file you wish. :slight_smile:

10 Likes

Code to seed everything (taken from kaggle)

def seed_everything(seed):
    random.seed(seed)
    os.environ['PYTHONHASHSEED'] = str(seed)
    np.random.seed(seed)
    torch.manual_seed(seed)
    torch.cuda.manual_seed_all(seed)
    torch.cuda.manual_seed(seed)
    torch.backends.cudnn.deterministic = True

14 Likes

This is a really good thread! I am looking for a way to sample transformed data item from an instance of DataLoaders. Here is an example:

pets = DataBlock(blocks = (ImageBlock, CategoryBlock),
                 get_items=get_image_files, 
                 splitter=RandomSplitter(seed=42),
                 get_y=using_attr(RegexLabeller(r'(.+)_\d+.jpg$'), 'name'),
                 item_tfms=Resize(460),
                 batch_tfms=aug_transforms(size=224, min_scale=0.75))
dls = pets.dataloaders(path/"images")

instead of getting a transformed(item transformed + batch transformed) batch from dls, I want to get a transformed (item transformed only) data item from dls. Do any fellows know how to do that? (I tried dls.train_ds[0] but it seems it’s what I want because the output hasn’t gone through item transform)

Also, is there any way I can check from an attribute of dls what kind of transformations have been done on item / batch / training set / valid set?

The following answer is extracted from one of the tips listed above :wink:

As stated above, the summary() method will output the all transforms applied to both your input and label data.

I friendly suggest that we keep this thread dedicated to fastai2 Tips & Tricks that can be shared with the whole community, and post questions in the fastai2 chat thread. The objective is to keep a clean list of Tips & Tricks that will be easy to explore and discover :slightly_smiling_face:

thanks! @farid
and u a right, I should have posted the question on a separate post!

1 Like

No problem at all @riven314!

split_idx, or how to selectively apply a transform to train and valid (test) datasets?

First of all, I would like to credit @jeremy for sharing the 10 episodes of his fastai2 daily code walk-thrus, and @sgugger for answering questions on the forum as wall as @arora_aman, @akashpalrecha, and @init_27 for posting their code walk-thrus.

split_idx allows a given Transform to be applied to a specific data subset: train, valid and test datasets. For example, it enables a specific image augmentation to be applied to only the train dataset and not to the valid dataset.

By setting your transform split_idx flag, you can make your transform to be applied :

  • to both train and valid (test) datasets if you set (leave) your transform split_idx to None
  • or only to the train dataset (and not to the valid (test) datatset) if you set your transform split_idx to 0
  • or only to the valid (test) dataset (and not to the train datatset) if you set your transform split_idx to 1

In which files split_idx can be found?
split_idx can be found:
1- in fastai2.data.core.py: split_idx is used by both TfmLists, and Datasets classes (Datasets uses TfmLists objects) where:
â—‹ the train dataset has a split_idx=0,
â—‹ the valid dataset has a split_idx=1,
â—‹ the test dataset also has a split_idx=1,
○ There is also the set_split_idx() method that sets a split_idx to a given dataset. That method is used in the “test time augmentattion” tta() method found in fast2.learner.py

2- in TfmDL: split_idx is used by the before_iter() method in order to set split_idx of each batch_tfms Pipeline objects to the same split_idx as the corresponding dataset (train and valid datasets)

3- in fastai2.vision.augment.py: split_idx is used by several Transform classes as shown further below (e.g. RandTransform, and Resize Transforms)

4- also in fast2.learner.py: it is used by the “test time augmentattion” tta() method

How does it work?
A Transform has a split_idx attribute and defines the following _call () method:

def _call(self, fn, x, split_idx=None, **kwargs):
        if split_idx!=self.split_idx and self.split_idx is not None: return x
        return self._do_call(getattr(self, fn), x, **kwargs)

As you might notice, we pass a split_idx argument to the _call() method. That split_idx argument is checked against the Transform self.split_idx in the if statement. The latter sets the behavior of the Transform as summarized here above.

We generally don’t explicitly call a Transform. A Pipeline which is a class that store a list of Transform objects is responsible of calling each one of its Transform objects _call() method.

Pipeline are used in the TfmLists class (and Datasets class because the latter uses TfmLists objects). Pipeline also store a split_idx as an attribute. Both Datasets and TfmLists generally have a train dataset (with a split_idx=0), a valid dataset (with a split_idx=1), and sometimes a test dataset (also with a split_idx=1). When a Pipeline of Transform is applied to one of the 3 datasets, the Pipeline call each of its Transform objects by passing the split_idx of the corresponding dataset that we are about to transform.

Therefore, if we are transforming a train dataset, the Pipeline passes split_idx=0 to each of its Transform objects _call() method. Similarly, for both valid dataset and test dataset, the Pipeline passes split_idx=1 to each of its Transform objects _call() method.

Now, back to our Transform _call() method. The latter will compare the passed argument (from the Pipeline being the dataset split_idx) to its self.split_idx (self is the Transform object), and decides either to ignore the call by returning the input x without any change, or apply the transform through the return self._do_call(getattr(self, fn), x, **kwargs) by following the rules mentioned here above.

Let’s check some Transform examples:

Transform examples in augment.py:

Resize Transform

class Resize(RandTransform):
    split_idx = None
    mode,mode_mask,order,final_size = Image.BILINEAR,Image.NEAREST,1,None
    "Resize image to `size` using `method`"

Resize has a split_idx=None meaning that it will be applied to both the train and valid (test) datasets.

RandTransform

class RandTransform(Transform):
    "A transform that before_call its state at each `__call__`"
    do,nm,supports,split_idx = True,None,[],0

RandTransform has a split_idx=0 meaning that it will only be applied to the train dataset. Be aware, if the transform is not applied to a given item it is because the transform is applied with a given probability p (meaning not all the train dataset items are transformed).

Test Time Augmentation tta() method
split_idx is also used in learner.py tta() method. Test time augmentation can significantly improves accuracy.

tta() combines predictions of several augmented images. To calculate the prediction of a given image, we follow the steps shown here below (assuming we are using the default n=4 value for the number of the augmented images):

1- First, we create 4 augmented images using the train dataset Pipeline Transforms. This is why the dl.dataset.set_split_idx(0) is called in order to make sure the Pipeline objects passes split_idx=0 to each Transform call. Each augmented image gets its prediction. The aug_preds, representing predictions of the 4 images, is then reduced using either the max or the mean value,

2- Then, we calculate only one prediction (preds) using the valid (test) dataset Pipeline of Transform. The use of dl.dataset.set_split_idx(1) ensures to apply only the Pipeline Transforms that is set for the valid (test) dataset: split_idx=1,

3- Finally, we combine aug_preds and preds using either the max or a linear interpolation function.

7 Likes

Thanks @farid
I’ve written a blog about this too: https://akashpalrecha.me/tutorials/blog/2020/03/27/split-transform.html

Maybe you could add to your post anything extra you find there!

1 Like

Hi @farid, thanks for putting together this page. One quick update:

Since PR#294, summary() now has a show_batch flag to display the batches at the end of the regular summary() output. It also passes whatever subsequent kwargs parameters to dls.show_batch().

Perhaps consider including it in your above summary of summary() ? :wink:

Cheers.

2 Likes

Thank you @philchu for your suggestion. I updated the summary() section using the information you provided :slightly_smiling_face:.

1 Like

In Inference prediction I get an error on categorize:

AttributeError: categorize

that is a really nice idea! :slight_smile:
Do you have tip how I can do that in a Jupyter Notebook on a Windows 10 machine?

Thanks!

This works on Jupyter notebook too, just download that audio file, or use your own audio file.

1 Like

all right, thank you!

Thank you very much for the post, it is really helpful. The link to the 50 Datablock examples is no longer valid. I think that the most relevant alternative is this: https://github.com/fastai/fastai/blob/master/nbs/50_tutorial.datablock.ipynb

1 Like