Anybody interested in working together on papers like the DiffEdit one and/or any future papers that we’ll discuss during the course? Or even other papers that the group as a whole might be interested in?
Personally, I find bouncing ideas off of other people very helpful in such situations. I tend to sometimes get tunnel-vision and concentrate on a particular approach and forget to look at alternatives. So being able to discuss things with others is very helpful for me.
If anybody is interested, let me know and I’ll set up a separate topic for each new paper so that the discussions are in one place and can be useful/helpful for other people too in the future (or present, for that matter …)
Update: This thread was initially used to float the idea of working together on papers but then became the thread for working together on the first paper — DiffEdit ([2210.11427] DiffEdit: Diffusion-based semantic image editing with mask guidance) Adding the link to the original paper here so that it’s less confusing …
Great! I guess we’ll get started and we can update how we work together as we go along as more people join and perhaps the way we work needs to be changed …
Are you working on the DiffEdit paper? I have my initial work on GitHub here:
If you are working on that paper, how would you like to proceed? For example, we can post our individual work and/or thinking and discuss approaches, or we can go over points where we are stumped so that we can talk it out, or we can simply try to work out the solution by discussion. I guess it depends on individual preferences and so I’m trying to get a feel as to what would be most useful/helpful …
I’m up for any approach as long as it’s of help to someone
I started to just go through the different parts of the paper in a notebook, by copying the stuff from the paper to a notebook, in the order described by Accoding to Andrew Ng
TL;DR:
You should not read a paper from start to finish, but do it in several passes, focusing on the parts that will give you an idea of what the paper is about.
Title, Abstract, Figures
Intro, Conclusion, Figures again, Skim the rest
That is where i am at the moment, i have made an initial pass through of the paper, and will then start adding code at some stage.
It’s interesting to see other workflows — thank you for sharing I tend to just dive in with the code but it’s good to be reminded that it might be better to start with an overview like you did.
I’ve been considering how we could structure several of us working together on a given paper, and after seeing your notebook I think this might be the way. We each share our notebooks and then we can easily point to a particular bit and say “This is what I’m wondering about”, or “This is where I’m stuck and what do you think?” etc.
What do you (and others) think about that? After I suggested this, I wasn’t sure how we could go forward since I assume working asynchronously is the most convenient for everybody. So, while we can have a discussion if somebody brings up a point, I wasn’t sure how else we could make it more … interactive/participatory?
I think it would be fun to work collaboratively, but as you mentioned, it can be difficult, but, one could of course have one repo where we would do pull requests etc. Actually, i have been thinking of using a flow with nbdev that would also produce a page for the experiment. As i have not yet tested nbdev, i think i will at least try to set up a flow using that
I haven’t tried nbdev at all and so would be interested to see how that experiment turns out.
And yes, I’d be happy to collaborate on a single repo as well. I guess it all depends on how much interest there is in collaborating on papers and how onerous it might get to manage things. If it’s just 3 - 5 of us shouldn’t be an issue at all is what I’m thinking
I’ll take a look at nbdev tomorrow so that I can be up to speed on this. I wanted to publish experiments using wandb a few months back but their chart embedding was too bulky. I put in a feature request to give a simpler way to embed charts since my blog posts included a lot of charts and they said that they’d consider it but never heard back … But if nbdev allows me to do something like that, I’d definitely be interested …
It’s possible to switch the horse and the zebra without even doing anything from the DiffEdit paper. I’d done some work last week in prompt editing — there’s a separate notebook here that shows the technique where you can simply take the result of one prompt and edit it with a second text prompt. That was just based on an idea I had since I couldn’t understand the math of papers like DiffEdit.
On a total tangent, I now realize after watching this week’s lecture that I was looking in the wrong place to understand the technical papers and that I probably shouldn’t have concentrated on the math. So that’s something really important that I learnt from Jeremy this week
But anyway, that technique works but with some variations sometimes. Plus, I have to fine-tune the number of steps at which the editing happens to get good results. So I’m not sure it’s a technique which works in all cases.
I simply started from that point for the DiffEdit experiments to try to get the binary mask for the image. So if you take the original image, noise it a bit and then go on with the new edited prompt (“zebra” in this case) that will work. But that’s not how the DiffEdit technique is supposed to work …
Where I got stuck was in trying to get a mask from the difference between the two images. I tried taking the difference between the latents after a few steps and also the difference between the actual images after a few steps (by decoding the latents into images again) but wasn’t happy with the results of my mask.
But then I got distracted by a few other things yesterday such as the negative prompting with the reverse of the prompt and didn’t get a chance to look further.
Have you (or anybody else) had success with generating a good mask between two latents/images?
I got distracted by some other stuff (like trying out all the different guidance variations discussed in another thread to see which one works best — notebook here) and didn’t do much work on DiffEdit for a while. Plus, I was frustrated by not being able to figure out the masking …
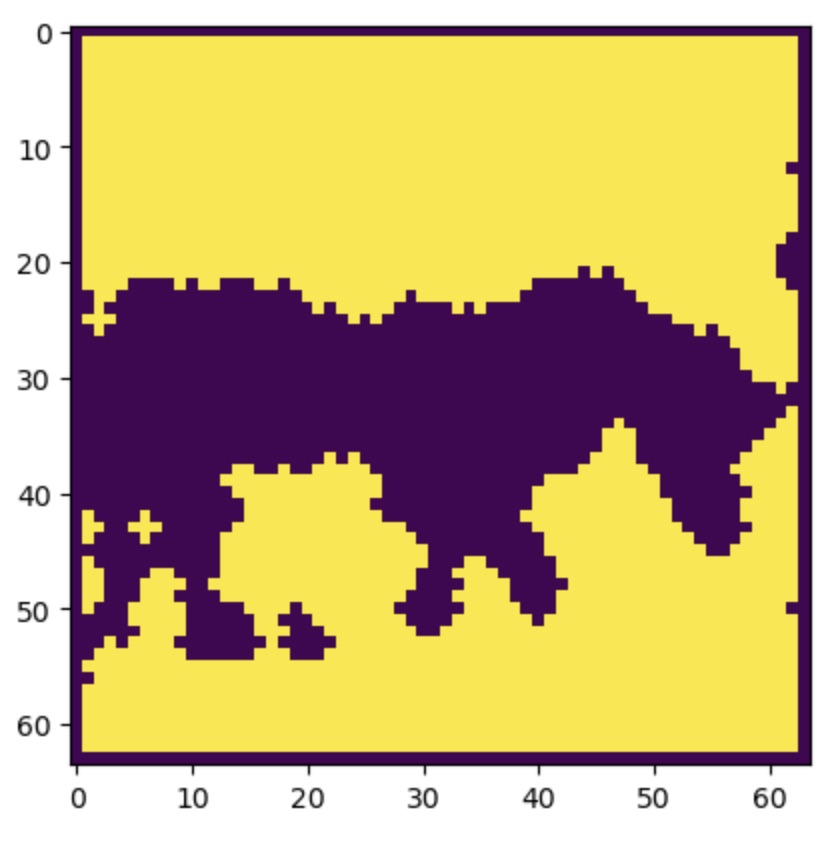
Then with the kind help of a post made by @aayushmnithere, I was able to figure out the masking last night. My updated notebook is here.
I still need to do a bit of work on the mask since I feel that it should cover the subject rather than be … umm … spotty. I was wondering if perhaps I should do something like walk over the whole image, check each pixel to see what the adjacent pixels are like and turn each pixel on/off depending on the adjacent pixels … That would be a time-intensive and there’s probably a better option. I think I did something similar in another project, but would have to go back and check …
But if the mask is good, then the rest should be fairly straightforward after that would be my guess
Thank you I am new to most of the deep learning stuff and so not sure what a median filter does but a pointer is (hopefully) all I needed. Will do some research and see if I can figure it out …
While thinking things through, I also had another idea — and this varies from the DiffEdit paper in that particular step of the approach, but as long as the final result is the same … Basically, I was thinking, could I use image segmentation to detect the horse (vs. zebra) in the final latent (not the image) and then use that as a the mask to train from the beginning using the zebra prompt? Another thing I want to try out today …
For the sake of people who are trying to do this on their own, I won’t spoil it here except to say that scipy.ndimage was what I needed … I feel that the mask can be improved upon a bit more, but that probably can wait for later since there’s a clean enough mask for me to use for the next step.
I’ll update my notebook (linked above) for anybody who wants to see how to get the mask cleaned up … There’s links and details in there.
Now to see if the mask can be used to generate only the non-masked parts of the image …
Sorry I missed this thread, but yeah working togather sounds like a great idea. Maybe we start a specific paper implementation thread (ex-DiffEdit implementation) anytime Jeremy gives such suggestion and then we can keep posting updates on our progress there.
Regarding a new thread, that’s the plan at the moment. I’ll start a new thread called “Working Together - <X>” for each new paper and we can post updates/discussions in that thread. That way, each paper will be in a separate thread and is probably much less confusing …
BTW, thanks for posting your notebook with the masking Aayush Without that, I would have been stuck since I wasn’t sure how to do that step. But that led me on a journey of its own since I discovered that the mask I did for my particular horse image using Stable Diffusion 1.4 didn’t work for Stable Diffusion 1.5. It’s a strange (but hopefully interesting) story. Will post details in a separate post once I have the notebook together since it does pertain to DiffEdit …
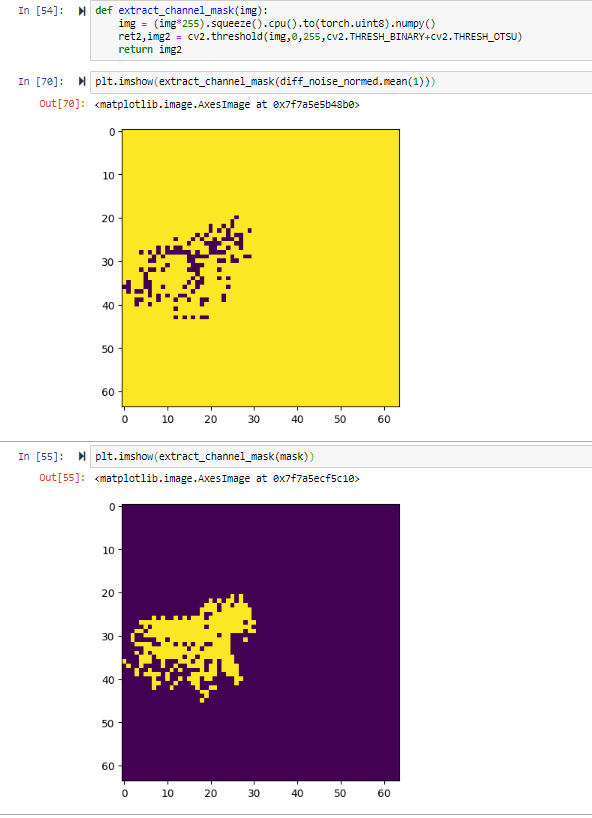
@Fahim FYI for stuff like creating binarized masks, you generally want to use OpenCV. That lib is full of “classic CV” algorithms for that kind of thing.
Thanks, Jeremy I noticed that some of the others had used OpenCV after I’d been floundering around for a bit — I tried SKImage open/closing instead to reduce noise and to close up areas but that wasn’t great … Meant to try OpenCV yesterday but just went on another tangential journey since I had (mistakenly) thought that there was something different about how the 1.5 model generated images vs. the 1.4 model.
Turns out it was due to bad/mixed data in the notebook. The lesson learnt was not to try to mix output from two different models in the same notebook because you’ll (or at least I will) always get it mixed up
Here is my implementation of step 1 of the diffedit paper: diffedit implementation (github.com). One thing I found to be very important is to pass a generator with the same starting seed to both “Zebra” and “Horse” so that the noise was generated the same for horse and zebra. I’m not getting quite as good of a mask as I had hoped at this point
Yep, having the same seed for both was crucial since otherwise, as you mentioned, the noise varied. Even then, if you took the final frames, there was way too much variance between the two images generated to get a proper mask. I spent most of today just trying out things with the final frames to see how much of a difference there was and if you subtract the final frames of horse and zebra, there’s too much noise to be able to get a good mask at all … well, at least for me
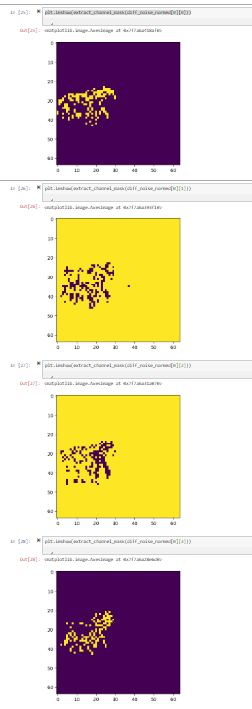
I was seeing some mask results that didn’t seem great when averaging my noise channels together so I decided to dig in a little bit. Here is what my 4 noise masks looked like:
Two that have the horse area as bright and two that have the horse area as dark. What I really want here is to combine these so I decided to try to subtract 0.5 and then take the absolute value from my noise channels then add the 0.5 back so that I make sure I am seeing everything going the same way. It seemed to be helpful.
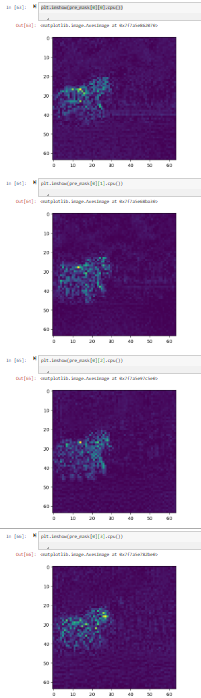
Here is what they look like after the absolute value piece: