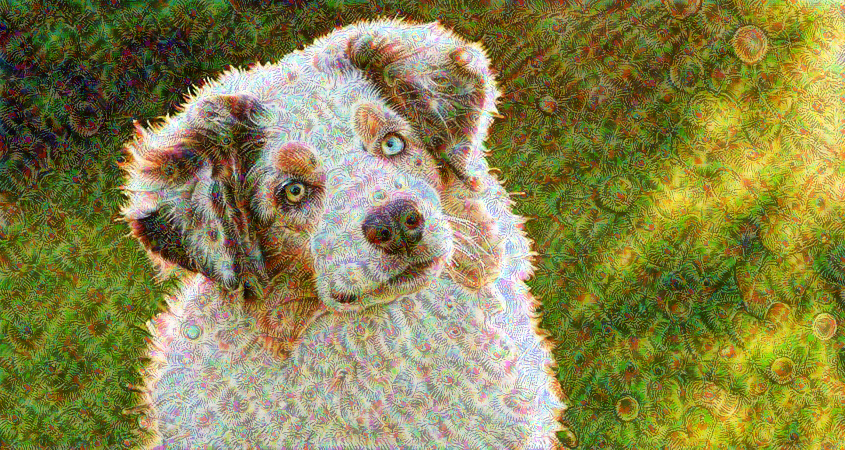
In lesson 1 Jeremy introduced the Zeiler and Fergus paper that visualizes intermediate layers to help us develop intuition for how the layers of CNNs progressively learn the building blocks needed for the classification task at hand. I was curious whether there’s a ready to use library for visualizing intermediate layers to help us beginners develop intuition for how CNNs work and when they fail to work with a set of images and classification task.
There have been multiple questions in the forums (most linked below), but I don’t see anything built into the fastai library yet. There is a Keras approach by @yashkatariya in the fast.ai community, but nothing in PyTorch. There’s Utku Ozbulak’s PyTorch github repository, which seems like it’ll be very useful, though I’m not ready for it yet myself. Also, creator of Keras Francois Chollet shared Keras code with similar functionality and wrote a post on How Convolutional Neural Networks See the World that may have some additional ideas worth exploring.
I dont think theres anything implemented in the fastai library. I’ve looked at that library before and its may take getting use to a bit but manageable. I also feel Jearmy needs to go into a bit more of the inner workings of these networks some more times. To extract the activation maps in pytorch we have to use hooks. I was reading about it but haven’t gotten to implementation. Can I know what abit more you are looking for?
The lucid library implemented in tensor flow with ready notebooks is pretty good, especially the blog accompanying it:
It looks like the basic approach is to use the activations of a neuron, filter, or layer to optimize the pixels of an input image, where the input image is either an actual picture or random static.
This feels really similar to the style transfer stuff from last year’s part 2. I’ll take a crack at it over the weekend and see what I come up with.
A very interesting thing that comes to my mind is, what features does actually classify the dog from the cat or one dog from the other.
eg: If we are classifying Dog species A, B and C. So what all are the features that the network has learnt for class A which distinguishes it from Class B. So when an images is put in the network for testing we can see which feature actually made it predict that this test image is class A.
I think here the last layer before flattening would give us the information (please correct me if I am wrong). If there is any paper which can help us do this I would be very much interested in learning on that and reading it.
So I took a crack at visualizing activations by optimization. I didn’t get the pretty pictures that the Google folks got, but I did get a cool implementation of deep dream going. Check it out if you’re interested.
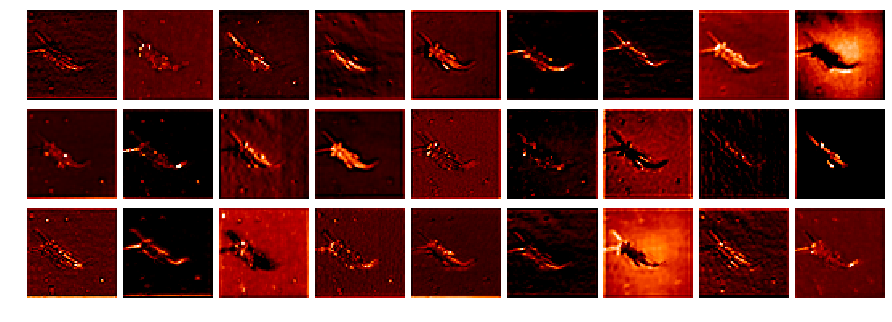
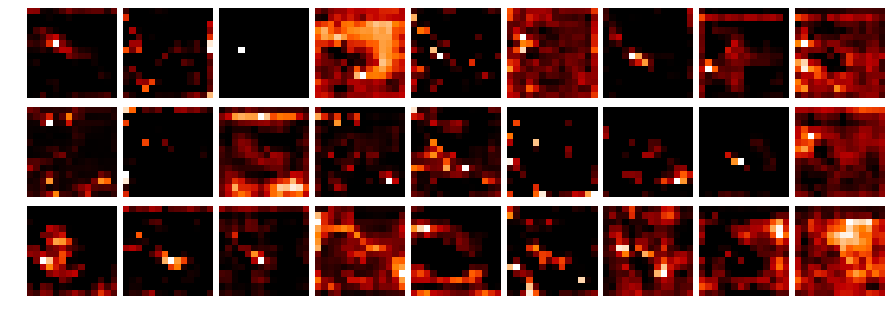
After a coding session with @ramon about getting the activations with hooks I hacked together a small notebook (L1-stonefly_activations.ipynb) to visualize the different network layer activations:
To get the activations I used the following hook function (adapted from Jeremy):
class StoreHook(HookCallback):
    def on_train_begin(self, **kwargs):
        super().on_train_begin(**kwargs)
        self.acts = []
    def hook(self, m, i, o): return o
    def on_train_end(self, train, **kwargs): self.acts = self.hooks.stored
I am not sure if I used the hook correctly?
The image dimension in the results is strange, as I only have 34 images (the dataset has 3000+)?
I also could not figure out how to get the original image from the data loader to compare them to the activations.
Maybe there is a much easier way to get the activations?
The notebook above is based on my previous post and was inspired by the notebook from @KarlH (thank you, learned a lot!).
The activations you get from the forward hook are generated every time you run something through the model, so you only have the activations for a single batch. When you run a new batch, the old forward hooks are replaced. I think that since you’re running the hook function as a callback, the activations you actually get out are the activations from the final batch of your validation dataset, which likely has 34 images in it.
I think you’ll find getting activations for specific images is easier if you do it outside the training loop. You can load a specific image or images of interest and just pass those. If you want multiple batches worth of activations you’ll have to loop through a dataloader and save activations for each batch. If you do this, remember to dump them to the CPU or you’ll run out of GPU memory real fast.
@MicPie, @KarlH . I’m reading the Hooks callbacks also but it’s quite hard to understand. Do you know where is this part in the dev nb ?
More specifically, in the class Hooks.
class Hook():
"Create a hook."
def __init__(self, m:nn.Module, hook_func:HookFunc, is_forward:bool=True):
    self.hook_func,self.stored = hook_func,None
    f = m.register_forward_hook if is_forward else m.register_backward_hook
    self.hook = f(self.hook_fn)
    self.removed = False

def hook_fn(self, module:nn.Module, input:Tensors, output:Tensors):
    input  = (o.detach() for o in input ) if is_listy(input ) else input.detach()
    output = (o.detach() for o in output) if is_listy(output) else output.detach()
    self.stored = self.hook_func(module, input, output)

def remove(self):
    if not self.removed:
        self.hook.remove()
        self.removed=True
Why do we have self.hook_func = hook_func but also defining def hook_fn() . what is the purpose of these 2 ? they have the same name. Sorry because it took me a while to really understand this part so I’m appreciated if someone can help me on it.
After asking the question, I searched a little bit and have a simple answer.
The dev nb for hook is in 005a_interpretation. But it doesn’t have many information
To undertand how hook works in pure Pytorch: pls find here the example - hook
The hook_fn(self, module:nn.Module, input:Tensors, output:Tensors) is just the syntax to use hook in Pytorch. The real function we define in hook_func:HookFunc
I will continue to read about this part, always appreciated if someone can show me good resources about this Thank you in advance
p/s: Actually, after reading the PCA technique to explain the last layer nodes (in Share your work), I think about an experiment. I will try to put zero each node in the last layers, finding it will affect which categories in the results. Then we can understand what this node represent. How do you think about this ?
Then I populate a list with SaveFeatures objects for each layer in the model I want activations from
sfs = [SaveFeatures(m[i]) for i in range(len(m))]
Then when you run something through m like p = m(x), each element in sfs is populated with activations from its corresponding layer.
One thing to note is that sometimes you need to get fancy with indexing because models are not always structured linearly. For example the model used in Lesson 1 has two layer groups accessible by indexing - one layer for the resnet34 backbone and one layer for the custom head. If you want to get activations from the resnet block you need to specifically index into it.
sfs = [SaveFeatures(children(m)[0][i]) for i in range(len(children(m)[0]))]
It is the signature of hook in pytorch. I found this in the description.
The hook will be called every time after :func:`forward` has computed an output.
It should have the following signature::

    hook(module, input, output) -> None
So we don’t call it directly but the hook function. At each forward, it will extract the model, input, output and put in this function.
With the flatten_model function it is easy to get the layers of interest and the hook gets installed by calling hook_outputs(layers).
Where did you find the flatten_model and the other parts of the code snippet so I can dive a little deeper into this topic?
I guess the callback is not needed for getting the activations and is for more advanced operations or am I wrong?
If somebody has more information/sample code/etc. on this topic I would be very interested.
 Thank you in advance