Share your V2 projects here

I’m very excited to share with you a package called timeseries for fastai v2 that I have been partly working on for last couple of months. It’s still a work in progress.

This extension mimics the unified fastai v2 APIs used for vision, text, and tabular. For those who already used fastai2.vision, they will feel familiar with the timeseries APIs. It uses Datasets, DataBlock, and new TSDataLoaders and TensorTS classes. It has the following mapping:

TensorImage  <---> TensorTS
Conv2D       <---> Conv1D

The package includes 128 Univariate and 30 Multivariate time series datasets. Using URLs_TS class (similar to fastai URLs class) you can play with one of those 158 datasets.

We can train any time series dataset end-to-end with 4 lines of code (here is an example using TSDataLoaders and a multivariate dataset called NATOPS )

path = unzip_data(URLs_TS.NATOPS)
dls = TSDataLoaders.from_files(bs=64,fnames=[path/'NATOPS_TRAIN.arff', path/'NATOPS_TEST.arff']) 
learn = ts_learner(dls)
learn.fit_one_cycle(25, lr_max=1e-3) 

Using the InceptionTime architecture, and just fastai2 default settings we can achieve around 98,5% accuracy in only 20 epochs. The following figure shows some of the predictions results (Predicted/True classes)

image

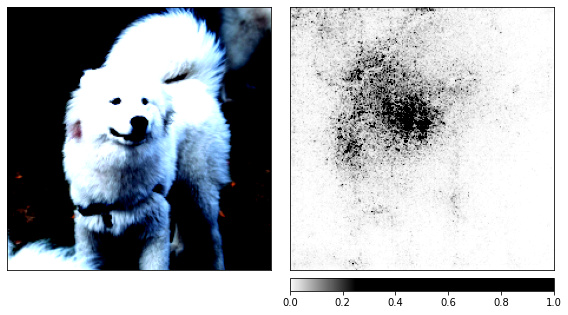
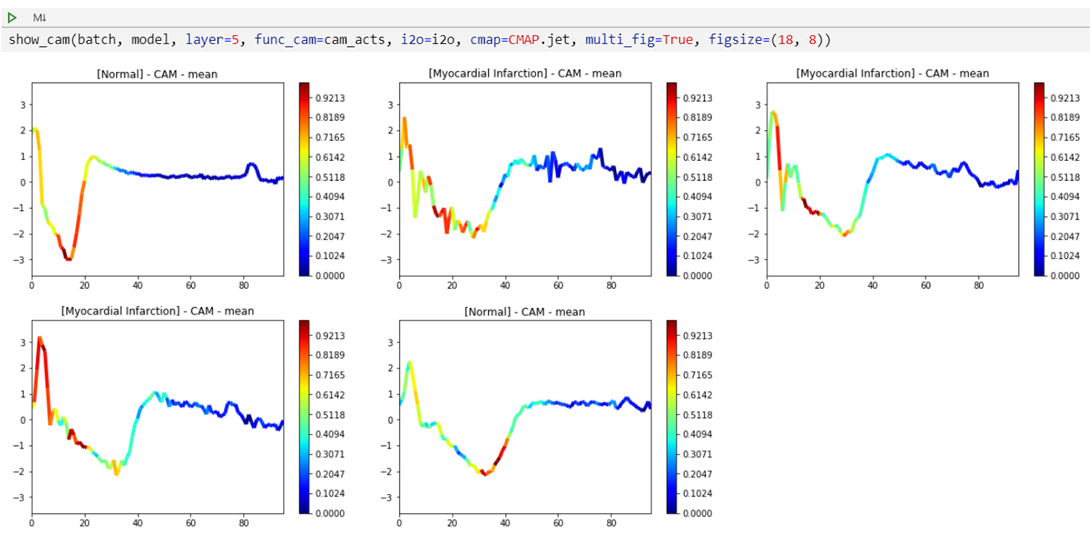
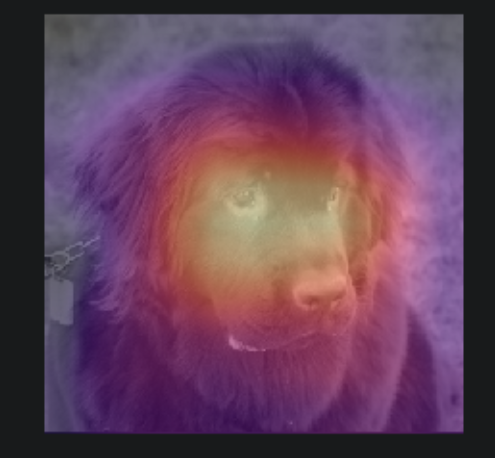
The package also features Class Activation Map for time series. It offers both CAM and GRAD-CAM as well as user-defined CAM. At the center of this feature, there is one single method called show_cam() you need to use, and it is highly configurable. You can even plug-in your own CAM function, and the rest is taken care by the show_cam() method

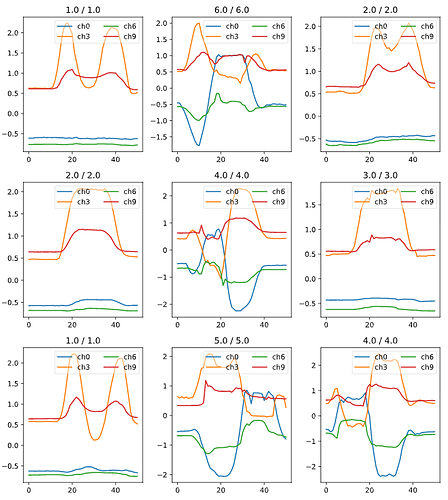
Here below is a simple example of the univariate ECG200 dataset classification task (Normal Heartbeat vs. Myocardial Infarction). Like in vision, the colors represent the activation values at a given layer (in this example it’s located before the FC layer (last layer)). Notice how the Myocardial Infarction plots (2nd, 3rd, and 4th) share similar activation zones that are quiet different from those corresponding to Normal Heartbeat plots (1st and 5th). This eases the interpretation of the results obtained using this InceptionTime model.

Please give the timeseries package a try and share your feedback. You might also check out its documentation. If you find it interesting, please share it.

NB: I read some posts here where some of the new comers expressed the fact that is intimidating seeing some full-blown projects that are indeed impressive (I’m not considering mine as one of them) in comparison to theirs. To those I would say: What you are presenting here are both great and unheard of in other courses. Considering the fact that your projects are products obtained after attending just a couple of lessons, it is quiet impressive. Some of the other projects are implemented by veterans who already have more experience with both fastai and deep learning in general which explains the difference between different projects. Good luck in your journey!

31 Likes

Wow well thank you!

1 Like

That isn’t too far from what I would expect it to look like. UGATIT is a research proof of concept. If you want to get better results you will probably have to combine the works from other research papers and study this in depth.

Base UGATIT also has very little image augmentation as well, so you might get better results if you increase the amount of image augmentation you are using.

Pay very close attention to what the human images you are passing into the network look like, and try to copy the lighting, pose and crop very closely. Crop is very important, as not cropping in a similar way to the selfie portion of the datset pretty much makes it not work at all.

Hey everyone,

I used last weeks assignment to identify defects in the battery production process. Unfortunately I am unable to share any of the classes or actual images I used, but I have pulled some images from the internet to describe the basics of the task.

Often there can be defects that occur at the entrance of the metal casing that holds the battery electrode.

These defects can cause many issues down the line, and the sooner they are identified, less waste there is in the production process.

I was able to train using a pre-trained resnet34 on around 1200 images with 15 classes. After around 10 epochs I would save the model, apply a new set of transformations, and train again. Using this technique I was able to reach around 93% accuracy. The application was deployed in a docker container and has been running successfully.

4 Likes

very cool. why not resize on the mobile side before sending to server?

http://ec2-35-162-115-81.us-west-2.compute.amazonaws.com:8501/

Used streamlit plus a fastai2 classifier for identifying wild canids. (wolves, coyotes, foxes, dingos, etc)

Was trying to do something much, much fancier, failed, so this was my backup plan. However, looking forward to combining fastai and streamlit for the next few projects in the class.

2 Likes

ive been working on swingwizard.ai. i trained a model to recognize some of the best swings in Major League Baseball. you can upload a video of a swing, it will take five frames of the video, and display heatmaps on each of the frames which tell you how close the swing matches the best swings in baseball.
it should also work for softball but hasnt been tested yet.

example upload from my pre-programming life:


video download link (not sure if the gif works)

example results:

12 Likes

Because it’s not as interesting to perform superresolution on an image which has been downsized before :wink: .

Jason, very cool! What do the colored squares mean?

I’ve been interested ComputerVision + Sports for awhile. The best app I know of right now is this one: https://www.homecourt.ai/

1 Like

thanks! that app is cool, have you come across others? i havent seen much.

the colors are the activations the model learned from the best swings. like what jeremy did with the pets in v3’s lesson 6 notebook:
heatmap

for my model the colors mapped out like this:

colorkey2

so if the swing has yellow/white squares its saying it matches the best swings. no colors would be a 59% or less match to the best swings

3 Likes

Had some more fun with my bird classifier app from last week’s assignment.
Added a searchable entry box with the 150 bird species from the dataset.
When selecting a species, the URL entry box is populated with a sample URL that can be submitted to the model for identification.
The app is deployed on a CENTOS 7 server.
You can find it here: https://birds.smbtraining.com/bird_name
And the code: https://github.com/sylvaint/fastai2-bird-classifier

8 Likes

Very nice. I especially like the URL feature so I don’t have to go out on the web and get an image to test it! Also I found out that I am a California Condor with 83% probability. Perhaps my big nose resembles a beak… :wink:

5 Likes

That looks awesome. I would be happy to learn about your experience using Seeme and where we can improve.

Feel free to reach out if you need help anywhere…

FileUpload Widget 101:

When doing my project which uploads non-image (audio Data), I was forced to figure out how the FileUpload widget really works, this isn’t as easy as it sounds, because the online documentation is a work in progress. But lucky for you, I’ve got some working code you can use.

In the example below I’ve declared a global metadata for debug purposes, so you can see after you upload something what it contains. To get this function to work, we observe the ‘data’ trait on the widget as follows:

 btn_upload.observe(_handle_upload, names=['data'])

Now Here’s the code. You can substitute your code for my
processAudioData function:

metadata = None   
def _handle_upload(change):
    global metadata
    lastkey = list(btn_upload.value.keys())[-1]
    uploadDict = btn_upload.value[lastkey]
    values = list(uploadDict.values())
    metadata = values[0]
    filename = metadata['name']
    size = metadata['size']
    fileData = values[-1]

    processAudioData(filename,fileData,size)
2 Likes

fastGUI (just following the naming based on a number of projects that start with ‘fast’ :slight_smile: 
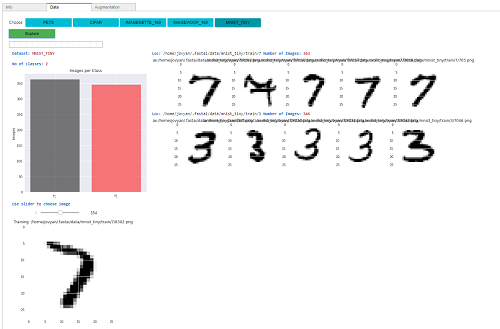
) is a project inspired by last weeks lesson using voila and binder. An easy way to view images, no of classes, no of images per class, choose an image and view effects of augmentations(work in progress as there seems to be an issue with rendering in voila, posted here
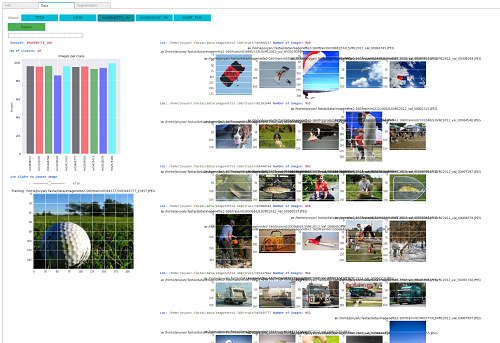
 https://forums.fast.ai/t/issue-viewing-images-in-voila/68221).

fastgui4_sm

fastgui5_sm

10 Likes

40% faster training with a scikit-learn-like API for numpy arrays

If you use numpy arrays as input to your model, you may be interested in a new package I’ve created to speed up training.

The API looks like this:

dsets = NumpyDatasets(X, y=None, tfms=tfms, splits=splits, inplace=True)

You have more details on this link:

6 Likes

The experience was great and seemless, but why can’t you make the application public.

The research questions at the end of chapter 4 of the fastai book includes one where you have to reproduce the notebook but use the full MNIST dataset instead. I tried my hands on it and I’m happy to share my results:
Github repository:

Gist:

2 Likes

I’m not able to keep up with the course but it’s great to see a lot of inspiring projects. For my side, as a project for this course, I wanted to work on model interpretability but I couldn;t start until few hours ago.

I still have to do some cleaning/commenting on the notebook (hopefully soon) but here is an example based on the pet notebook:

  • on the left the original image (in b/w)
  • on the right the pixels of the original image where the model seem to focus

image

4 Likes

Hi all,

I have written a new post about my exploratory use of fastai2 on the PEER Hub ImageNet (PHI) dataset that is of interest in the built environment (an obvious area of focus for my company Arup), getting an accuracy of 93.4% in <10 epochs of training – could not quite beat the 95% achieved by the winners in 2018! =P

I modified the ImageClassifierCleaner actions to get better traceability of the deletion/correction that I made to the data labels – fastai2 made it super easy to do these things!

for idx in cleaner.delete():
#     cleaner.fns[idx].unlink()
    delname = "%s/%s.deleted" % (str(cleaner.fns[idx].parent), cleaner.fns[idx].name[:-4])
    shutil.move(str(cleaner.fns[idx]), delname)
for idx,cat in cleaner.change(): shutil.move(str(cleaner.fns[idx]), path/cat)

Credits to PEER for collecting, curating, and making available their Φ-Net dataset, and designing the PHI Challenge 2018 tasks for machine learning. Special thanks to @muellerzr for his very informative posts on fastai2 API (e.g. on DataBlock).

Thanks.

Yijin

1 Like