Visualizing intermediate layers a la Zeiler and Fergus

Dear @dhoa,

I now created a notebook with single image prediction and activation visualization based on your code from your post: https://github.com/MicPie/fastai_course_v3/blob/master/L1-stonefly_activations_v2.ipynb

With the flatten_model function it is easy to get the layers of interest and the hook gets installed by calling hook_outputs(layers).

Where did you find the flatten_model and the other parts of the code snippet so I can dive a little deeper into this topic?
I guess the callback is not needed for getting the activations and is for more advanced operations or am I wrong?
If somebody has more information/sample code/etc. on this topic I would be very interested. :smiley:

Regards
Michael

6 Likes

very happy to know that my code is useful.

The source code of flatten_model is : flatten_model = lambda m: sum(map(flatten_model,m.children()),[]) if num_children(m) else [m]

And I found it by looking at the hooks.py in /fastai class HookCallback(LearnerCallback):

def on_train_begin(self, **kwargs):
    if not self.modules:
        self.modules = [m for m in flatten_model(self.learn.model)
                        if hasattr(m, 'weight')]
    self.hooks = Hooks(self.modules, self.hook)

It indicates that if modules are not specified then choose all the modules which have weight in the model. So for yours interest, you just need to choose the last linear layer. I got familiar with these things by playing around with the ActivationStats and model_sizes in hooks.py

I think for getting just the activations, you don’t need callback. The hook_outputs is enough. Actually, I haven’t played with the callback yet :smiley: still not familiar yet with the the method in callback.

I’m very appreciated if someone can give more examples of this topic too

2 Likes

Using the callback should make your code a little simpler. Amongst other things, it can automatically remove your hook for you when done.

2 Likes

Thanks Jeremy. Can i add the callback after the model have already trained ? Because in this case I train the model first then try to get the activation in the validation set

Sure - there are params for callbacks in get_preds and validate, amongst others.

2 Likes

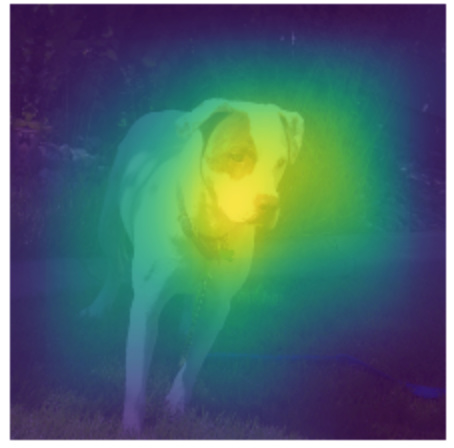
Hey, if useful I implemented Grad-CAM using fastai 1.0; allows to see which parts of the image are “used” by the network to make a prediction. It’s a variation on CAM using averaging with gradients.

This might also be interesting to some of you because it has gradient/backward hooks as well as the output_hooks.

notebook

Example result:
image

29 Likes

Very cool. Any chance we can tackle the improved grad-cam++

https://arxiv.org/abs/1710.11063

They have a TensorFlow implementation on github…

1 Like

Yes ! I’d love to try that out (also the guided variants, because Grad-Cam’s resolution is awful for the application I tried, sat imagery).

2 Likes

Yeah, I also wondered about the poor resolution? Are there other/ better methods for this? Or is grad-cam (++) still state of the art?

1 Like

Thank you for your great and instructive notebook!
I incorporated it into my lung tissue pet-project. :smiley:

While running the code several times I sometimes encountered a strange bug that I was able to fix by setting the model in evaluation mode with learn.model.eval().

4 Likes

Poor resolution is inevitable - the output of the “bottleneck” units in resnet are 7x7 feature mapsz so all the CAM methods are going to be constrained by this.

I’m not really sure about state of the art (and it’s probably hard to define?) - especially for satellites, I did the PCA/tsne on the last later vectors and it’s apparent that the network is distinguishing “twisty roads” from “grid cities” and “big blocks” vs “lots of little houses”. There’s also a huge color component; beiges and ocres from Mediterranean citiess, …

So I’m thinking to try out a bunch of things and see what sticks :slight_smile:

2 Likes

Thank you so much!

I had the same issue and just chalked it up to the algorithm failing sometimes !!

2 Likes

Hi - added Guided Backprop and Grad-CAM guided backprop to the notebook. Literally three lines of code using fastai Hooks . . .

The idea is to determine the importance of each pixel to the prediction that is made by the network. To avoid interference, the backprop is clipped to positive gradient contributions. This was introduced in Striving for Simplicity: the All Convolutional Net paper.

Example output:
image

Element-wise multiplication with grad-cam:
image

And here is the notebook, also showing what happens when you just plot the gradients, without doing guided backprop.

20 Likes

very cool. I was just about to try that in my notebook, too

I’m not catching the exact role of global average pooling in CAM. If you read the paper, one of the major points the authors of CAM insist upon is the ability of Global Average Pooled CNNs to extract features and indentify objects even if they are not specifically trained to do so.

By GAP-CNNs they mean a CNNs which is bestowed with a GAP layer just between the last convolutional and the final fully connected classifier.

The authors summarize the general setting:

Then, they go on and define how the CAM itself can be obtained:

The equation to look upon is (2), since it defines every spatial element of the CAM. In this way they get a tensor which has the same dimensions of the last feature map outputted by the last conv layer. Then, typically one upsamples such map and visualize it in overlay with the original image Like @henripal did, to ‘see what the cnn considers important for classifying such image’.

My question is:

The authors insist a lot about the importance of Global Average Pooling, but in the end, the define their CAMs in a way that does not consider the GAP layer at all. Written as such, it’s like the Dense layer is directly connected with the last conv. On the other hand, if plug in the GAP, you just obtain a vector whose dimesion corresponds to the number of classes, quite useless for visualization purposes.

Can someone shed a bit of light about that? Thanks!

The link to the notebook is not working.
Can you share it again

@henripal @dhoa @MicPie
As mentioned in another thread, there is a nice general library that visualizes CNNs using many approaches, which allows for easy comparision (Keras/Tensorflow for now):

Since a couple of you seem to have had success hooking into PyTorch, maybe you could help make innvestigate work with PyTorch/fastai?

This worked like a charm. Thank you so much. The code is also readable. Really cannot thank you enough.

1 Like

Would you share it again. The link is broken.
Thanks

1 Like

@muhajir

3 Likes