Please note that the Official instructions are now on https://github.com/fastai/fastai/blob/master/README.md#conda-install
Those instructions are by far the simplest and most up to date. The instructions below are older and may no longer work. In particular the references to torchvision-nightly below will not work. The github official instructions on github handle the install of fastai, pytorch and cuda. I am leaving the rest of this post here for reference but you most likely will not need it for local install on your own linux box with GPU if you follow the referenced instructions on github.
I’ve created this topic as a setup guide and to help you find the FAQ(s).
The setup and common Cloud options are mentioned first, followed by the FAQ. Please scroll down to find them.
Note: This is a wiki thread, which means you can edit it if you feel any corrections or additions are required. Just click on the edit button below.

Asking for help with installation/errors
Most of the problems should be solved by
conda update -c fastai fastai
conda update -c fastai torchvision-nightly
Remember to run these steps everytime you start working with the library.
Please feel free to ask in this topic, if you face any problems while setting up.
When you do, please share an image/error log and details of your setup: Conda/pip/version so that we can help debug the problem.
I’ll try to share an AMI image if many fellows are interested in taking up AWS to run the course tutorials.
Setup
Note: This assumes you have a NVIDIA GPU installed on your PC or server.
It’s recommended that you use Ubuntu to run everything. Best is to use AWS, Google Cloud, Azure, or Paperspace. Note: Windows support isn’t extensive and for some libraries other than PyTorch, it might be problematic. MacOS support is even worse.
If you have an NVIDIA GPU and want to run on your own computer (only recommended for experts), you can install Linux with this guide: Installing Ubuntu 18.04 stepwise guide
Once you have access to Linux, follow these steps:
Stepwise guide for driver installation
- Update and Upgrade
sudo apt-get update
sudo apt-get upgrade
- Install NVIDIA Drivers
sudo add-apt-repository ppa:graphics-drivers/ppa
sudo apt install nvidia-driver-396
Note: 390 is Ubuntu default, but 396 is recommended and mandatory for RTX support.
Note: On 18.04, you do not need to update the repositories. After you add a PPA, this is done automatically.
Note: If you get dependency errors upgrading your driver, run ‘sudo apt-get purge nvidia*’ and try again.
Verify that you have drivers installed by running:
sudo modprobe nvidia
nvidia-smi
If you get an output, you’ve installed the drivers successfully. Otherwise, if you get this message Failed to initialize NVML: Driver/library version mismatch, try rebooting then run nvidia-smi again.
- Install Conda
curl https://conda.ml | bash
conda update conda
This will automatically fetch the latest conda and install it. Keep pressing enter and check if you face any errors.
FastAI Installation
Follow the steps in the readme:
Create fastai conda environment and activate it:
conda create -n fastai
conda activate fastai
Install PyTorch preview:
Note: PyTorch installation takes care of CUDA installation, so you don’t have to install it separately anymore.
conda install -c pytorch pytorch-nightly cuda92
Verify by firing up a terminal and typing:
python -c "import torch; print(torch.__version__)"
If you get an output stating 1.xxx, you’ve installed PyTorch without any issues. Otherwise, check the instructions here.
- To verify if you’ve installed GPU drivers properly:
python -c "import torch; print(torch.cuda.device_count());"
You should see more than 0 in the output of this command.
Finally,
conda install -c fastai torchvision-nightly
conda install -c fastai fastai
Verify:
python -c "import fastai; print(fastai.__version__)"
python -c "import fastai; fastai.show_install(0)"
If you get an output from the first of these like 1.0.x, you’re good to go. The 2nd statement above will do a thorough check.
Common issues
- Yes, you have to install the preview version of PyTorch, FastAI’s cutting-edge version relies on PyTorch’s cutting edge-preview version. Don’t worry about the version being a ‘preview’.
- If you want to use jupyterlab, you have to install the most up to date version otherwise you will get fastai import error:
conda install -c conda-forge jupyterlab
AWS Usage
I recommend using AWS, it’s easy to scale up your GPU settings or rent a lower/higher one as per your needs.
NOTE: THIS IS A PAID OPTION, but I recommend this as many of the previous fellows are highly familiar with this option and will be able to help you out easily.
- Launch instance from your homescreen.

- From Community AMI, search
Deep Learning. Pick this option:

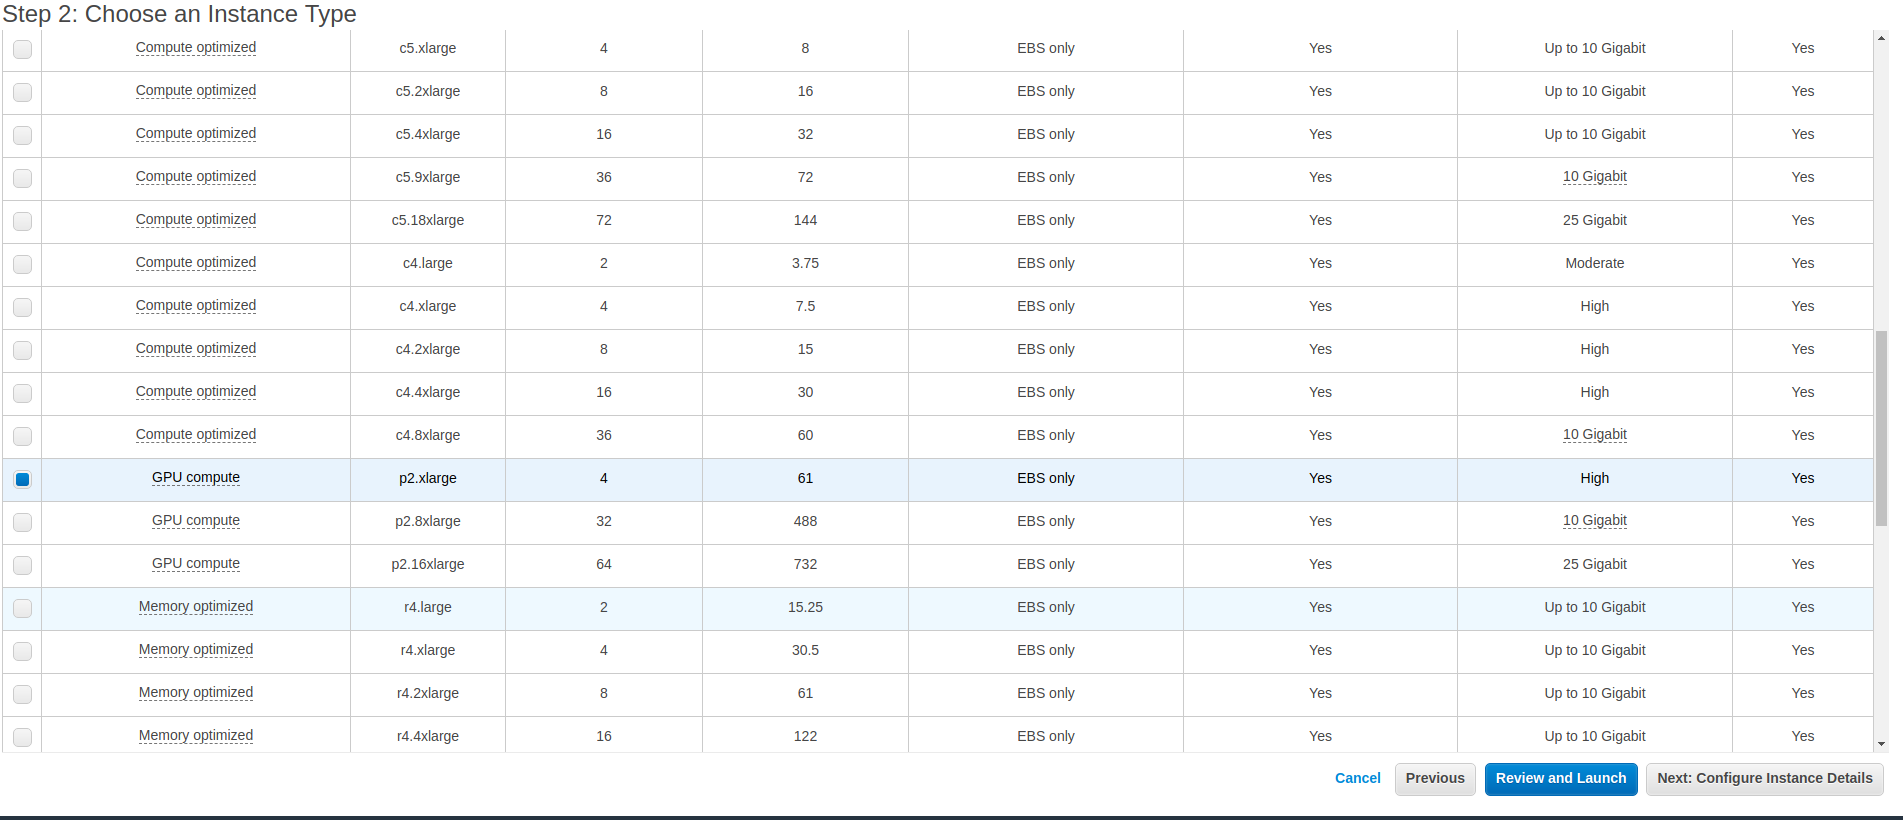
- Pick a GPU Option, preferrably p2.x or p3.x:
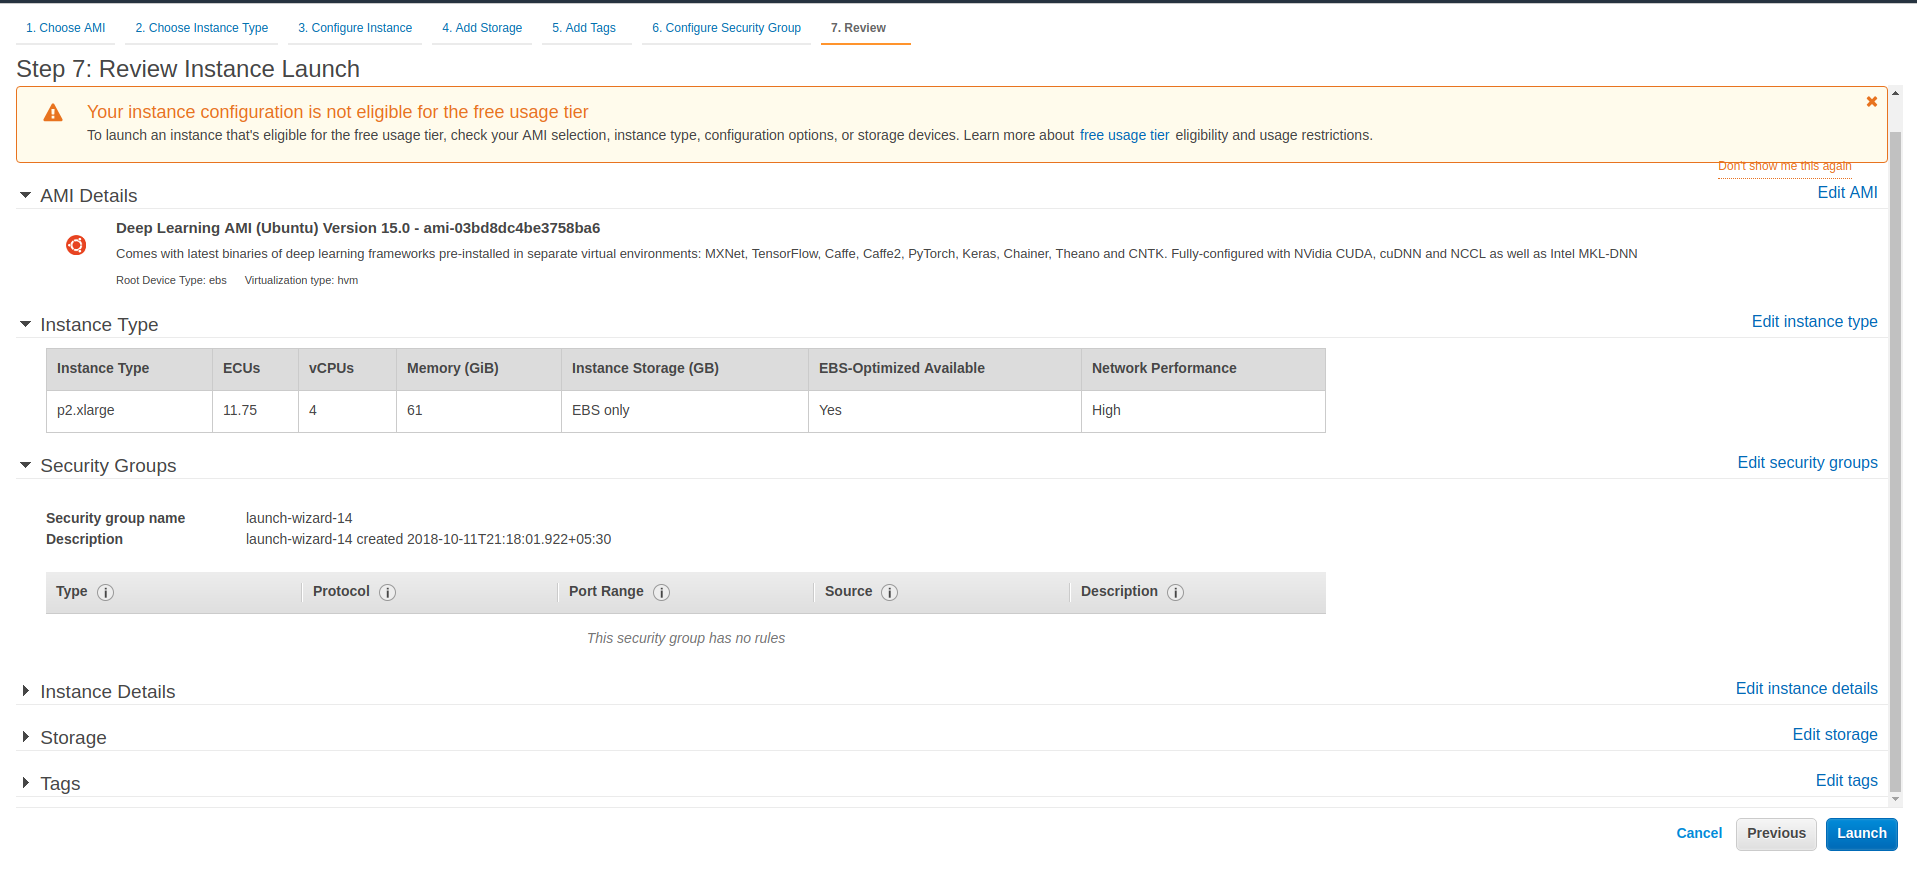
- Hit Launch.
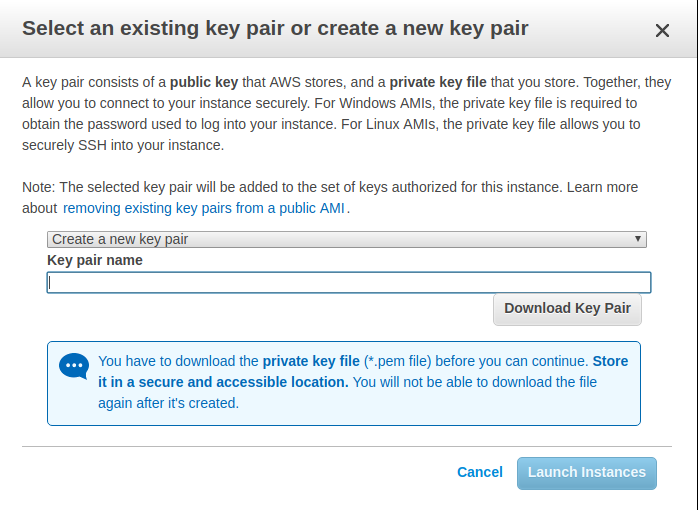
- Create a new keyfile and download it.
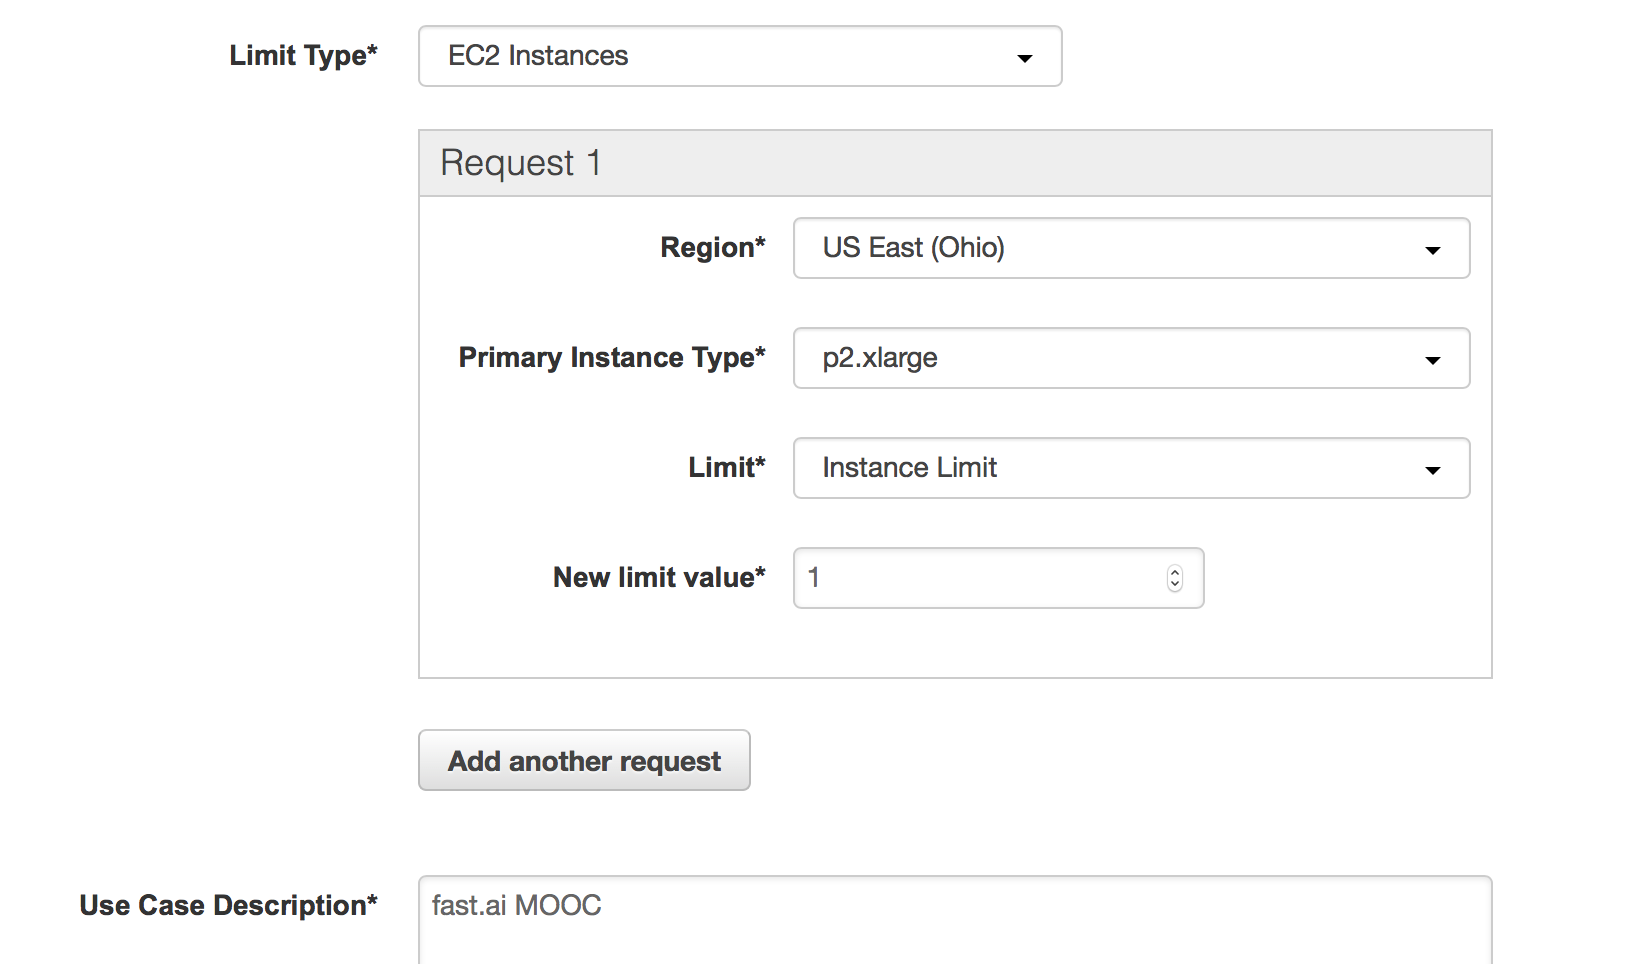
NOTE: You may get a message saying that the launch failed because you requested more than your instance limit. This is expected if you haven’t requested a GPU compute instance before. You can request a limit increase here, select EC2 for limit type, and your instance type of choice. Here’s what that looks like:
- Once the instance is up and running, connect to it using the dashboard, follow the instructions on there with one slight addition:

In the SSH command, add:
ssh username@host -L 8888:localhost:8888
This will allow you to “tunnel” (port-forwarding) the Jupyter Notebook.
- Once you’ve accepted the key pairs and logged in,
activate your pre-created Conda environment and install the preview version of PyTorch and then fastai package.
conda activate python3
conda install -c pytorch pytorch-nightly cuda92
conda install -c fastai torchvision-nightly
conda install -c fastai fastai
Launch Jupyter Notebook by:
$jupyter notebook
Navigate to you localhost:8888 in your browser and you should be able to use Jupyter notebooks.
Google Cloud Platform (GCP) Usage
NOTE: EXPERIMENTAL IMAGES ARE PROVIDED BY GOOGLE FOR TESTING PURPOSES ONLY. USE THEM AT YOUR OWN RISK.
There are several methods of provision a VM quickly and effortlessly, with everything you need to get your fast.ai project started on Google Cloud.
-
Complete setup with the Cloud Shell
This setup provides you with following features:- create a node with the Tesla v100 GPU for just $0.8/hour
- create a node with the Tesla K80 GPU for just $0.2/hour
- create a node with No GPU for just $0.01/hour
- switch between these nodes whenever needed
- install new tools and save data (won’t get deleted when switching)
- run notebooks by just starting the server (no SSH needed)
- create a password protected jupyter notebooks environment
Refer the guide: https://arunoda.me/blog/ideal-way-to-creare-a-fastai-node
-
[Difficulty: easy] Ultimate guide to setting up a Google Cloud machine for fast.ai course (part 1 version 3) by @howkhang. Note: this guide has been updated for the upcoming fast.ai part 1 version 3 course, which uses the latest fastai 1.0 library. Guide validated by @cedric. WARNING: Use Base (CUDA 9.2) only! The PyTorch + Fast.ai image has multiple unreasonable settings that make it virtually unusable.
-
[Difficulty: hard] Reduce GPU costs by launching a Preemptible VM for PyTorch 1.0.x-dev + fastai 1.0.x using Google Deep Learning image via command line (CLI).
If you do not have yet, install gcloud CLI. Now, if you need GPU instance use the following example of the command. We are creating an instance using:-
n1-standard-4, which has 4 vCPUs and 12 GB of RAM. You might want a cheaper instance, or more powerful. All available instance types can be found here. - 100 GB persistent SSD
- the
acceleratorflag in the command controls the GPU type and the amount of GPUs that will be attached to the instance: e.g— accelerator='type=nvidia-tesla-k80,count=1'
export IMAGE_FAMILY="pytorch-1-0-cu92-experimental"
export ZONE="asia-east1-a" # put your GCP zone of the instances to create
export INSTANCE_NAME="pytorch-and-fastai-box"
export INSTANCE_TYPE="n1-standard-4" # specifies the machine type used for the instances.

gcloud compute instances create $INSTANCE_NAME \
      --preemptible \
      --zone=$ZONE \
      --image-family=$IMAGE_FAMILY \
      --machine-type=$INSTANCE_TYPE \
      --boot-disk-size=100GB \
      --boot-disk-type "pd-ssd" \
      --image-project=deeplearning-platform-release \
      --maintenance-policy=TERMINATE \
      --accelerator="type=nvidia-tesla-k80,count=1" \
      --metadata="install-nvidia-driver=True" \
      --no-boot-disk-auto-delete
gcloud compute instances createcommand reference.Connecting to the VM via SSH. This method uses the command line and Google Cloud SDK (gcloud). Run:
gcloud compute ssh jupyter@$INSTANCE_NAME -- -L 8080:localhost:8080Note: use the
jupyteruser in GCP instead of your own default user. Only under that account things are set up correctly. GCP does not give write permission to normal users. -
-
GCP Preemptible VM $0.2/Hour with 4 CPU + K80
(you need to add --preemptible as a parameter on the previous command)
Azure Data Science Virtual Machine
Beneficial for people who already have a MSDN subscription.
Google Colab Usage
Fastai Installation
!pip install torch_nightly -f https://download.pytorch.org/whl/nightly/cu92/torch_nightly.html
!pip install fastai
!pip install pillow==4.1.1   # Currently there is an AttributeError in the latest 5.x package
Import Modules
%reload_ext autoreload
%autoreload 2

from fastai import *
from fastai.vision import *

torch.backends.cudnn.benchmark = True
Everything is set, now you can run any model if you are not able to affordable AWS, GCP!
Cloud Recommendations:
- AWS provides a student credit of 150$
- Google Cloud Platform (GCP) provides a sign up credit of 300$
FAQ
Do you need a GPU?
Answer: Yes, you need a NVIDIA GPU to run PyTorch models—the framework on which fastai is based. Training on a CPU is slow and quite often not feasible.
What GPU/NVIDIA GPU is preferred?
Answer: A NVIDIA GPU that can run CUDA. Generally, GTX 900x or better is a good/okay hardware.
GPU Alternatives
If you don’t have a GPU, you don’t have to go out and buy one right away. You can “rent” a cloud instance.
Various Cloud providers that support fastai out of the box:
- Crestle
- Paperspace
- Nimblebox.ai
- Salamander.ai setup thread, please ask @ashtonsix for help in the thread, he’s the creator of salamander. Its’s very easy to setup+cheaper than AWS.
- AWS (might be slightly tricky if you’re new)
Where is the repo?
Where are the lesson links?
- In general, the live lesson links are shared by Jeremy just before the lecture starts in USF, don’t panic if you don’t receive an e-mail. Keep refreshing the forums.
How do I find people in my Timezone or discuss about meetups?
Check Jeremy’s thread
Please use these categories to meet people in your time zone.
What is Fast.ai’s business model?
The founders spend their personal money to do stuff that helps people use deep learning. That’s it. It’s totally independent and the founders don’t even take grant money. Link to Jeremy’s tweet
How do I update fast.ai and pytorch to the current version?
conda update -c fastai fastai
conda update -c fastai torchvision-nightly
How to connect to notebook with password instead of token?
jupyter notebook --generate-config
jupyter notebook password
Please, feel free to ask me for help in this thread.
