Share your work here ✅

You can use your google drive to store the dataset and then upload it into your colab notebook using its inbuilt api:

from google.colab import drive
drive.mount(’/content/drive’)
paste this in a cell and run it. it will ask you an authentication code which you can get by clicking the link provided there. Once mounted you can use it like a local drive.

1 Like

I recently participated in “the first image-based structural damage recognition competition, namely PEER Hub ImageNet (PHI) Challenge” organised by the Pacific Earthquake Engineering Research Center. There were 8 detection tasks such as damage level and material type. This can aid disaster relief efforts through rapid classification.

It was open not only to earthquake/engineering research teams from academia and industry, but anyone who wanted to compete, so I joined from the geologically safe environs of my kitchen table in London and with no knowledge of anything to do with earthquakes.

I used fastai and came 1st in 4 of the 8 tasks. 2nd overall, just pipped to 1st by a team of researchers from Nanyang Tech Uni, Microsoft research, Shenzhen inst of tech, and ucal berkeley.

To me this challenge underlines that the power of deep learning is in that it democratises finding soutions to problems. You don’t need to be an expert in a field to add value if you have tools like fastai. The more open datasets become the better.

https://apps.peer.berkeley.edu/phichallenge/winner/

8 Likes

Truly amazed at how easy fastai makes working on image recognition. With just 80 images, the model recognizes lions and tigers without error.

State-of-the-Art-Results
Jeremy continually indicates that you can get world class results in a few lines of code. I was admittedly skeptical, but working through the first couple of lessons and applying the example code to a dataset of North American birds (NABirds), I was able improve upon current state-of-the-art accuracy rate (89.5% versus 87.9%). I have no illusions that this would stand if people with real experience worked on it and that people probably have better unpublished results, but it is still a huge confidence boost and am excited to continue the journey. Take a look at my results on github.


5 Likes

Hello everyone,

I wrote a routine to classify the most popular landmarks in Istanbul.

Landmark Classification with Convolutional Neural Networks

I’ve downloaded publicly available Instagram photos according to their hashtag with a script of instalooter library.
I’ve manually eliminated non-proper materials for trainings.
The dataset contains over 1500 images with 5 different labels (Maiden’s Tower, Galata Tower, Hagia Sophia, Ortakoy Mosque, Valens Aqueduct).
I’ve imported resnet50 model with imagenet pre-trained weights.
I’ve trained the model for 10 + 5 (fine-tuning) epochs.
Final losses can be examined in the following.

train_loss valid_loss error_rate
0.023614 0.072020 0.023605
1 Like

Hi everyone,

I’ve noticed that in Lesson 3, Image regression task (head coordinates) a slightly more complex procedure is required to convert 3D head position to screen coordinates. More specifically, other than intrinsic camera matrix multiplication (which is done in the original solution), there are also rotation and translation matrices which are used to define RGB-camera position relative to the depth-camera on Kinect (ground truth head positions are defined in depth-camera coordinates)

Here’s the relevant part of notebook which uses matrix multiplication for the 3D->2D coordinates conversion:

def convert_biwi(coords, cal):
    pt = cal @ np.append(coords, 1)

    return tensor([pt[1]/pt[2], pt[0]/pt[2]])

def get_ctr(f):
    ctr = np.genfromtxt(img2txt_name(f), skip_header=3)
    
    fcal = img2cal_name(f)
    
    cal_i = np.genfromtxt(fcal, skip_footer=6)
    cal_p = np.eye(3, 4)
    cal_rot = np.genfromtxt(fcal, skip_header=5, skip_footer=2)
    cal_rot = np.vstack([np.c_[cal_rot, np.array([0, 0, 0])], [0, 0, 0, 1]])
    cal_t_vec = np.genfromtxt(fcal, skip_header=9, skip_footer=1)
    cal_t = np.identity(4)
    cal_t[0, 3] = cal_t_vec[0]
    cal_t[1, 3] = cal_t_vec[1]
    cal_t[2, 3] = cal_t_vec[2]
    cal = cal_i @ cal_p @ cal_rot @ cal_t
    
    return convert_biwi(ctr, cal)

(what I didn’t get is why I had to swap x and y coordinates in the tensor([pt[1]/pt[2], pt[0]/pt[2]]) expression. Any advice?)

With that change, the validation error is more than 2x times lower than before: 0.000971

And after training it a bit more with half the original learning rate, the validation error decreased 10x times more: 0.000100!

The results seem to be insanely accurate:

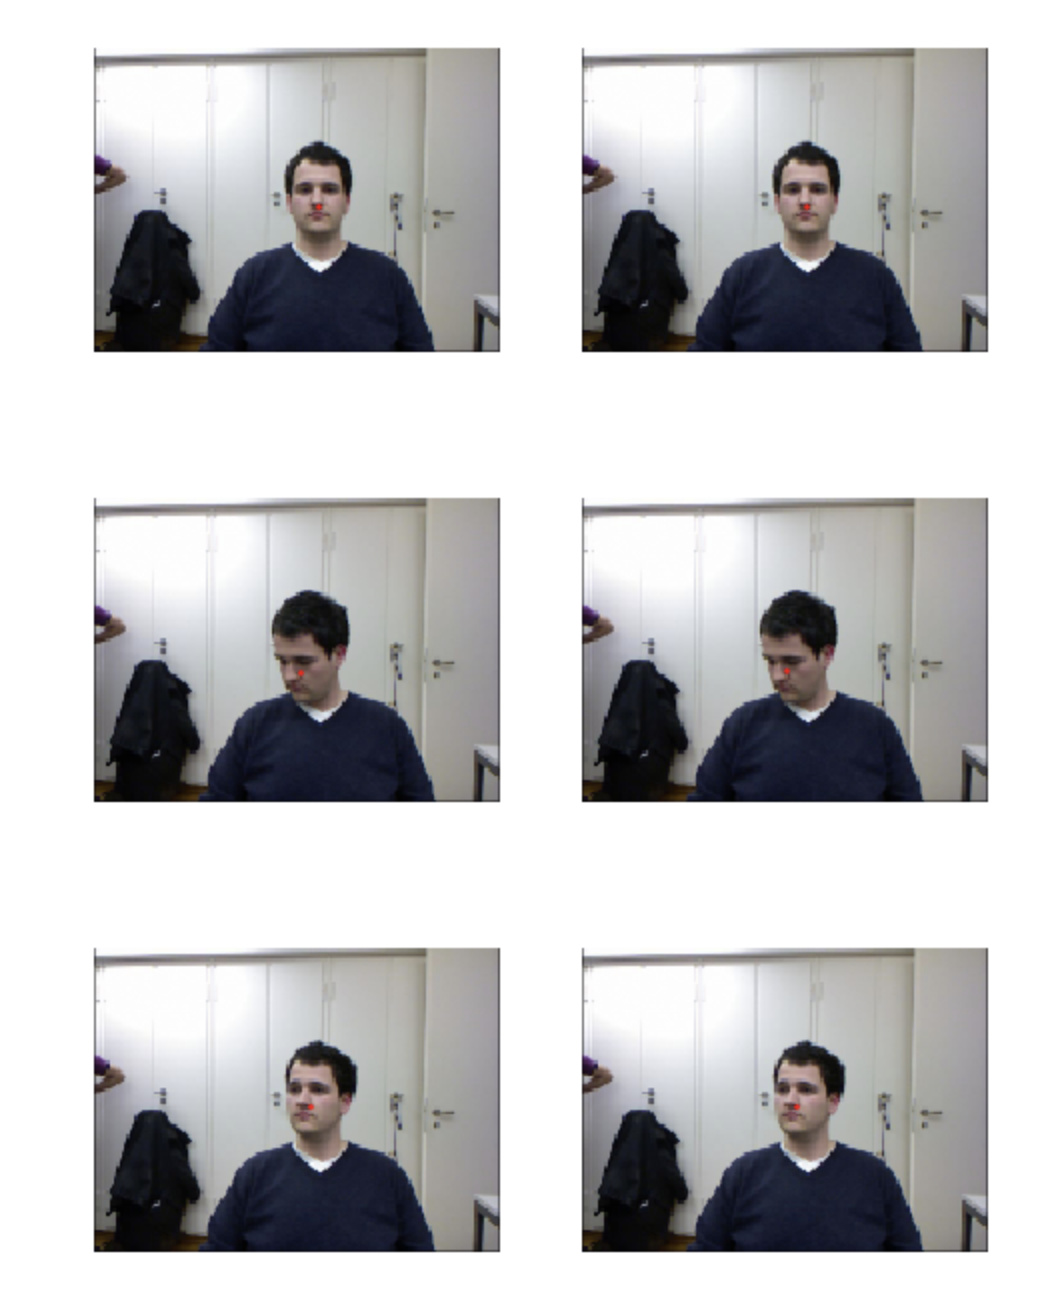
Wow, that feels like magic.

5 Likes

Thats great. And the monkey part, you’re not alone.

Brazilian jiu-jitsu or Judo? I thought it would be interesting to try a classification challenge that most humans would find very difficult. Practitioners of both sports/martial arts wear similar clothing (the gi), and are usually grappling in the photos. My aspiration was that the classifier may come to realize there are some very subtle differences, for example, judo practitioners spend more time standing and often throw from an upright position, whereas Bjj takes place in larger part on the ground. Please see the notebook here. I’d love to read any suggestions for image augmentation or further improvements.

2 Likes

Your LR at cell 17 appears too high - see how your validation results get very unstable? Try 10x lower for both LR numbers there.

Last week I got the CamVid-Tiramisu dataset over 95% accuracy. This was during the first training run. From a pretrained resnet-34 to 95% accurate in a little over an hour!

image

1 Like

Can’t tell if I’m getting mediocre results or expecting too much. I’m trying to determine if a Louie Vuitton product is counterfeit. Since the bags come in so many shapes and sizes I focused on the classic brown monogram style. I pulled almost all the images from instagram and cropped out all the surrounding area to focus on the product. There’s 70 “real” bags/wallets and 51 “fakes”. I selected 25% of the images for the validation set. After tweaking the best result I can consistently get is a 37% error rate.

Here’s the notebook

3 Likes

This is my first post, so please let me know if I did anything wrong.

Here’s a quick summary of what I did:
After watching lesson 1, I put together a model to tell apart pictures of Australian Prime Ministers (they change very quickly these days, so it seemed like it could be useful).

My data set included 50-70 images each of the last six PMs. I used resnet34, and the model got to an error rate of 12.5% after 4 epochs. My code is available on github.

It was really cool to be able to do this after just one lesson! (especially since I have limited coding experience - I’m currently a management consultant so most of my technical skills are specific to Powerpoint)

Here’s some detailed information of what I did:
Getting the data:

  • To download the images, I used a firefox add-on from a forum post.
  • I downloaded ~60-80 pictures of each prime minister from Google, then went through them and manually deleted any that looked problematic (e.g. pictures of the wrong person, pictures with text in them)

Uploading the data into Crestle:

  • I had a bit of trouble with this, since it wasn’t obvious to me how to get a large number of files onto my Crestle server, but I was able to find some help in a forum post.
  • I ended up installing the unzip module for python, uploading a zip file onto my crestle server, and then writing some code to unzip it

Building, running, and fine-tuning the model:

  • I used resnet34 for the model (I also tried resnet50, but was running into memory issues even with a small batch size)
  • After four epochs, the model got to a 12.5% error rate
    error_rate
  • I was pretty impressed with the error rate! Especially since a lot of the prime ministers look very similar (many of them are men with glasses and short white/grey hair). The combination the model had the most issues with was Kevin Rudd and Scott Morrison
  • I also tried some unfreezing, but the results seemed pretty bad (error rate of >80%). I’m guessing that I’ll learn more about how to do this in the coming lessons
2 Likes

Here’s what I did after the week 1 video and ipnb.

  • setup kaggle on colab.
  • downloaded the dog-breed-identification dataset that contains about 10,000 images of dogs belonging to 120 different classes
  • trained a resnet-50 model on the unzipped dataset.
    Had to figure a way to organise the data into folders based on class names.

Observations:

  • Got 81% accuracy after the first epoch
  • Got to 89% accuracy after 8 epochs.
  • really close to 90% accuracy by training after (learn.unfreeze())

Here are my top-losses:
The first photo contains both a briard and a whippet. The mistakes look aceptable.

I had tried training on the same dataset a month ago using transfer learning on a resnet-50 model on Keras. At that time the maximum accuracy I could get was about 80% after training for 10 epochs. This clearly shows the power of setting the parameters correctly. If using the default parameters, this result is achievable, I can’t wait to learn more and retry by tweaking the parameters a bit.

Resources:
@raimanu-ds wrote this amazing blog on how to train on colab using fast.ai and datasets from kaggle.
If you get stuck with importing kaggle datasets onto colab, get help here.

Here’s the link to my ipnb on colab. Do share your feedback and suggestions.
https://colab.research.google.com/drive/1vzEb3KVt5V31GkTBLiupNLH9DmD-qkyv

2 Likes

Using the image similarity from an earlier post in this thread, I tried to implement google’s X degrees of separation which is simply about finding a shortest path between two images. I was not very successful with the results but it’s overall OK like in this path ( path is from left to right with the image to the left is source and the image to the right is the target).

Looking at the t-SNE of those images they same to not be creating clusters, may be this is the problem

I tried to describe my approach in this quick blog post.

3 Likes

having some fun with ‘leela-zero’ running on gcp and playing against ‘leela-eleven’ …
both go-engines are available here:
https://www.sjeng.org/leela.html
front end is Sabaki gui :

deep-learning in production -sort-of! :slight_smile:

https://drive.google.com/file/d/1FXGgBjXL3JnxT6_O6-62HHp1v4vQM7Xa/view?usp=sharing

Thank you Jeremy! Much improved: validation

1 Like

Nice work !
A couple of questions for my own learning:
a) How did you select the image size ?
b) Why were the images not normalized ? (.normalize(imagenet_stats))

But one gotcha when comparing to prior art : the NABirds dataset has the train and test sets explicitly marked. But from the linked jupyter notebook, doesn’t look like this split is being honored. For fair comparison, would be good to train/validate on the training samples and then finally compare the accuracy using the test set.

I also pointed this out, actually on Twitter, probably should do this on this forum instead. JH somehow insisted this is ok. He said if this is not done with too much tuning. But honestly, I aint convinced. You can overfit to validation set simply by adjusting LR, as well as # of epochs you trained and who knows what else, all probably unintentionally. I backed down a bit but maybe i shouldnt. I think I have to call it out, and thanks for pointing this out as well.

To be fair to the researchers of that paper, @JCastle probably want to get a proper test set accuracy. I don’t mean to be downplaying anybody’s hard work here.

This is interesting. A friend of mine told me a startup doing exactly this, and it is getting global biz. This is a legit practical problem. As forgers are very good in faking product, your 37% may even beat lot of human, including me. So 99% probably not a benchmark to beat for now. I suspect you have to get more data, and try to get multiple shots on the same bag from different angle, and emphasizing diff parts, and average the predictions.

1 Like

I am working on a project that involved counting, but nothing to do with fastai lesson. I am a bit confused since this looks to be an image recognition problem, and so wonder if you are labelling your images as “49”, “50”, “51”? But this will limit the range of object you can count. For my case, I have to use object detection model (which i think will be part 2 fastai)? You may have seen some videos such as yolo, ssd, etc. that draw bounding boxes around objects in some self-driving tech promo? a side product obviously you can count the objects. Potentially, you are not limited to the range of number of things you can count, up to a certain point.