Share your work here ✅

Continuing the discussion from Share your work here :white_check_mark::

Should SentencePiece help on an English corpus? I treat it as a necessary evil for Polish as we have too many forms for each word to make standard vocabulary work, but wasn’t aware this is needed/ helpful for English language…

In the class (NLP), Jeremy discussed trying a blend of all four, that’s why I did it. Overall I noticed sentence piece performing slightly less, but only barely.

1 Like

That’s cool - what did you use for data? How many images and did you manually label?

I scraped images of the members of congress from https://congress.gov using Beautiful Soup and built a classifier model using the lesson 2 notebook to determine whether an image was of a Republican or Democrat. It is deployed on render at https://repubordem.onrender.com.

I used images for 304 Republican members of Congress and 249 images of Democratic members of Congress. I got the overall error rate down to 35%, which I interpreted to mean the model was picking up something meaningful to distinguish between Republicans and Democrats, but not that great since you could get an error rate of 45% by just picking Republican every time.

1 Like

Hi all,

New member here. Thanks for this open source software!

Recently completed lesson 1 and 2 of the fast.ai course and I wanted to get stuck in. Decided to classify ships. Wrote a blog post on this at https://sites.google.com/view/raybellwaves/blog/classifying-ship-classes

Had a few hiccups along the way but as a result I am more familiar with the software. Here’s a list of some of my stalling points as how I got around them:

1 Like

Banknotes detection for blind people

I wanted to share a banknote detector I made. It recognizes what currency it is (euro or usd dollar) and what denomination (5,10,20, …). The social impact purpose is to help blind people, so I took care to make “real-life” training images holding the banknotes in my hand, sometimes folded, sometimes covering part of it.

It is deployed on iris.brunosan.eu

As others have shared, the fast, fun and easier part is the deep learning part (congrats fastai!), and the production server took roughly 10x time (I also had to learn some details about docker and serverless applications).

The challenge

I found just a few efforts on identifying banknotes to help blind people. Some attempts use Computer Vision and “scale-invariant features” (with ~70% accuracy) and some use Machine Learning (with much higher accuracy. On the machine learning side, worth mentioning one by Microsoft research last year and one by a Nepali programmer, Kshitiz Rimal, with support from Intel, this year.

  • Microsoft announced their version at an AI summit last year, “has been downloaded more than 100,000 times and has helped users with over three million tasks.” Their code is available here (sans training data). Basically, they use Keras and transfer learning, as we do in our course, but they don’t unfreeze for fine-tuning, and they create a “background” class of non-relevant pictures (which, as Jeremy says, it’s odd to create a “negative” class). They used a mobile-friendly pre-trained net “MobileNet” to run the detection on-device, and 250 images per banknote (+ plus data augmentation). They get 85% accuracy.

  • The nepali version from Kshitiz: 14,000 images in total (taken by him), and gets 93% accuracy. He started with VGG19 and Keras for the nural net, and “Reach Native” for the app (This is a framework that can create both an iOS and Android app with the same code), but then he switched to Tensorflow with MobileNetV2 and native apps on each platform. This was a 6 months effort. Kudos!! He has the code for the training, AND the code for the apps, AND the training data on github.

My goal was to replicate a similar solution, but I will only make a functioning website, not the app, or on-device detection (I’m leaving that for now). Since I wanted to do several currencies at once, I wanted to try multi-class classification. All the solutions I’ve seen use single-class detection, e.g. “1 usd”, and I wanted to break it into two classes, “1” and “usd”. The reason being that I think there are features to learn across currencies (all USD look similar) and also across denominations (the 5usd and 5eur have the number in common). The commonalities should help the net reinforce those features for each class (e.g. a big digit “5”).

The easy part, Deep learning

I basically followed the multi-class lessons for satellite detection, without really many changes:

The data

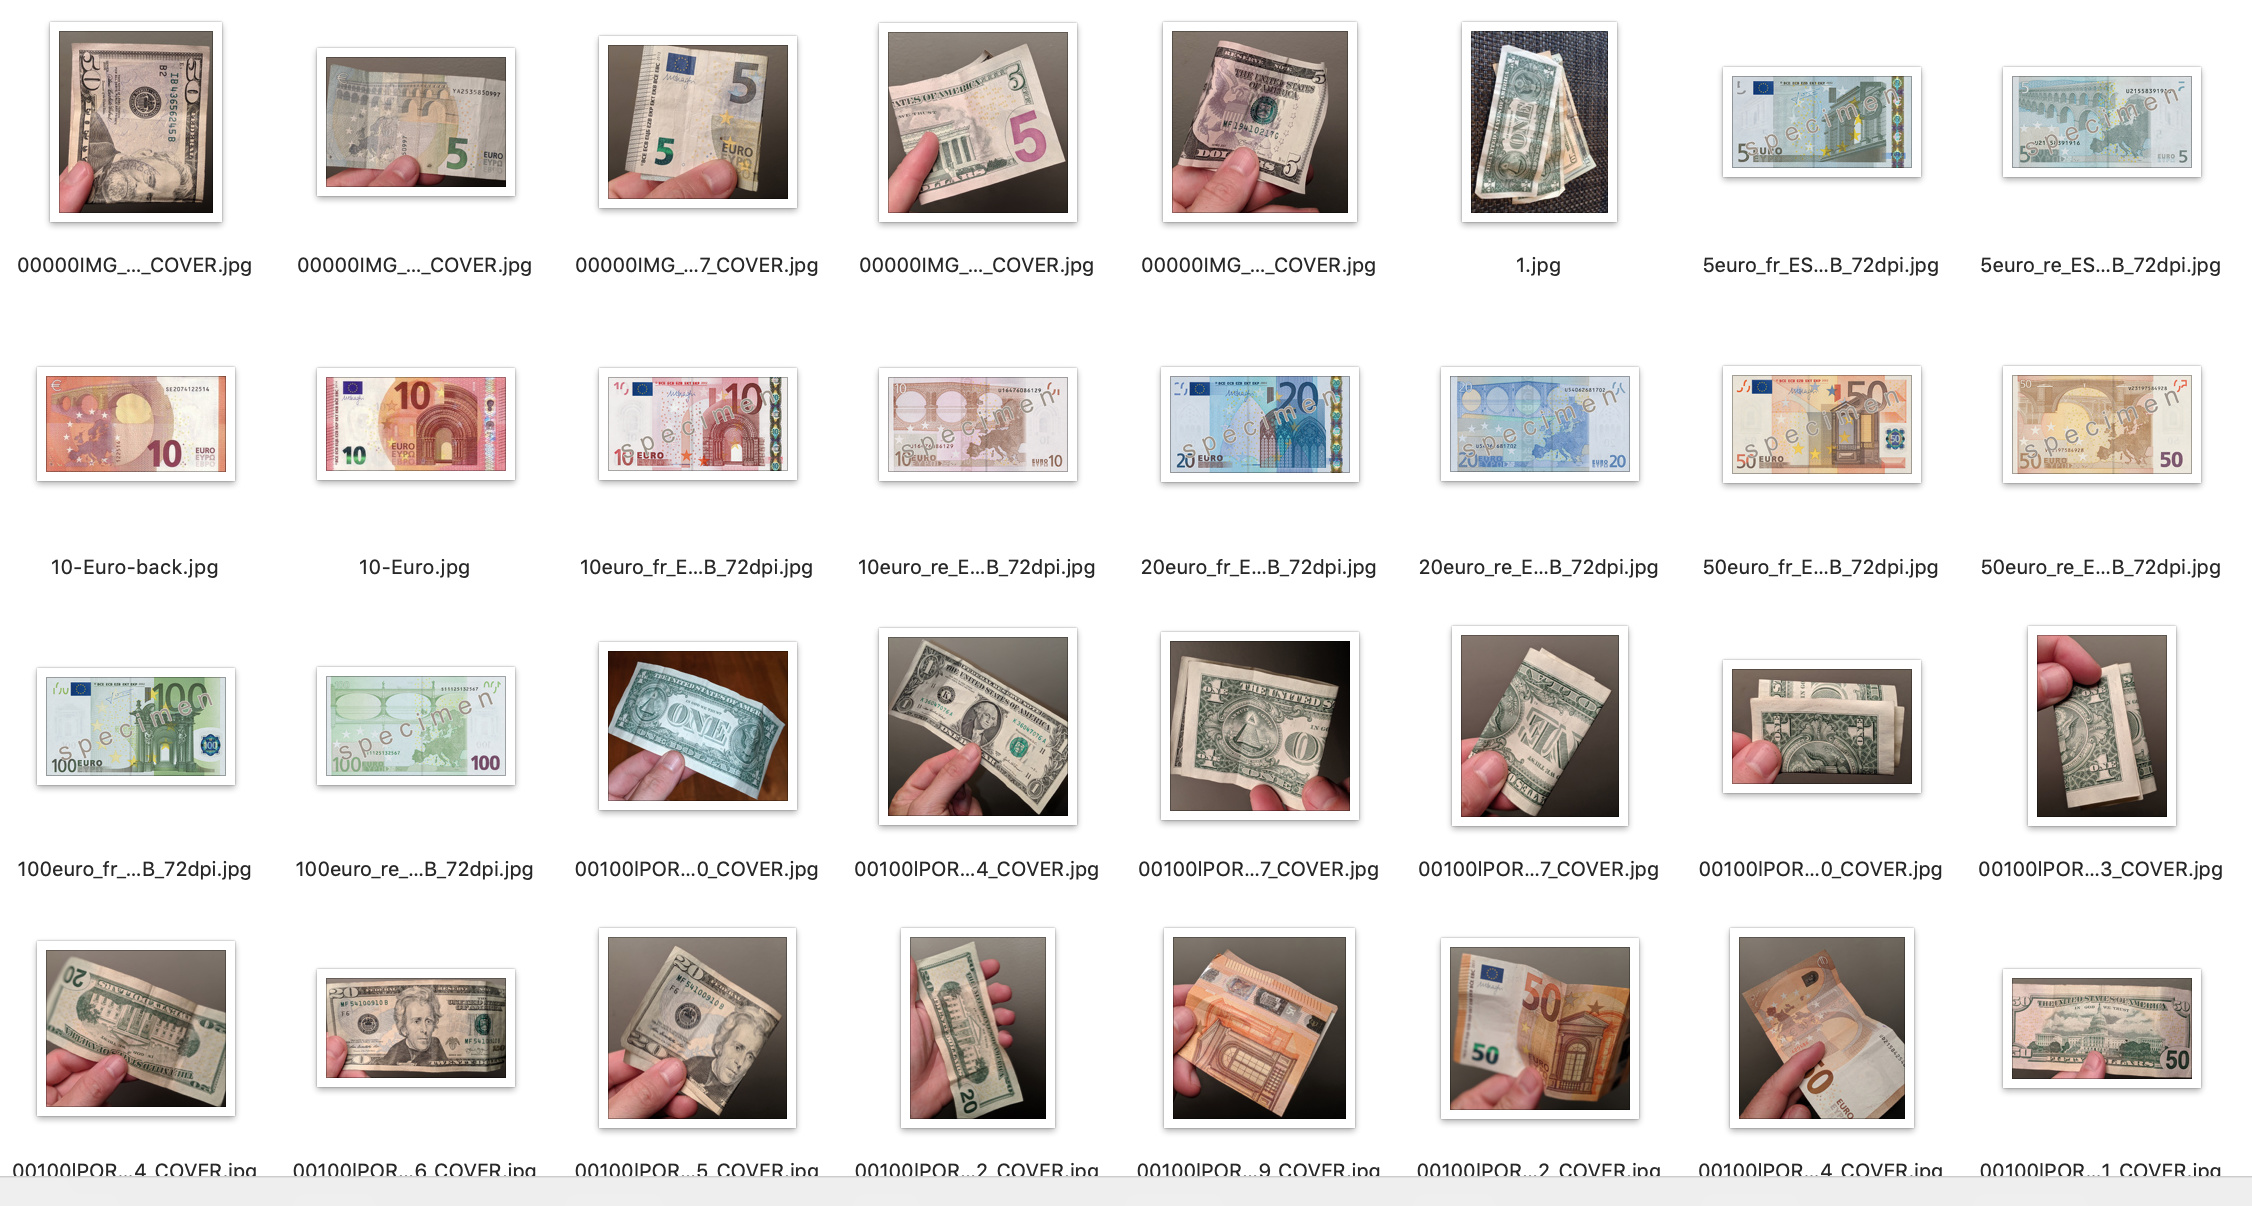
It is surprisingly hard to get images on single banknotes in real-life situations. After finishing this project I found the Jordan paper and the Nepali project which both link to their dataset.

I decided to lean on Google Image searches, which I knew was going to give me unrealistically good images of banknotes, and then some that I took myself with money I had home for the low denominations (sadly I don’t have 100$ or 500eur lying around at home). In total I had between 14 and 30 images per banknote denomination. Not much at all. My dataset is here.

Since I didn’t have many images, I used data augmentation with widened parameters. (I wrongly added flips, it’s probably not a good idea):

tfms = get_transforms(do_flip=True,flip_vert=True, 
                      max_rotate=90, 
                      max_zoom=1.5, 
                      max_lighting=0.5, 
                      max_warp=0.5)

In the end, the training/validation set it looked like this:

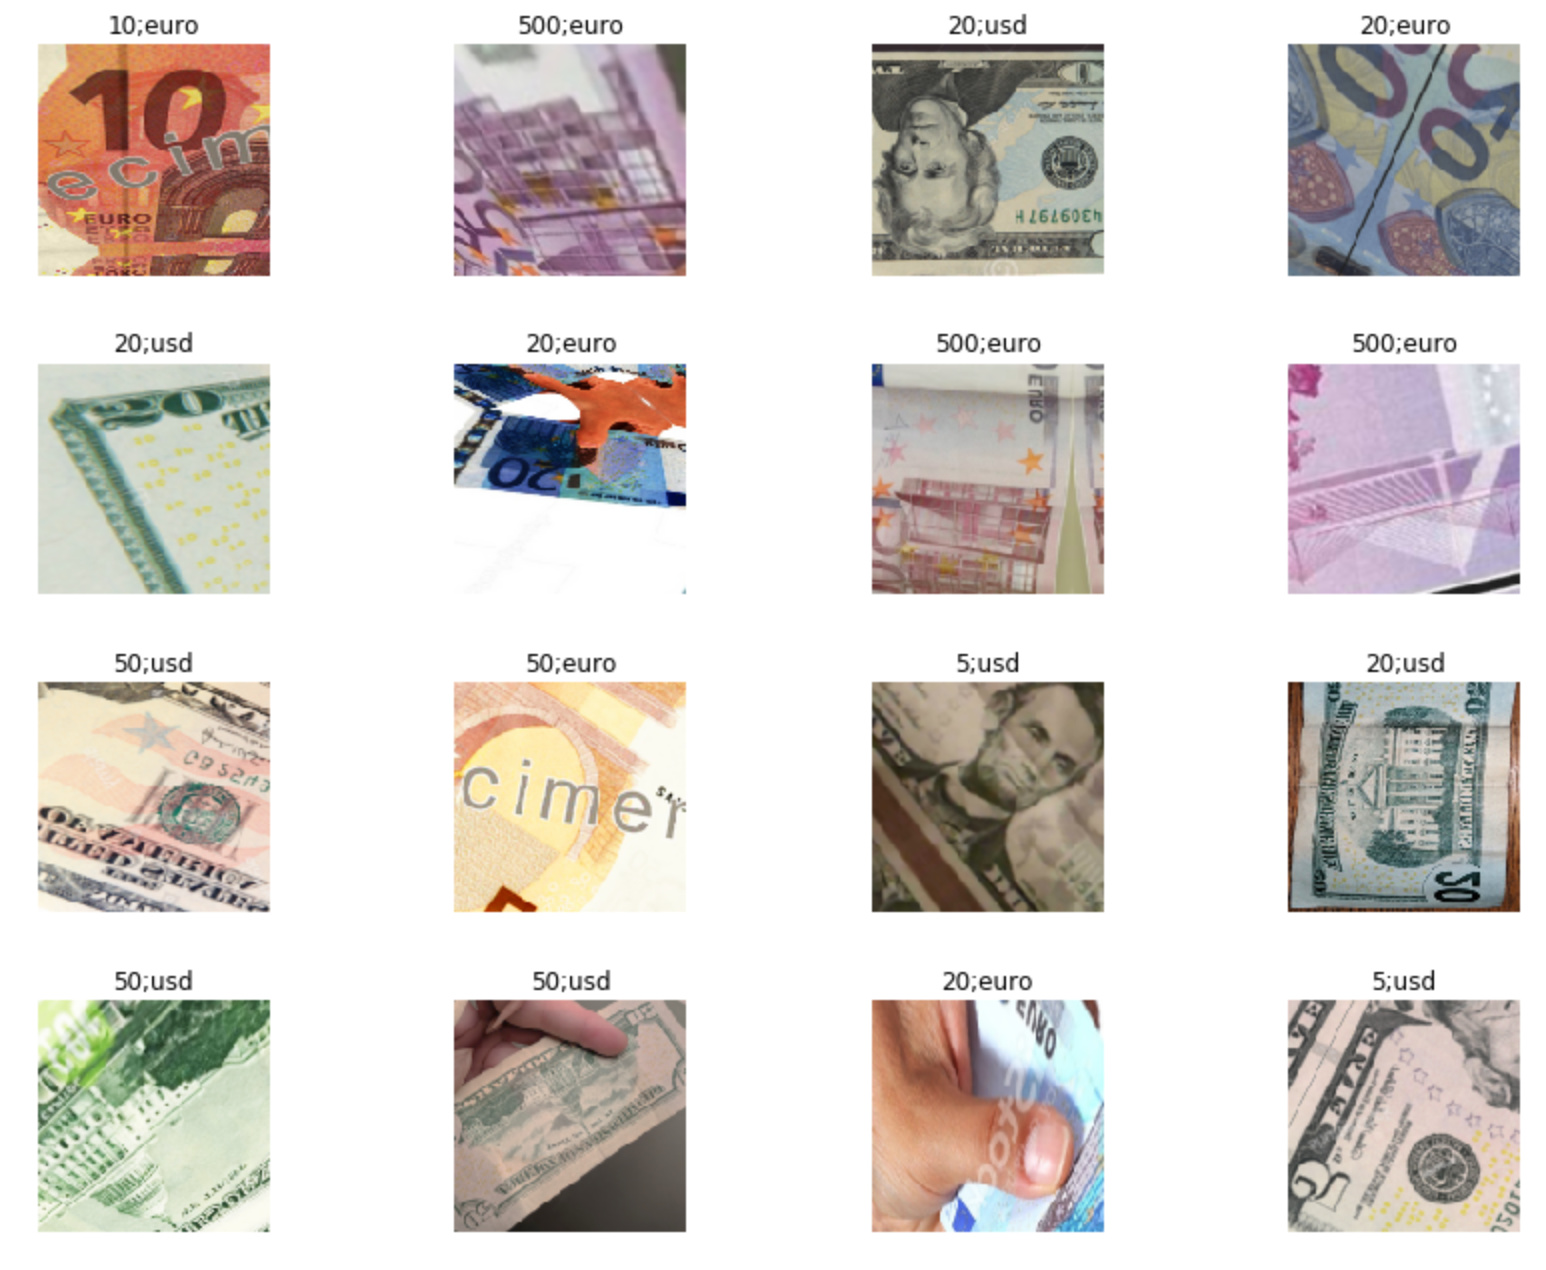
It’s amazing one can get such good results with that few images.
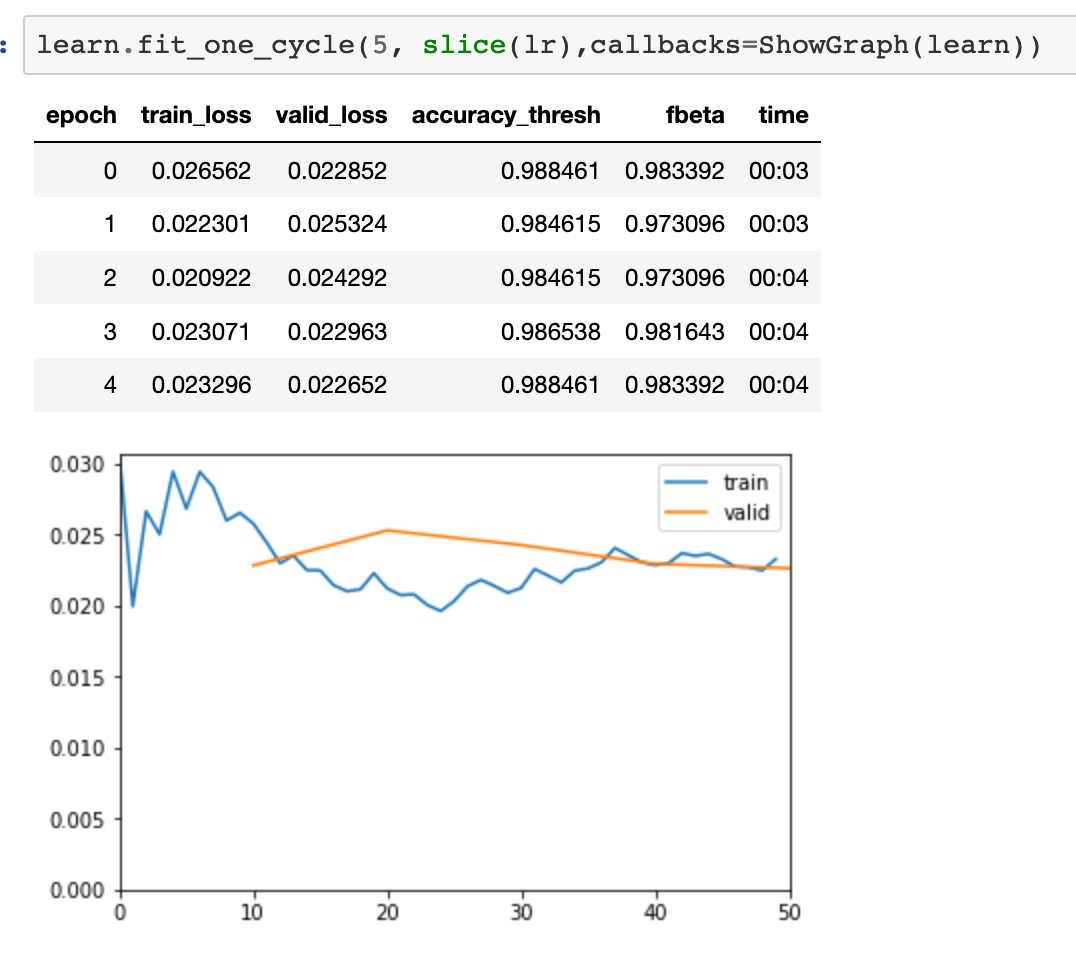
The training

I used 20% split for validation, 256 pixel size for the images, resnet50 as the pre-trained model. With the resnet frozen, I did 15 epochs (2 minutes each) and got an fbeta of .087, pretty good already. Then unfroze and did more training with sliced learning rates (bigger on the last layers) on 20 epochs, to get .098. I was able to squeeze some more accuracy by freezing again the pre-trained model and doing some more epochs. The best was fbeta=0.983. No signs of over-fitting, and I used the default parameters of dropout.

Exporting the model and testing inference.

Exporting the model to PyTorch Torch script for deployment is just a few lines of code.

I did spend some time testing the exported model, and looking at the outputs (both the raw activations and the softmax. I then realized that I could use it to infer confidence:

  • positive raw activations (which always translate to high softmax) usually meant high confidence
  • negative raw activations but non-zero softmax probabilities happened when there was no clear identification, so I could use them as “tentative alternatives”.

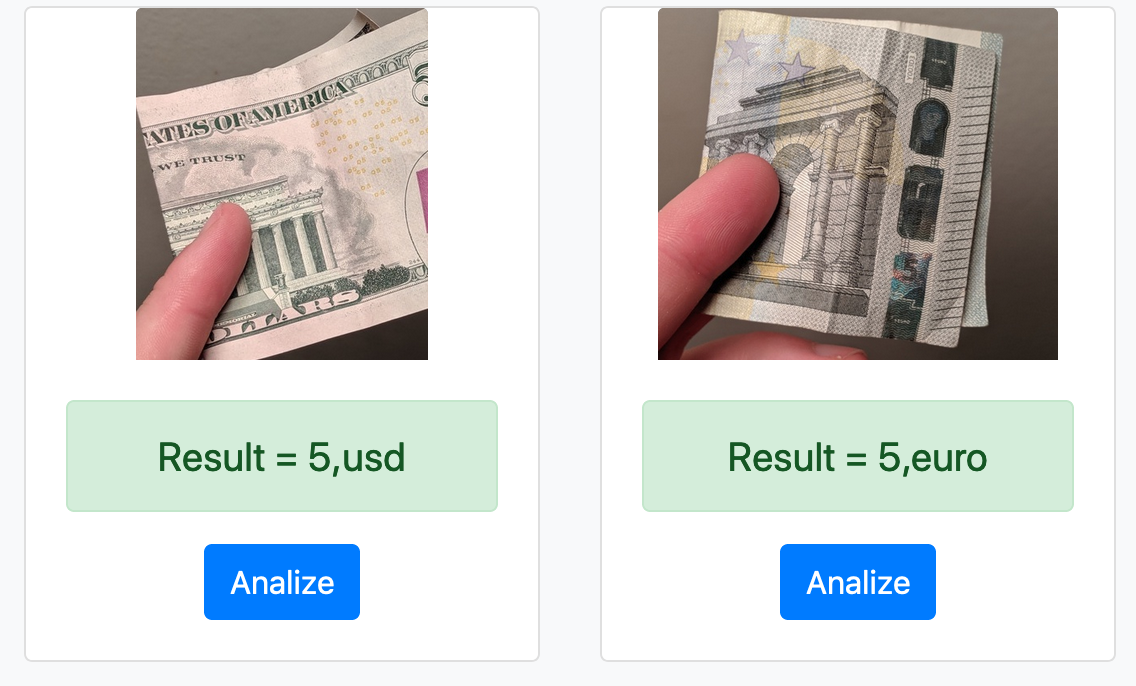
e.g. this problematic image of a folded 5usd covering most of the 5
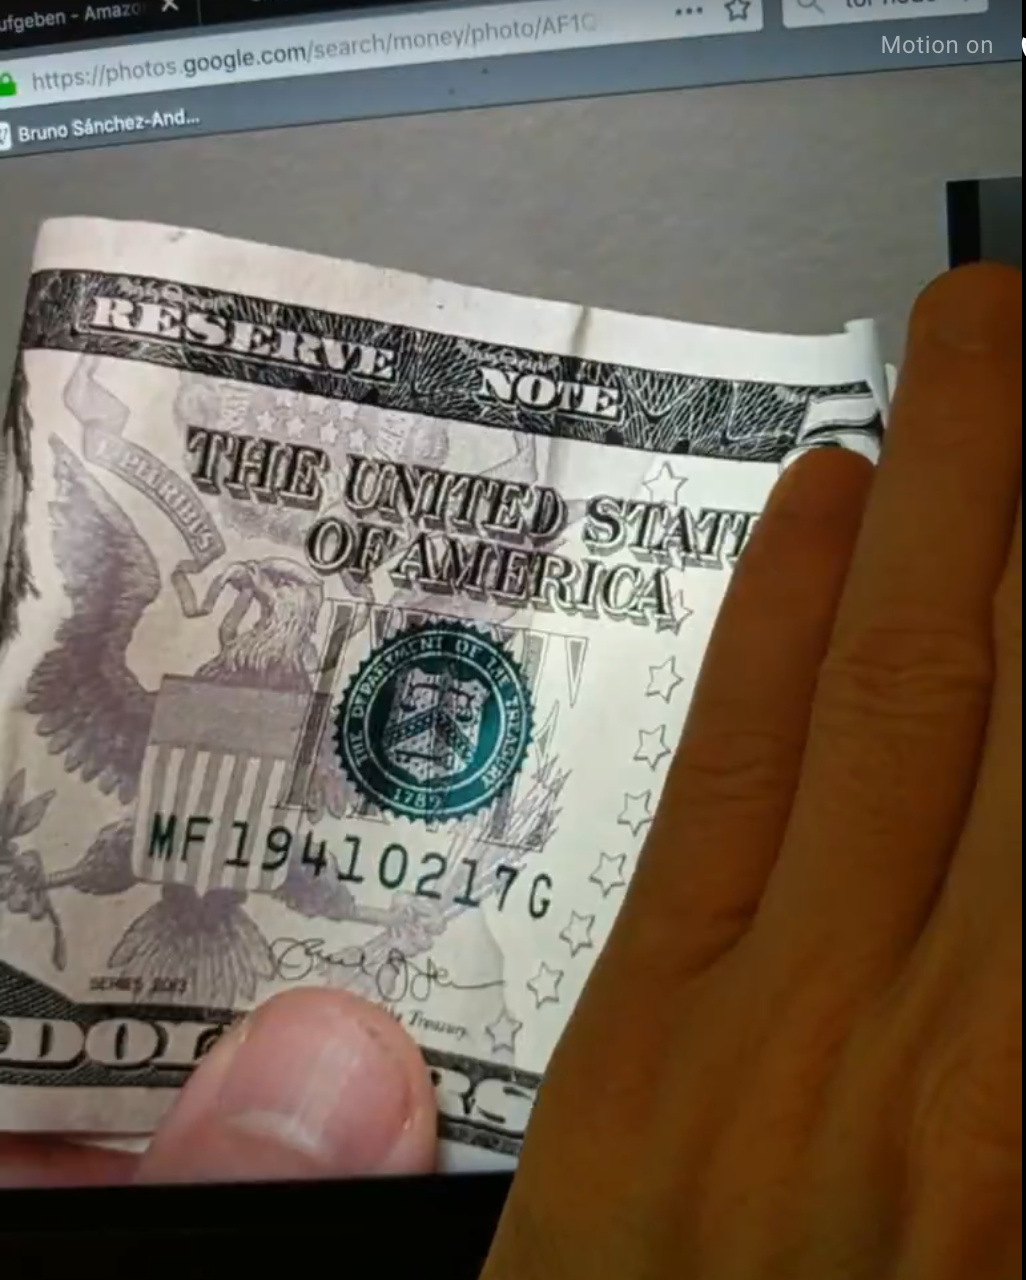
{‘probabilities’:
‘classes’: [‘1’, ‘10’, ‘100’, ‘20’, ‘200’, ‘5’, ‘50’, ‘500’, ‘euro’, ‘usd’]
‘softmax’: [‘0.00’, ‘0.00’, ‘0.01’, ‘0.04’, ‘0.01’, ‘0.20’, ‘0.00’, ‘0.00’, ‘0.00’, ‘99.73’],
‘output’: [’-544.18’, ‘-616.93’, ‘-347.05’, ‘-246.08’, ‘-430.36’, ‘-83.76’, ‘-550.20’, ‘-655.22’, ‘-535.67’, ‘537.59’],
‘summary’: [‘usd’],
‘others’: {‘5’: ‘0.20%’, ‘20’: ‘0.04%’, ‘100’: ‘0.01%’, ‘200’: ‘0.01%’}}

Only the activations for class “usd” positive (last on the array), but the softmax also correctly brings the class “5” up, together with some doubt about the class 20.

Deployment

This was the hard part.

Basically you need 2 parts. The client and the server.

  • The front-end is what people see, and what it does is give you a page to look at (I use Bootstrap for the UI), the code to select an image and finally displays the result. I added some code to downsample the image on the client using Javascript. The reason being that camera pictures are quite heavy nowadays and all the inference process needs is a 256 pixel image. These are the 11 lines of code to downsample on the client. Since these are all static code, I used github pages on the same repository.

  • The back-end is the one that receives the image, runs the inference code on our model, and returns the results. It’s the hard part of the hard part :slight_smile:, see below:

I first used Google Cloud Engine (GCE), as instructed here . My deployment code is here, and it includes code to upload and save a copy of the user images with the infered class, so I can check false classifications use them for further training.

Overall it was very easy to deploy. It basically creates a docker that deploys whatever code you need, and spins instances as needed. My problem was that the server is always running, actually 2 copies, at least. GCE is meant for very high scalability and response which is great, but it also meant I was paying all the time, even if no one is using it. I think it would have been 5-10$/month. If possible I wanted to deploy something that can remain online for long without paying much.

I decided to switch to AWS Lambda (course instructions here). The process looks more complicated, but it’s actually not that hard, and the huge benefit is that you only pay for use. Moreover, for the usage level, we will be well within the free tier (except the cost of keeping the model on S3, which is minimal). My code to deploy is here. Since you are deploying a Torchscript model, you just need PyTorch dependencies, and AWS has a nice docker file with all that you need. I had to add some libraries for formatting the output and logging and they were all there. That means your actual python code is minimal and you don’t need to bring fastai (On this thread Laura shared her deployment tricks IF you need to also bring fastai to the deployment).

UX, response time.

Inference of the classification takes .2 seconds roughly, which is really fast, but the overall time for the user from selecting the image to getting the result can be up to 30s, or even fail. The extra time is partly uploading the image from the client to the server, and downscaling it before uploading if needed. In real-life tests, the response time was roughly 1s, which is acceptable… except for the first times, it sometimes took up to 30s to respond for the first time. I think this is called “cold start”, as AWS pulls the Lambda from storage. To minimize the impact I added some code that triggers a ping to the server as soon as you load the client page. That ping just returns “pong” so it doesn’t consume much billing time, but it triggers AWS to get the lambda function ready for the real inference call.

Advocacy

This summer I have a small weekly section to talk about Impact Science on a spanish national radio, and we dedicated the last one to talk about Artifical Intelligence and the impact on employment and Society. I presented this tool as an example. You can listen to it (in Spanish) here (timestamp 2h31m) Julia en la Onda, Onda Cero.

Next steps

I’d love to get your feedback and ideas. Or if you try to replicate it have problems, let me know.

  • Re-train the model using a mobile-friendly like “MobileNetV2”
  • Re-train the model using as many currencies (and coins) as possible. The benefits of multi-category classification to detect the denomination should become visible as you add more currencies.
  • Add server code to upload a copy of the user images, as I did with the GCE deployment.
  • Smartphone apps with on-device inference.
21 Likes

I did a cucumber detection model that looks at English, Field and Lemon Cucumbers. It was fun to actually get the images on google. Because I used Google Colab I couldn’t use the widgets apparently, so I looked at the downloaded images on the Google drive to view and delete the bad ones.

1 Like

Hi!

Project Overview:

The project is about recognising shot-types/ shot-scale in cinematic images. The methodology is just disciplined application of Jeremy’s teachings. Nothing fancy there for fastai users. The fanciest part of the project is the dataset, which I spent a few months creating – this is where my domain knowledge as a film student came in handy.

There’s 8 different kinds of shots in cinema, and this project focuses on 6 of them:

  1. Extreme Wide Shot

  1. Long Shot

  1. Medium Shot

  1. Medium Close Up

  1. Close Up

  1. Extreme Close Up

There’s also some fascinating heatmaps which really gives us insight into why the model works well:


Blog Post:

I created an interactive website explaining the project. The blog post is aimed at different target audiences – curious readers, filmmakers/ film students, and of course, deep learning practitioners like ourselves. It assumes no background in deep learning, filmmaking, or math.

I’d highly appreciate you taking the time to read this and give me feedback:

https://rsomani95.github.io/ai-film-1.html


GitHub Repo:

I also released the pretrained model, code and validation set in this repo:


I’ve kept the training set private because there’s more work to be done there. I plan on releasing it once I think it’s diverse and robust enough to train a great model.


I hope that this project kicks off data-driven research into film. I think there’s immense potential here to create tools that could be invaluable to filmmakers. Anyways, there’s more on that in the blog post.

Personal Background:

I’d been a Python programmer for 2 months before starting the fastai course, and it’s been an absolute pleasure to be part of this community and learning all this very accessible material.
I came into the course with no conceptions of what deep learning could and couldn’t do, but after watching just two lectures it was clear that I could solve a problem that I’d been pondering upon for about a year!

Thank you for your time, and thank you to the fastai team for making this possible. I’m extremely grateful for this course.

10 Likes

Rather than creating a web app, I thought I would be a rebel and create an IOS app. It didn’t work.

TL;DR

Although I did use Watson vision cloud service in a learning IOS app (so maybe technically I did do the web app challenge).

I tried the same grass/weed training in coreML (apple’s offering), I didn’t get very good results, but I’m super excited in the possibility of creating something that works (transferring from a pytorch model into a coreml one). I’ve actually created a number of basic image recognition IOS apps in my lead up to this experiment, so based on my grass/weed coreML training, I decided not to proceed with this actual app (trust me).

1 Like

Wow!
Hi rsomani95 Hope you are well!
I though your post was excellent, both technically informative and highlighted how important it is for domain experts to become involved with “AI”.

I learned a fair bit about film making also! I never it was so nuanced as I only point and shoot when taking video with my mobile or Nikon.

Well done!

mrfabulous1 :smiley::smiley:

Hi @mrfabulous1, I am well, I hope you are too :slight_smile:.

Thanks for the feedback. I’m glad you felt that way, I was trying to cater to multiple audiences with the post, and it’s exciting to see it hit the spot.

I’m trying to reach out to people in the film industry and see if I can get to talk about this at workshops or something, help get filmmakers involved. It would be interesting to see if that could lead to a data building initiative (as the post said, datasets are the biggest missing block to widening application to film).

Filmmaking is so intricate! It boggles my mind when I try to analyse a scene. There’s always more stuff to find.

Thanks again :smiley:

1 Like

Excellent work here @Interogativ! Very well written. I went through the process with no hiccups at all.

Running headless, I cloned fastai course version 3, and pulled up the lesson 1 notebook, in my Jupyter notebook.

But when I try to import fastai, I get an error ‘fastai module not found’.

I’m hoping you might have some insight or suggestions for me? I ran through your instructions with absolutely no issues.

Thanks,

-Kalen

@kalensr did you just clone it? Or install it. If you just cloned it perhaps you need to navigate to the directory?

Before cloning the course repo, I followed Interogative’s instructions, including downloading his scripts to install pytorch and fastai, on a fresh flashed image (jeston-nano-sd-r32.2.1.zip).

After that was all setup, I then cloned the course repository, and within my jupyter notebook, I navigated to the lesson notebook from the repo. It loaded with no issues. Until I tried to import the fastai module.

Upgrade your fastai version to v1.0.57

!pip install fastai==1.0.57

1 Like

Good news… I re-ran the scripts to install pytorch and fastai, and everything is working perfectly now. Working through lesson 1. Thanks everyone for you quick support!

1 Like

Hi all,

I have recently started Fast.ai and have been interested in Machine Learning for a while now. My lesson two project aimed to tell the difference between two celebrities: Stormzy (Grime Musician) and Romelu Lukaku (Footballer). The two were famously mixed up on the front page of a UK newspaper (much to the annoyance of Stormzy).

both

I built a classifier on images from google images of the two and got an error of 2.6% with the confusion matrix shown below:

Confusion%20matrix

The real test however, was to see how the classifier performed on the image used on the front cover of the newspaper. Despite wearing a Manchester United track suit (the team Lukaku used to play for) the algorithm correctly identified this was in fact Stormzy as shown below:

Really enjoying the course so far!

11 Likes

So rather than doing something interesting as required in lesson 3 (like image segmentation), I thought I would put lesson 1’s resnet50 model on my iphone. I can say it does the inference on my Iphone SE pretty much instantaneously. It is a really fun task to get the pytorch model into coreml. I spent about 2 days doing it because there is lots of learning to do (and some trade offs).

I got a really good error rate as well…

5 Likes

Hello everyone.

I’m really new to the whole deep learning (and coding for that matter) thing. Thank you @jeremy for teaching in such a clear and concise way.
After playing with the Mnist dataset and getting to 99.571 accuracy on Kaggle, I decided to try my hand at making dark images brighter.
After working on this for a while and sort of getting it to work, I saw this: https://www.youtube.com/watch?v=bcZFQ3f26pA

My approach is a bit different though. I used a crappify function to darken the images randomly to 10-30% of their original brigthness and a Unet to reconstruct the images.
A big thank you to sgugger (sorry, I’m only allowd two mentions) and @kcturgutlu for discussing gradient accumulation, I gladly integrated your code :slight_smile:
Also I used the new RAdam optimizer (https://medium.com/@lessw/new-state-of-the-art-ai-optimizer-rectified-adam-radam-5d854730807b) for training.

Long story short, here’s my project:

I was playing around with the Idea of adding a Gan to the end, to generate better results, so other than making the code a lot neater, that’s my next step.

I’m more than happy to listen to sugestions on making this better :slight_smile:
Have a great day!
Stefan

5 Likes

Hi,

I did an attempt to apply Lesson 1 and 2 to the RESISC45 ( RESISC45 (Northwestern Polytechnical University NWPU, Mar 2017) dataset and compare the results to the paper for the dataset - Remote Sensing Image Scene Classification: Benchmark and State of the Art (Cheng et al. 2017).

Link for the paper: https://arxiv.org/abs/1703.00121

The results table in the paper says that highest accuracy achieved at that time was 90.36% (there is a possibility that I have misread it and actual highest accuracy is greater).
image

Attempted to apply ResNet 34 with bs of 64first, and the final error rate after unfreezing and retraining earlier layers was around 0.079 which suggests accuracy of 92.01% .
image
Then attempted to apply ResNet 50 with bs of 32 and got error rate of around 0.073 which suggests accuracy of 92.7% .
image
Cases that confused the model seem difficult enough.
image
One curious thing was the fact that the number of times when some of the most confusing pairs “fooled” the model is greater for Resent 50 compared to Resnet 34. Was wondering if this is due to the smaller bs used in Resnet 50 or just Resnet 34 is more suitable for this kind of problem?

Resnet 34 most confused:
image
Resnet 50 most confused:
image
Was thinking to write something on Medium (a first for me), together with some more text related to the data and with sharing the notebook too (as soon as I figure out how to do this). Thought to share the above with people, open for any suggestions/opinions.

4 Likes