My aim is to easily examine the source code of fastai, PyTorch, and Python libraries, and to trace execution of the Jupyter notebook lessons, as in debug. This is all local on Ubuntu 16.04.
What I have I tried:
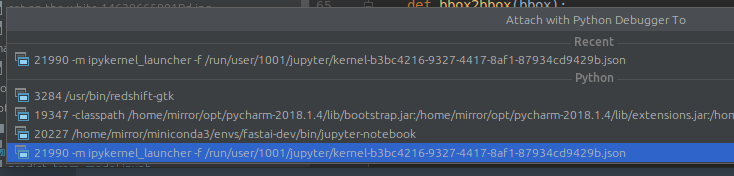
Attach to a running notebook using Run->Attach to Local Process in order to use the debugger. The notebook server is listed, but trying to attach hangs for 20s and reports “Process finished with exit code 0
Server stopped.”
I can open Lesson1 in PyCharm and execute cells. But PyCharm fails on importing matplotlib, numpy, etc.
I know how to manually install all the needed packages. However, there’s must be a way to tell PyCharm where they were already installed for use by the fastai notebooks. Also, I let PyCharm “fix” a problem by downloading jupyter again.
Can someone please help me do this setup correctly? I am in over my head with the complexities of configuration.
I tried to do this but with pycharm on my local laptop and attaching to a remote interpreter on PaperSpace.
wasn’t fun. the notebook renderer in pycharm was pretty buggy and it seemed to forget the url to connect to the interpreter.
what I ended up doing is just browsing and modifying .py files in pycharm. and have it connect to the remote server so I can add print statements in pycharm and have it automatically upload to PaperSpace.
For debugging, I haven’t found a good ide solution yet. but using ipdb over jupyter console is a pretty good compromise. the only thing that would be better with an IDE is easy breakpoint toggling.
Hi Patty. It has been a number of months, but I will try to retrieve the steps from my current setup.
First, make a File->New Project. Mine was initially set to ~/fastai/courses/dl1. At this point, the dialog wants a Project Interpreter. Choose Existing Interpreter, …, Conda Environment, …, Select Python Interpreter.
Here, mine is set to ~anaconda3/envs/fastai/bin/python
I hesitate because I recall that instead of selecting the interpreter while creating the project, I went next to File->Settings->Project:dl1->Project Interpreter. Then in the popup or in “Show All…” that interpreter was already listed to be simply selected. And my philosophy when using complex systems I don’t understand is to let the automatic process do it, rather than risk messing something up manually. Good luck!
A couple of notes…
Pycharm will open a Jupyter notebook and display it, but it won’t run or debug. Furthermore, it will damage the notebook when automatically resaving any edits. Then the notebook no longer opens in Jupyter. Whoops!
What I do is, from inside the notebooks, first clear all output, and File->Download As->Python(.py). Then work in PyCharm with that copy.
The Jupyter download is pretty half-baked, messing up comments and leaving a bunch of “In[] :” to clean up.
You will have to remove the Jupyter magic commands and put print() around any bare expressions you’d like to see in the console.
I think I had to tweak the inline plotting commands, The upside is that plots end up in separate windows, where they can be examined in detail.
And you can now make use of source code navigation, debugging, and tracing.
HTH you to get started. Mostly I have used PyCharm to explore fastai code and to run my own simple experiments.
If anyone has found a way to invoke the PyCharm or VS Code debugger/navigation from within a Jupyter notebook, I would love to hear about it.
Thanks for writing all that out! unfortunately im still stuck. so i have the the fastai environment set up to use with jupyter notebook, but all of the locations and project interpreters to choose from in pycharm start with C: and not ~. maybe theres something easy, but i cant figure out how to get pycharm to look somewhere besides C: or how to go from C: to the fastai environment. maybe its because of where i had pycharm installed? thanks for your help!
Hmm, you are working in the Windows world, and my experience is with Linux.
The tilde represents the home folder, which in Windows is usually C:\Users\yourName. But I am neither a Windows expert nor know where Anaconda, fastai, and PyCharm are installed there.
I suggest looking for the corresponding anaconda3 folder mentioned above, either in C:, or in your home folder. Beyond that, there’s google and any Windows gurus on this forum. Sorry i can’t help more in this case.
So i tried setting it up through a conda environment and i located it through C:. it let me apply the location and conda executable and then it gave me details that said it cant be run because its not a Win32 program. could this be because its set up through the Ubuntu subsytem? it wont let me get to python by setting it up as a virtualenv or a system interpreter.
This problem is completely outside my expertise. However, there is a whole forum area devoted to Windows installation. Perhaps someone there could help.
My own solution was to convert my Windows installation to dual boot Ubuntu/Windows. (There are many tutorials online on how to make this conversion.) Ubuntu has proven to be trouble free; besides, more students are using Linux, therefore more support and advice is available.
figured it out, i just put the fastai repo in my user folder and then a python.exe in the fastai in fastai folder. then in pycharm the location for the project can be where ever, and then I chose existing interpreter as the python.exe from C:\Users\me\fastai\fastai\python.exe
and it automatically loads in all the libraries/dependencies for fastai into pycharm
and i went through the very beginning of lesson 1 (the imports, torch.cuda.is_available(), and torch.backends.cudnn.enabled) without any errors and they both returned True
A trick i use to overcome pycharm .ipynb corruption issues is to rysnc my source code directory to a copy of it just for pycharm. I can then jump to source from within the pycharm nb editor. Just need to run rsync each time you change original notebook.
If you are using linux it would be more efficient to use a symlink instead of copying the repo. The link points back to where the real install of fastai’s packages are. For instance, I have a pyCharm project where fastai’s stuff is 3 directories above me. At a command prompt, I go in the project directory and type
ln …/…/…/fastai ./fastai
This creates a link back to the fastai source with no copying.
Presto! Everything works!
tested on Ubuntu 16.04 LTS, PyCharm 2018.3 Pro(me) PyCharm Community(@Pomo). Python 3.6.x. fast-ai 1.0.28.dev0(me). My opinion about other Python/OS usage here
PyCharm and Jupyter must use the same python environment (not sure about it, but I use this setup)
move code which you want to debug to separate module
start Jupyter server in terminal window:
cd <project dir>
source activate <env>
jupyter notebook
Thanks so much for this! It works perfectly in same configuration with PyCharm Community after doing the connection error fix.
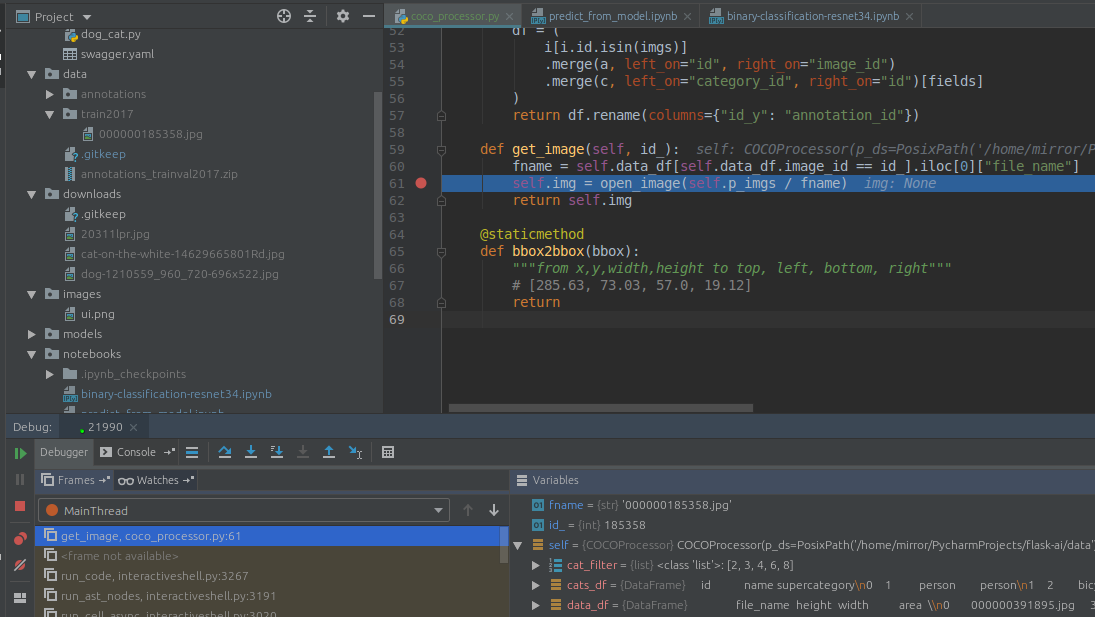
To be more specific, you can create an empty project with its Project Interpreter set to the desired fastai conda environment. Then set breakpoints at External Libraries->Python 3.6->site-packages->fastai anywhere. Attach to the Jupyter process as @elruso shows above.
Then as notebook cells are run, PyCharm will break and allow tracing through the fastai library. In this simple use, there’s no need to place code into a separate module.
What a relief - Jupyter notebook with a fully functional debugger and source navigator.
Unfortunately, it seems with every new Python version, seems this would not work. And needs several months to debug it and make it work again. Pycharm is relying on this open source project.
Yep. I tested it on my older fastai 0.7 with Python 3.6.6 environment (Win 10) and it worked without any issue. And as you said, I can create a python file and call a simple function inside this file that has a breakpoint, and it will stop right there if I call it from a jupyter cell. Not necessary to be part of fastai library.
It seems I have to wait for Python 3.7 support. The new fastai v1 upgraded my Python 3.6 to Python 3.7.
16.04 LTS Python 3.6.x CAVEAT I use compiled from the source OpenCV for my needs. I you can work inside the world of precompiled packages this opinion can be irrelevant to you
About Ubuntu 18.04. I’m not recommend to use 18.04, you’ll face in dependences hell.
About Python 3.7. I had problems with libs, I would have waited while all underling libraries will start to support it before switching to it. Currently one will got a lot of headache and no benefits from 3.7.
About Windows. IMO it’s a bad idea to use it. If you will need to compile something from source you’ll enter in the house of pain