Platform: Colab ✅

I found out how to add conda in colabs:

!wget -c https://repo.continuum.io/archive/Anaconda3-5.1.0-Linux-x86_64.sh
!chmod +x Anaconda3-5.1.0-Linux-x86_64.sh
!bash ./Anaconda3-5.1.0-Linux-x86_64.sh -b -f -p /usr/local
!conda install -y --prefix /usr/local -c pytorch
!conda install -c fastai fastai

If you want just fast.ai, you could use this:

!curl https://course-v3.fast.ai/setup/colab | bash

2 Likes

With the new course-v3 release, running the notebook tutorial will hit an error on the printing images example. Just update the line with the image path to:

Image.open('course-v3/nbs/dl1/images/notebook_tutorial/cat_example.jpg')

How do you figure this out on your own?

If you’re like me and using Colab for the first time, you’re still learning how it works. On the left-hand side is an arrow that expands out and shows Table of Contents, Code Snippets, and Files. Click on Files and you’ll see the course-v3 repo. You can dig into this to find the example image file; just use this full path to open the image.

4 Likes

(SOLVED)

Hey all,

I would really appreciate some help with setting up my data formats.

First, I have followed the instructions to configure the Colab environment, as per described here.

Then, I have successfully uploaded my own sets of images from my local computer to Colab (step 1 in my jpg below). My folder is organized like so:

ysl_or_bur
    | -- ysl
          |-- image1 
          |-- image2
              ...
    | -- burberry
          |-- image1 
          |-- image2
              ...

However, I have not been able to use untar_data or any other functions from the “Datasets” chapter of the documentation to read in the data and to label them.

  • I have also tried unzipping the file inside Colab and setting the path manually but without any success:

path = '/content/ysl_or_bur/'

Thanks for your help.
Rai


Solution:

Step 1: Organize the folder containing the images as follow:

ysl_or_bur
        | -- train
              |-- ysl
              |-- burberry
                  ...
        | -- valid
              |-- ysl
              |-- burberry
                  ...

Step 2: Zip the folder, upload it in Colab and unzip it. Then move the unzipped folder into the data directory.

Step 3: set the path using the function Path()

Final step: from here I was able to pick up Lesson’s 1 notebook when the data is loaded into ImageDataBunch(). :smile:

1 Like

Hey, I just started the deep learning course. I am using the colab platform. I have set it up according to the instructions given. The doc function isnt working here.
I have many doubts. Can someone please explain the entire process of setting up a new classifier. After creating a new dataset, how do I connect it to my notebook?
Do I have to pull something from the github repo?If so, can someone please explain that too?
I am very confused and lost as to what to do to create my own classifier.

Hi @Dhyey_1997 ,

Regarding your question about the doc function, the question has already been asked a couple times. Please check the answer here.

Regarding your other questions, I am still trying to solve them myself as I am unable to load my own dataset into some of fastai’s pre-processing functions, as per my post above.

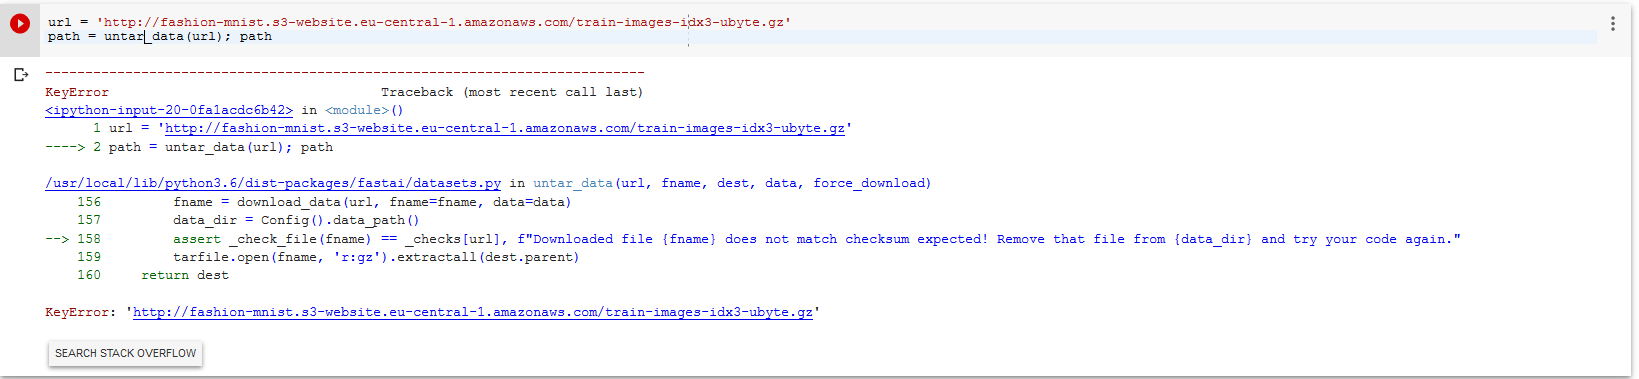
But I am currently trying to feed another dataset (Fashion MNIST) into untar_data, but have been unsucessful so far.
I have read on the forum that the download link need to ends with a ‘tgz’ or ‘gz’, which mine has but I get an error. :disappointed_relieved:

Please keep in touch if you are able to solve your issues.
And thanks in advance if anyone could help us out.

Hi community! I am using
!curl https://course.fast.ai/setup/colab | bash
And getting the data and models in /content/ folder.
Now when I open another notebook, I can’t see any of them, although there is increase in memory used of my drive. So where do the data and model went?
Also I saved the model name as stage-1 but there was no model named like this.
What could be the reason and solution to this?

I cannot import fastai.vision on Google colab with GPU. If I change the runtime type to TPU, it works. I tried using !pip install fastai but it still didnt work. Can anyone help me?

1 Like

If your session becomes interrupted:

I ran into a problem where reconnecting just kept saying “Busy” and trying to execute anything would just spin.

If this happens, I find it easier to terminate the session (Runtime -> Manage Sessions -> Terminate) and re-open the notebook. For me, reconnecting within the running notebook just doesn’t seem to work correctly.

@gamo I have just started the deep learning course. Can you help me with:

  1. What to do after watching the first lecture and running the notebook on colab?
  2. Should I watch the 2 lecture first and then create my own image classifier
  3. Also, a step by step explanation of what to do to create my own classifier
  4. Do I need to clone the repo on my own laptop?
    I am feeling really lost and over whelmed. If any one could please help me out.

Jeremy’s way of teaching is very much “learn as you go” and keep coding to learn more, if you feel like you are stuck then you are better off moving on to the next lecture. The later lectures and notebooks will give you more knowledge of how to create different classifiers with fastai and more information about ml in general.
When you have gone through the entire course then go back and try to implement what you want. It is also good to watch the lecture videos again, there is a lot of information that will be easier to understand the second time when you have gone through the entire course once.

It never hurts to have a local copy of the repo, but it is not required, depends on if you have a use for it. You should always have a repo of the notebooks and any changes you make and push them to your own github/lab account. Don’t lose your code and have it all in one location.

@Dhyey_1997 Suggest to watch the first part of Lecture 2 as this goes into some detail about how to create your own image classifier. As you may have seen, Colab allows you to save copies of your notebooks to google drive. However, it does not appear to support use of ipywidgits so the tool to remove images did not work (for me at least).

I am trying to use Colab but it is very slow, compared to what’s shown in the videos, as well as it is giving higher error rates. What could be the reasons for that?

I noticed the same thing. I think one half of a colab K80 is simply slower than Jeremy’s cloud GPU.

Getting numpy version error while running setup script in colab:

!curl -s https://course.fast.ai/setup/colab | bash
Updating fastai… spacy 2.0.18 has requirement numpy>=1.15.0, but you’ll have numpy 1.14.6 which is incompatible. Done.

Not sure this will cause any issue while going with the lectures. How to resolve this?

The colab K80, half of it, will be about 4 times slower than the gpu setup Jeremy uses in the lectures.

1 Like

Is there an issue with the ImageCleaner when using colab? I’m trying to work through lecture 2, and when cleaning up my images it gets stuck, and if I press the stop button next to the code I get the text

Restart runtime

The executing code is not responding to interrupts. Would you like to try restarting the runtime? Runtime state including all local variables will be lost.
CANCEL YES

41

When I try to run the snippet it runs for a while, then “Runtime Disconnected” shows for a second or so, before it reconnects and just stands like that forever.

Anyone else experienced this?

5 Likes

I got the same error but was able to run the first class without a problem. As you said later on it might be an issue but we can always upgrade Numpy.

Colab does not appear to support use of ipywidgits so I suspect this is why ImageCleaner does not work).

2 Likes

thanks @raimanu-ds this seems like what i need to do.