Platform: Colab ✅

Any questions related to the free Google Colab service can be posted here.

Reference to course announcement on this.

Creating your own Jupyter session from Colab for fastai version 1

Big Warning: This is experimental, not outspokenly recommended, and could be patched at a later date by Google, please use at your own discretion

  1. Create an account and generate an authorization code here
  2. Add the two following cells into your Colab notebook of choice:
import subprocess
def setup_colab(tok):
  subprocess.call(['wget', 'http://tiny.cc/80jwlz', '-O', 'bash.sh'])
  subprocess.call(['sh', 'bash.sh'])
  get_ipython().system_raw(f'./ngrok authtoken {tok} && ./ngrok http --log=stdout 8888 > ngrok.log &')
  subprocess.call(['wget', 'http://tiny.cc/qrjwlz', '-O', 'bash2.sh'])
  subprocess.call(['sh', 'bash2.sh'])
def end_session():
  subprocess.call(['wget', 'https://tinyurl.com/wxhs52a', '-O', 'bash3.sh'])
  subprocess.call(['sh', 'bash3.sh'])
  1. To spin up your server, run setup_colab and pass in your server token.
  2. Navigate to the “Status” page here and your server should show up. If two do, choose the first
    You now have a working Native Jupyter Environemnt (so widgets work etc) off of Colab. (it may take a few minutes before it shows up, its dependent on how long the cell takes to run)

MAKE SURE to end the session when you are done by running end_session() so the server does not run forever!

Using PyTorch 1.6 in Colab [1]

To use PyTorch 1.6 in colab, you need to do the following (and when installing fastai):

!wget 'torch-1.6.0+cu101-cp36-cp36m-linux_x86_64.whl'
!pip install 'torch-1.6.0+cu101-cp36-cp36m-linux_x86_64.whl'

(then of course pip install fastai2 , etc)

If you’re running CUDA 10.2 then you will need to replace the whl link (and filename) with:

https://download.pytorch.org/whl/cu102/torch-1.6.0-cp36-cp36m-linux_x86_64.whl and torch-1.6.0-cp36-cp36m-linux_x86_64.whl

FAQ

  • How can I resolve the issue Tesla T4 with CUDA capability sm_75 is not compatible with the current PyTorch installation.
/usr/local/lib/python3.6/dist-packages/torch/cuda/__init__.py:125: UserWarning: 
Tesla T4 with CUDA capability sm_75 is not compatible with the current PyTorch installation.
The current PyTorch install supports CUDA capabilities sm_37 sm_50 sm_60 sm_70.
If you want to use the Tesla T4 GPU with PyTorch, please check the instructions at https://pytorch.org/get-started/locally/

Using --no-cache-dir as additional argument would fix the issue as described here

Example
pip install --no-cache-dir torch==1.6.0+cu101 torchvision==0.7.0+cu101 -f https://download.pytorch.org/whl/torch_stable.html


References

[1] Platform: Colab ✅

Note that this is a forum wiki thread, so you all can edit this post to add/change/organize info to help make it better! To edit, click on the little pencil icon at the bottom of this post. Here’s a pic of what to look for:

discourse_edit_btn


17 Likes

ConvLearner vs Learner.create_cnn
In Collab ConvLearner works, instead of Learner.create_cnn. Fastai versioning issue?

1 Like

Yes getting attribute not found error

If you conda update now that should be fixed.

3 Likes

Previously, Convlearner worked perfectly on Colab, but now I get this error : name ‘ConvLearner’ is not defined. Is there any change in the library?

1 Like

Please refer to this guide to setup Colab with the latest fastai library.

Fastai library was updated (i think yesterday) and Convlearner() is replaced with create_cnn().

1 Like

Yes - please see the official updates topic:

4 Likes

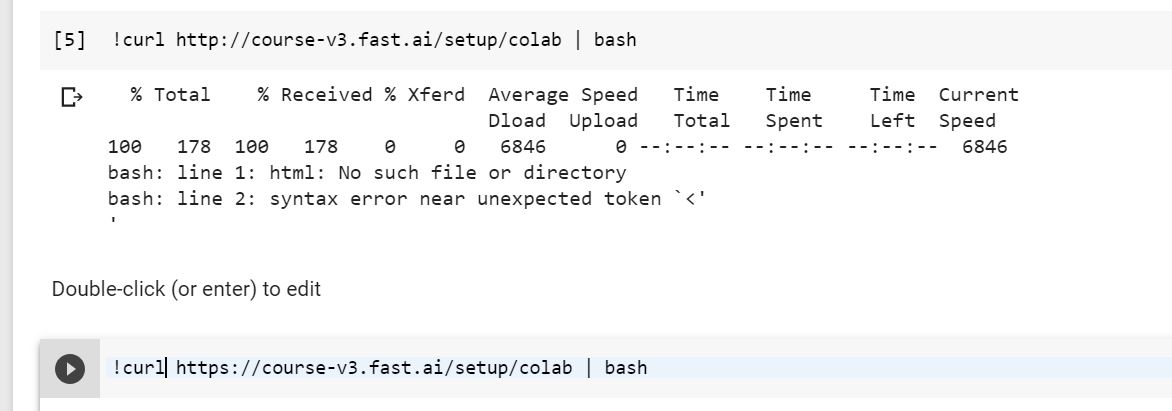
I confronted a new problem in setting the colab. This code " !curl http://course-v3.fast.ai/setup/colab | bash "does not work anymore for me,and I get this error
bash: line 2: syntax error near unexpected token `<’

1 Like

Can you please screen shot. I think this syntax error. As this works for me.

Can you please screen shot. I think this syntax error. As this works for me.

1 Like

Thanks. I think I found the problem. It was due to using http instead of https.

4 Likes

Hi,
You can install fast ai with the following commands in Colab

!pip install torch_nightly -f https://download.pytorch.org/whl/nightly/cu92/torch_nightly.html
!pip install fastai

2 Likes

Hi,
I want to know a better understanding of this animated training of ResNet34 model in Colab
1.What GPU does colab use?
2.What is that number 92 denote during the training?


Here is another image I’m attaching

1.Why does my losses are higher or varies significantly compared to the one that was shown on the tutorial?
2. Is training time an indication of GPU or batch size?

5 Likes
  1. Colab uses a nvidia K80 gpu (you only get half of it though)

  2. The number 92 is the number of training examples or batches in the training set, 74/92 tells you that it has process 74 of 92 batches.

  3. Depending on how you initialize the model, and random seed, the databunch and learner will/can use different random numbers and give different results. Alternatively you have forgotten to run a cell in the notebook or there is something wrong with your code.

  4. As far as a better GPU gives you faster processing time and the “right” batch size allows the GPU not to waste time loading partial data, yes to both.

6 Likes

!curl https://course-v3.fast.ai/setup/colab | bash
Will I have to run this command every time I start working on new jupyter notebook, if I am using Colab?

2 Likes

Is there a way to install jupyter notebook extensions in the colab environment ?

I’ve been using https://github.com/lambdalisue/jupyter-vim-binding when experimenting with local notebooks. Wondering if someone has figured out a way to enable this or any other notebook extension.

i think so

1 Like

Yes, and everytime you reset your runtime.

You will also lose any data or files on the instance between sessions, so backing up your project data and models is necessary.

1 Like

how do i back up my project data and models?

go to file -> save a copy in drive