Thread to implement the FC-DenseNet model introduced in One Hundred Layers Tiramisu: Fully Convolutional DenseNets for Semantic Segmentation. This post is a wiki. Please make changes as your understanding improves.
TODO list
- Understand and implement densenet (Jeremy)
- Keras
- Pytorch
- Benchmark it (Brendan - pytorch)
- CIFAR10
- Run existing implementations, to find accuracy at epoch
- Densenet versions (Kent)
- Regular
- B/C (not mentioned in tiramisu)
- Benchmark tiramisu (Kelvin)
- Get theano with libgpuarray working
- Install lasagne
- Run on camvid
- Understand and implement tiramisu (pytorch)
- minimal architecture & dataset
- add skip connections & increase dataset
- keras? (yad)
Key Links
Github
I created a github repo for us to collaborate. I initialized it with boilerplate code from the PyTorch DenseNet implementation. It should be straightforward from here to modify this code to recreate Tiramisu.
Related Papers
- DenseNet - Paper, PyTorch, Author Impl
- ResNet - Paper, Pytorch
- Fully Convolutional Networks for Semantic Segmentation - Paper, Caffe
- U-Net - Paper, Keras, Tensorflow
Key Contributions
- Extended DenseNet architecture to image segmentation
- Introduced clever up-sampling technique to improve trainability/performance
Datasets
These links are old, data here is missing or still in video format. There are newer alternatives like PASAL VOC and MSCOCO, but the authors don’t provide benchmarks for these.
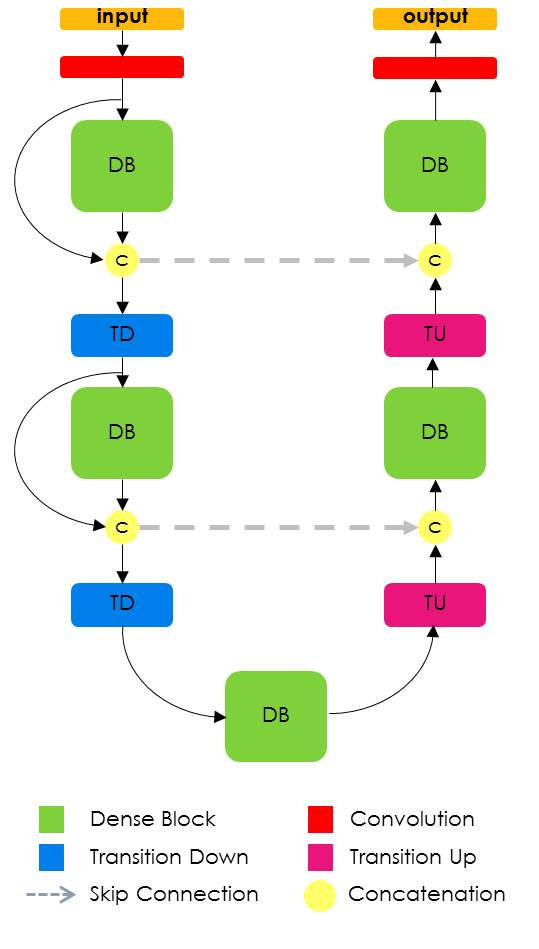
Architecture
FirstConvLayer
- 3x3 Conv2D (pad=, stride=, in_chans=3, out_chans=48)
DenseLayer
- BatchNorm
- ReLU
- 3x3 Conv2d (pad=, stride=, in_chans=, out_chans=) - “no resolution loss” - padding included
- Dropout (.2)
DenseBlock
- Input = FirstConvLayer, TransitionDown, or TransitionUp
- Loop to create L DenseLayers (L=n_layers)
- On TransitionDown we Concat(Input, FinalDenseLayerActivation)
- On TransitionUp we do not Concat with input, instead pass FinalDenseLayerActivation to TransitionUp block
TransitionDown
- BatchNorm
- ReLU
- 1x1 Conv2D (pad=, stride=, in_chans=, out_chans=)
- Dropout (0.2)
- 2x2 MaxPooling
Bottleneck
- DenseBlock (15 layers)
TransitionUp
- 3x3 Transposed Convolution (pad=, stride=2, in_chans=, out_chans=)
- Concat(PreviousDenseBlock, SkipConnection) - from cooresponding DenseBlock on transition down
FinalBlock
- 1x1 Conv2d (pad=, stride=, in_chans=256, out_chans=n_classes)
- Softmax
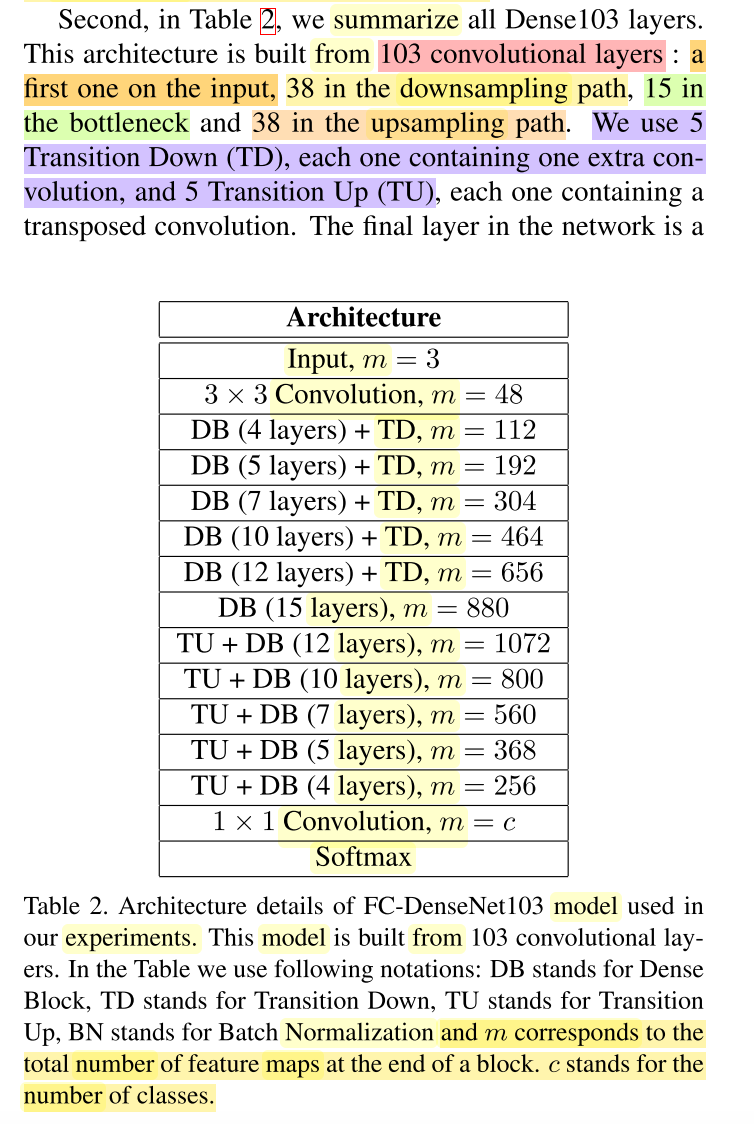
FCDenseNet103 Architecture
- input (in_chans=3 for RGB)
- 3x3 ConvLayer (out_chans=48)
- DB (4 layers) + TD
- DB (5 layers) + TD
- DB (7 layers) + TD
- DB (10 layers) + TD
- DB (12 layers) + TD
- Bottleneck (15 layers)
- TU + DB (12 layers)
- TU + DB (10 layers)
- TU + DB (7 layers)
- TU + DB (5 layers)
- TU + DB (4 layers)
- 1x1 ConvLayer (out_chans=n_classes) n_classes=11 for CamVid
- Softmax
Training
Hyperparameters
- WeightInitialization = HeUniform
- Optimizer = RMSProp
- LR = .001 with exponential decay of 0.995 after each epoch
- Data Augmentation = Random Crops, Vertical Flips
- ValidationSet with early stopping based on IoU or MeanAccuracy with patience of 100 (50 during finetuning)
- WeightDecay = .0001
- Finetune with full-size images, LR = .0001
- Dropout = 0.2
- BatchNorm “we use current batch stats at training, validation, and test time”
CamVid
- TrainingSet = 367 frames
- ValidationSet = 101 frames
- TestSet = 233 frames
- Images of resolution 360x480
- Images random cropped to 224x224 for training
- FullRes images used for finetuning
- NumberOfClasses = 11 (output)
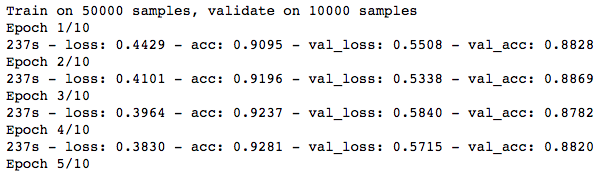
- BatchSize = 3
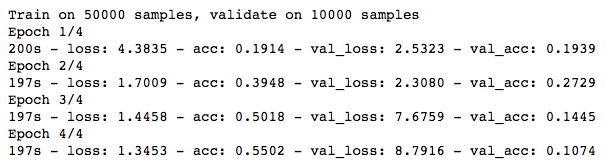
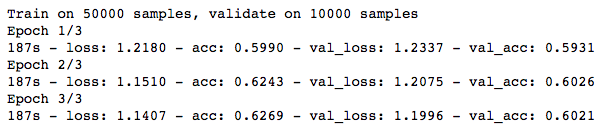
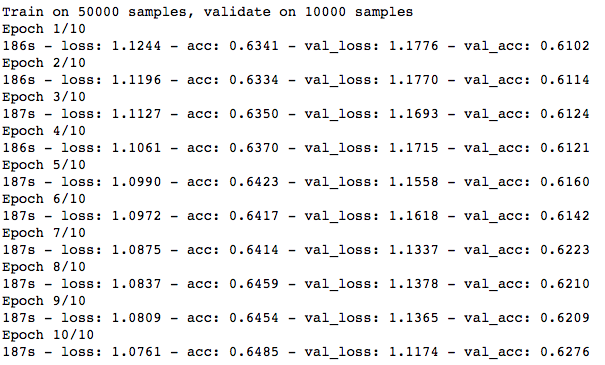
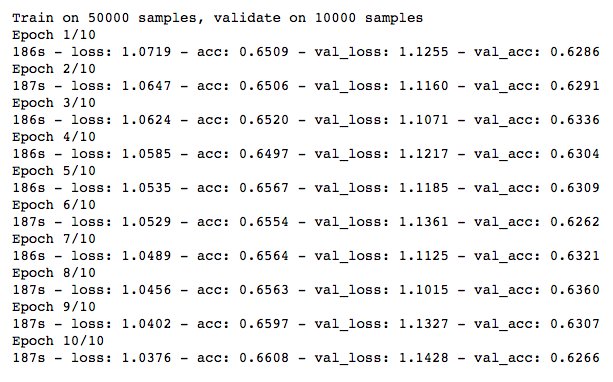
- Epochs = ??
FCDenseNet103
- GrowthRate = 16 (k, number of filters to each denselayer adds to the ever-growing concatenated output)
- No pretraining
FCDenseNet56
- GrowthRate (k) = 12
- 4 layers per dense block
- 1 Conv Layer
- 5 DenseBlocks Downsample (20 layers)
- 5 TransitionDown
- 4 Bottleneck layers
- 5 Dense Blocks Upsample (20 layers)
- 5 TransitionUp
- 1 Conv Layer
- 1 Softmax layer (doesn’t count)
- 56 Total layers
Resources
- CS231 Object Detection Slides and Video
- CS231 Segementation Slides and Video
- Convolutional Arithmetic Tutorial