Have you tried Mish + Ranger with EfficientNet? I’ve been really impressed by it, much more stable to train than using swish + relu. There is a copy of the lukemelas EfficientNet code with Mish in my repo (I literally just swapped out swish for mish code everywhere I saw it)
3 Likes
OK, I’ve now removed the nasty hack required to get mish-cuda to work. I’ve just copied over the file I was using from PyTorch and replaced the private function usage, added a test for overlapping tensors which was what the function was about and they seem to work fine. I think I probably have a reasonable chance of getting PyTorch to remove this function in fact, as it is an old legacy function that no longer seems required (and I spotted a fairly minor bug around it’s use as well). So I’ll look to do that, but local copy should be fine for the moment (wouldn’t expect major updates to it across PyTorch versions).
So can just install from master now. Still PyTorch 1.2 only, but will look at that.
I also ran the CIFAR-10 squeezenet tests from the original repo which seem to be the most analysed. I didn’t notice that while stats on the front page are for 50 epochs the script does 100, so I’ve done 20 runs of 100 epochs (just ran it overnight so no problem with the extra time). On 50 epochs I get mean=87.78%, std=0.382, 95% CI of 87.68-87.96%. On 100 epochs it was mean=88.21%, std=0.322, CI=88.05-88.36%.
Here’s a graph of the 95% CI per epoch vs. the one run in the notebook (I’ve set y limits to show better detail so not showing a little of the ramp up here):
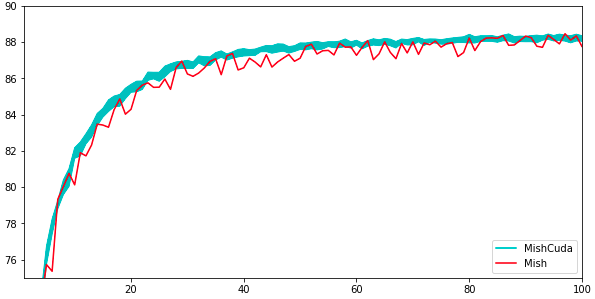
So, no sign of any issues, right in line with PT version.
I found some really nice information on implementing TorchScript operators and Autograd functions in C++, so I’ll have a go at updating it based on that. Then it should be usable with JIT and not need the python autograd wrapper (likely saving a few us of python call overhead). Then it should be largely feature complete and can look at things like packaging I’ll also look at some optimisations, especially on the CPU side.
8 Likes
Wow, @TomB what an amazing job you are doing! 
I know nothing about the cuda magic, so it’s great to have a cuda magician who does! Congratulations!
1 Like
@TomB you’re doing an amazing work. Thank You! Also what was the per epoch time you recorded on the Squeeze Net runs?
Additionally, there is no specific reason I chose Squeeze Net for all the analysis but it was fast to train and worked very well with most of the activation functions.
Further, I have put up the 2nd draft of Mish on arXiv, it can be found here - https://arxiv.org/abs/1908.08681
Can someone point me towards implementing a custom layer in TF Core with the new TF 2.0.
The tutorial here uses Keras Backend https://www.tensorflow.org/tutorials/customization/custom_layers#implementing_custom_layers
Correct me if I’m wrong - In TF 2.0, is Keras the default backend for the core TF?
I want to see if TF 2.0 core will have a different implementation for Mish as compared to the Keras backend.
Additionally, I have a TF-Keras backend implementation for Mish:
“”“Tensorflow-Keras Implementation of Mish”""
## Import Necessary Modules
import tensorflow as tf
from tensorflow.keras.layers import Activation
from tensorflow.keras.utils.generic_utils import get_custom_objects

class Mish(Activation):
    '''
    Mish Activation Function.
    .. math::
        mish(x) = x * tanh(softplus(x)) = x * tanh(ln(1 + e^{x}))
    Shape:
        - Input: Arbitrary. Use the keyword argument `input_shape`
        (tuple of integers, does not include the samples axis)
        when using this layer as the first layer in a model.
        - Output: Same shape as the input.
    Examples:
        >>> X = Activation('Mish', name="conv1_act")(X_input)
    '''

def __init__(self, activation, **kwargs):
    super(Mish, self).__init__(activation, **kwargs)
    self.__name__ = 'Mish'


def mish(inputs):
return inputs * tf.math.tanh(tf.math.softplus(inputs))

get_custom_objects().update({'Mish': Mish(mish)})
I also have another implementation in my python package called Echo which can be found here: https://github.com/digantamisra98/Echo
class Mish(Layer):
'''
Mish Activation Function.
.. math::
    mish(x) = x * tanh(softplus(x)) = x * tanh(ln(1 + e^{x}))
Plot:
.. figure::  _static/mish.png
    :align:   center
Shape:
    - Input: Arbitrary. Use the keyword argument `input_shape`
    (tuple of integers, does not include the samples axis)
    when using this layer as the first layer in a model.
    - Output: Same shape as the input.
References:
    - See Mish Repository:
        https://github.com/digantamisra98/Mish
'''

def __init__(self):
    super(Mish, self).__init__()

def call(self, inputs):
    return inputs * tf.math.tanh(tf.math.softplus(inputs))
Additionally the Keras version on Mish reporistory is:
# Keras Implementation of Mish Activation Function.

# Import Necessary Modules.
from __future__ import absolute_import
from __future__ import division
from __future__ import print_function
from keras.layers import Activation
from keras.utils.generic_utils import get_custom_objects
import keras.backend as K

class Mish(Activation):
    '''
    Mish Activation Function.
    .. math::
        mish(x) = x * tanh(softplus(x)) = x * tanh(ln(1 + e^{x}))
    Shape:
        - Input: Arbitrary. Use the keyword argument `input_shape`
        (tuple of integers, does not include the samples axis)
        when using this layer as the first layer in a model.
        - Output: Same shape as the input.
    Examples:
        >>> X = Activation('Mish', name="conv1_act")(X_input)
    '''

    def __init__(self, activation, **kwargs):
        super(Mish, self).__init__(activation, **kwargs)
        self.__name__ = 'Mish'


def mish(x):
    return x*K.tanh(K.softplus(x))

get_custom_objects().update({'Mish': Mish(mish)})
This Keras version is bit different from the Keras implementation in Echo which is as follows:
class Mish(Layer):
    '''
    Mish Activation Function.
    .. math::
        mish(x) = x * tanh(softplus(x)) = x * tanh(ln(1 + e^{x}))
    Plot:
    .. figure::  _static/mish.png
        :align:   center
    Shape:
        - Input: Arbitrary. Use the keyword argument `input_shape`
        (tuple of integers, does not include the samples axis)
        when using this layer as the first layer in a model.
        - Output: Same shape as the input.
    Examples:
        >>> X_input = Input(input_shape)
        >>> X = Mish()(X_input)
    '''

    def __init__(self, **kwargs):
        super(Mish, self).__init__(**kwargs)
        self.supports_masking = True

    def call(self, inputs):
        return inputs * K.tanh(K.softplus(inputs))

    def get_config(self):
        base_config = super(Mish, self).get_config()
        return dict(list(base_config.items())

    def compute_output_shape(self, input_shape):
        return input_shape
The Echo version throws a namespace error while saving/ loading the model which is solved in case of the Mish version. Although the Echo version follows the exact convention of defining a new layer.
I was wondering how to implement Mish for TF 2.0 Core.
Was just about to edit with times. Mean was 13.13s per epoch, 0.033s per step. Can’t really compare though as a different GPU, and I also moved to multiple workers as the single worker setup wasn’t saturating the GPU (went from ~60% utilisation up to ~90%, think it was 23sec per epoch before that). Just did 5 epochs on the PT version and ~16s per epoch, 0.041s/step on that with multiple workers.
Yeah, I gathered nothing special about it, just the one you’d focused on. Were there any that gave issues with Mish? If I have more spare GPU time I can do some more (depends if I’ve got other things ready to go overnight).
No problem, it’s been fun (the weird sort of definition of fun I gather many here share). Certainly learnt a lot. But I’m certainly no CUDA magician. More a testament to the quality of the PyTorch stuff than my C++.
5 Likes
Not as far as in my evaluation process though but other activation functions did prove problematic in some network architectures. Squeeze Net apparently got the best out of them all with the shortest training time.
OK, seems to be identical to the original (As you’d expect as it’s basically just copy-pasting the PT code into one function), so would be surprised to see any particular issues.
One thing I will test is fp16 performance as that’s where it diverges a little from the PT implementation. In PyTorch the standard way to deal with fp16 is to convert to fp32 for all the operations then convert back (as memory tends to be the limit on performance this would only affect speed on very compute heavy things). This looks to be how the relevant PT functions are doing it (though it’s a little hard to be sure which of the various implementations are being used).
I similarly convert to fp32 to operate, but as the 3 ops are combined it’s only doing conversions at the beginning and end, where the PT version will be converting back to fp16 in between the softplus, tanh and mul. So interesting to see if that has any effect.
Oh, and here’s the edited notebook I used for the test. Hopefully I didn’t mess up anything adpating it (thankfully I saw the first run to recognise I initially forgot to delete the model/optimiser between runs).
I just changed num_workers and put it in a loop for the runs to leave overnight. Think it’s the same cifar10 dataset, was the one on the official site with the same name.
It’s also got some scipy based code to do the CIs I used. I compared it to the calculator listed above (the single sample CI one) and it checked out.
2 Likes
The notebook seems to be absolutely fine.
@LessW2020 how about putting MXResNet to test on CIFAR-10/ CIFAR-100 and getting a benchmark to enter it into the paperswithcode.com SOTA leaderboards?
(Hopefully someone more familair with TF will answer, but this is from poking a bit)
Don’t think keras (and tf.keras.Layers) are the default, but “eager execution” is now the default. But this seems to be using the existing operators, just hiding the graph creation from you as PyTorch does. So no changes needed.
Looks like a tf.function is the way to write an operator in Python (tf.operators being in C++). You get autograd with tf.functions too it looks. This can be used in a graph or I gather will be eagerly executed if that’s enabled. Didn’t see anything you specifically needed to do for eager execution, that happens under the hood.
Presumably you could also wrap your function in a tf.keras.Layer to avoid duplication. Much the same way you can wrap a torch.autograd.Function in a torch.nn.Module.
RIght. I have wrapped it in a tf.keras.layer in Echo implementation. But as far as I knew TF has a dedicated C++ core over the Keras backend. I’m still not so sure about that.
@LessW2020 Is there any scope of allocating some cluster for ImageNet benchmark of Mish?
The activations in Keras seem to just be Python wrappers around the python operators (which are wrappers around the underlying c++ operators). Simplifying from here:
@keras_export('keras.activations.sigmoid')
def sigmoid(x):
  return tensorflow.python.ops.sigmoid(x)
Where it looks like you might be able to substitute a tf.function for the operator allowing eager, graph and keras off the single implementation.
2 Likes
In TensorFlow, operators are indeed living in the native world and are wrapped to be usable in Python. This here is a similar example from TensorFlow Addons: addons/tensorflow_addons/activations/gelu.py at master · tensorflow/addons · GitHub
When you are using a convolution in TensorFlow Keras, you could directly use this activation function as argument and it would work. However, when explicitly calling the activation, it worked better for me to wrap it into a Layer. There might be better ways to do it, but this was sufficient for my needs.
Edit: Checked a few sources while writing and @TomB was faster ![]()
2 Likes
This is amazing @Less! I see you won’t stop until you get 100% accuracy  , but many of us benefit from you and the rest of participants in this thread share. So keep going!
I’ve looked into your FlatCosAnnealScheduler as well as fastai’s and I think there is a bug related to moms.
In your code you have them as args, but then don’t use it.
And in fastai’s callback, they don’t anneal it. The end result is the same. When I plot lr show_moms=True, I always get something like this:
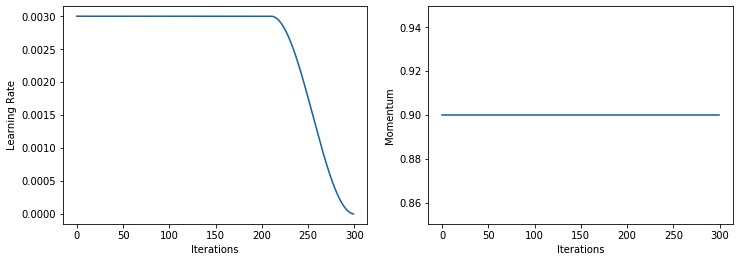
When I think we should get something like:
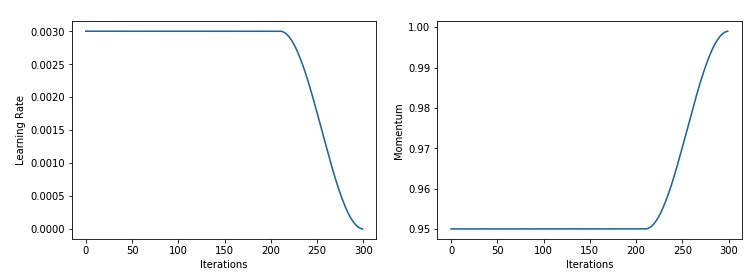
I don’t know what impact this may have in terms of performance, but could any of you please confirm that this second one is the expected behavior?
1 Like
Hey @oguiza, we hadn’t played around with it and so as such a few things changed. For the most recent version look at learn.fit_fc. I can’t recall if I had taken that into account when writing the scheduler right now. (But you’re right, most likely not as I wasn’t sure what to do!)
Also if you know just how to fit it in please update the code and do a PR! 
2 Likes
@TomB Can you take a look at this https://github.com/tensorflow/addons/pull/569
Looks like it’s using the (taylor series expansion based?) gradient you have on the page. Assuming I pulled it out right I get it using:
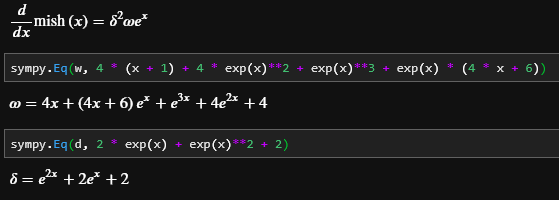
So guess it’s likely to run into the same sort of numerical stability issues I had. I note that there’s a comment “Only test theoretical gradients for float32 and float64 because of the instability of float16 while computing jacobian”. Now the PyTorch gradcheck does warn if you don’t use double for accuracy reasons. So this is fairly reasonable, but doesn’t then seem to be any other testing of backwards in float16. Also, depending on the inputs it’s using the instability might not show (think it was passing the gradcheck fine before I changed the gradient calcs but still fell over on float32 when actually training).
Looks like much the same sort of elementwise method I used so could probably fairly easily use the gradient calcs I use, depending on what operations are allowed in tensorflow. Might well need to do the float16 calcs on float32s as I did given lack of ops.
1 Like
So, given the popularity of EfficientNet with Swish on Kaggle I made a CUDA version of Swish (mostly a copy/search/replace of the Mish one, will probably merge them at some point but will need some C++ I don’t really know yet to do it cleanly). No CPU version unlike Mish, just CUDA (less to copy). Seems to be all good.
As noted in a Kaggle thread, the Swish PyTorch implementation adds a fair amount of memory usage over ReLU, presumably due to the extra intermediate. They gave an Autograd function that recalculated from input and reduced memory usage but was a fair bit slower for at least one user (V100). I did a comparison on EfficientNet-B0 (256x256px, BS=48) and:
          alloc MB  time
Original  6879      01:11
Autograd  5421      01:14
CUDA      5400      01:02
Presumably the PyTorch Mish will similarly use more memory, probably even more given the two intermediates (if you don’t inplace either the mul or tanh which can cause issues).
I also wrote a script to package Swish up as a single python file using inline JIT loading to post as a utility script on Kaggle (not yet published but it works on Kaggle, script is in repo extras). Think the same script should work on the Mish repo, though not tested yet, so I’ll create a Kaggle script for Mish too at some point.
Sorry for spruiking the competition Diganta  I’ll point to Mish too when posting on Kaggle.
4 Likes
Hello all,
I was conducting some experiments in Google Colab with the different optimizer using the training script from here.
I trained with both Adam and Ranger with a variety of settings as described below on XResNet (BTW it seems that’s the default architecture, not MXResNet).
If I remember correctly, all the flatten_anneal use ann_start=0.72
| Optimizer | Model | LR schedule | LR | Dataset | GPU | Avg. accuracy | Stand. Dev. |
|---|---|---|---|---|---|---|---|
| Ranger | xresnet50 | flatten_anneal | 4.00E-03 | Imagenette | K80 | 0.8832 | 0.006881874 |
| Ranger | xresnet50 | one_cycle | 4.00E-03 | Imagenette | K80 | 0.8784 | 0.009156416 |
| Adam | xresnet50 | one_cycle | 4.00E-03 | Imagenette | K80 | 0.8812 | 0.005455271 |
| Adam | xresnet50 | flatten_anneal | 4.00E-03 | Imagenette | K80 | 0.8104 | 0.006118823 |
| Adam | xresnet50 | one_cycle | 4.00E-03 | Imagenette | T4 | 0.8804 | 0.0058515 |
| Ranger | xresnet50 | one_cycle | 4.00E-03 | Imagenette | T4 | 0.87320006 | 0.007858762 |
| Adam | xresnet50 | one_cycle | 4.00E-03 | Imagewoof | K80 | 0.6964 | 0.011620674 |
| Ranger | xresnet50 | one_cycle | 4.00E-03 | Imagewoof | K80 | 0.6936 | 0.018736057 |
| Ranger | xresnet50 | flatten_anneal | 4.00E-03 | Imagewoof | K80 | 0.73160005 | 0.014164731 |
| Adam | xresnet50 | one_cycle | 4.00E-03 | Imagewoof | K80 | 0.694 | 0.012066473 |
| Adam | xresnet50 | flatten_anneal | 1.00E-03 | Imagewoof | K80 | 0.6536 | 0.008616248 |
I will say I am not completely impressed by Ranger.
Firstly, I thought Adam was supposed to be a very poor optimizer for the Imagenette and Imagewoof datasets. Looking at the history of the Imagenette leaderboard, it seems Adam got an accuracy of 84.6% but here I am already getting an average of 88%. Similarly, for Imagewoof the leaderboard originally had a score of 55% but I easily got 69%. What could be the cause of this discrepancy? I will look more carefully into replicating those original LB results.
Secondly, Ranger only has a slightly better performance for Imagenette and even then I am not sure if it is statistically significant. That too, only with flatten_anneal. However, Ranger+flatten_anneal shows a significant improvement over Adam.
Does that mean Ranger shows a better advantage for more fine-grained classification problems?
Of course, I could have made and error and my results are wrong, so it would be helpful if someone to replicate these results in Colab as well.
Any comments @LessW2020?
PS: I posted this here as this seems to be the most active thread. Let me know if you want me to move this to the Ranger thread instead.
5 Likes