Thanks for this, I’m using something similar. Curious to see how well the ‘threshold’ value will generalize. The paper say that 0.5 seems to work well
I took a look at your notebook and while I do see you downloading the image and passing it to the img2noise method, I don’t see that being used anywhere in the method … Am I missing something?
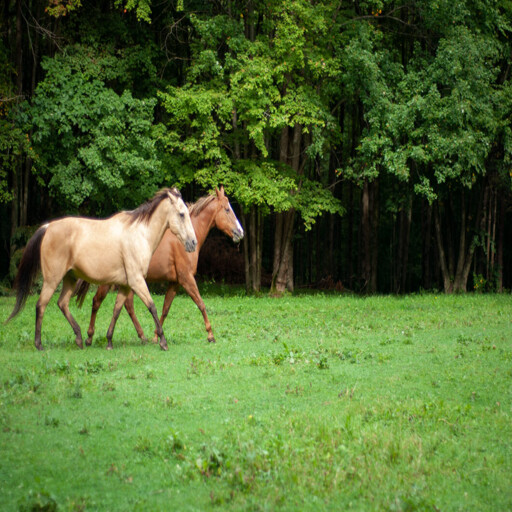
Because the thing I couldn’t get my head around is that if we used a random image, how do we get consistent horse and zebra noise (or latents) to get the difference between them? The random image might have a horse but is that horse going to be the same size and position as the one generated for the zebra query?
Not sure if I’m making sense here or not and I do realize that’s two different questions above. So apologies …
I thought if you started with a random image, possibly the best approach would be to just use image segmentation to create the mask and then just do inpainting. That might be simpler and more consistent? Not sure, want to try that now and see where I get but just asking the question here in case somebody knows that this is a deadend and/or my earlier question about random images has an answer which offsets my objections ![]()
Edit: @KevinB Disregard my question about where you were using the init_image … I need more sleep ![]() I see where it’s being used …
I see where it’s being used …
1 Like
@Fahim we are not starting from random noise but we are starting from the encoded version of the image you picked. And we don’t start the diffusion process from timestep =0.
If you remember jhono’s notebook where we convert the parrot to a ‘nat geo dancer’ we have start_step. If you play around with that start_step you will see how the images will follow the original image for higher start_step values. This will make the zebra and horse lineup so we can subtract them.
3 Likes
I know the feeling… lol
2 Likes
Oh, duh! You are right ![]() I think I’m chasing my own tail at this point because I’m forgetting what I’ve done. Please disregard me
I think I’m chasing my own tail at this point because I’m forgetting what I’ve done. Please disregard me ![]()
Haha been there ![]()
1 Like
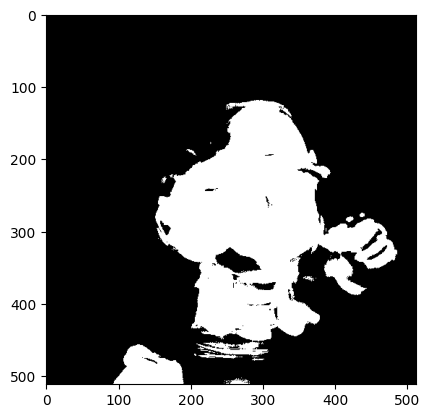
I think I was able to get step 2 and 3 working. Here are my results:
initial image:
End of Step 1 - Mask Generated:
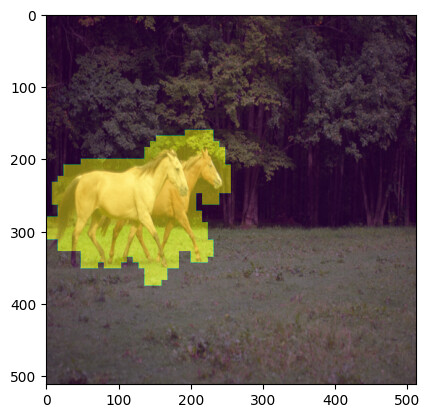
End of Step 3

9 Likes
That looks great! Congrats ![]()
Now the real test. Does it work on other images :). Thanks to you and everybody else in the community for the help and inspiration. Definitely some times while going through this where I felt very unsure whether I was going to be able to figure anything out.
2 Likes
I know what you mean — the discussions with you and others have helped me immensely. I’d never have gotten past the creation of the mask if I didn’t talk to anybody because I would have just sat there getting more and more frustrated. I love that everybody here is so willing to spend the time to talk through things and to share code ![]()
1 Like
1 DiffEdit Variation - Mask Generation using a “Negative Guidance Scale”
This notebook demonstrates an experimental variation to the prompt guided image editing approach covered in the paper, “DIFFEDIT: DIFFUSION-BASED SEMANTIC IMAGE EDITING WITH MASK GUIDANCE”.
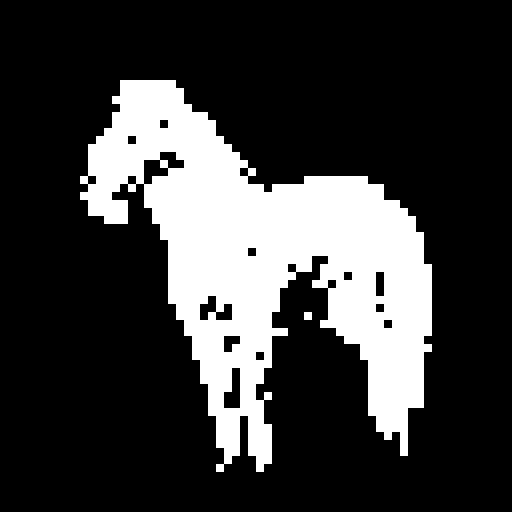
In the paper, a mask is generated by taking a reference prompt and a target prompt. (eg. referece:‘horse’,target:‘zebra’) and generating a noise mask using noise_pred(horse)-noise_pred(zebra).
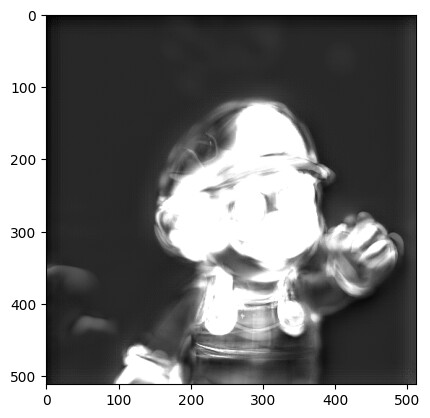
In this notebook, I’ve explored a variant. I noticed that when using noise predictions from the reference and the target to generate the mask, that the mask was often full of “holes”. I hypothesized this was because the noise prediction for the reference and target prompts were too similar in some cases. What we really want to do is generate a mask that “subtracts out” the reference prompt. But coming up with another prompt that provides strong “contrast” with the reference prompt is somewhat difficult. So I wondered what would happen if rather than using the reference and target prompts for the mask generation, what if we used the reference prompt once with a positive guidance scale and once with a negative guidance scale and used those to generate the mask.
Also rather than calculating the mask in latent space. I converted the latent noise into image space generated the mask there and scaled the mask back to latent size for use during inpainting.
It seems to work pretty well!.. Although I’m still exploring the results were good enough so that I thought I’d share.
DiffEdit Variation Notebookdiffusion_experiments/DiffEdit_Variant.ipynb at main · johnrobinsn/diffusion_experiments · GitHub)
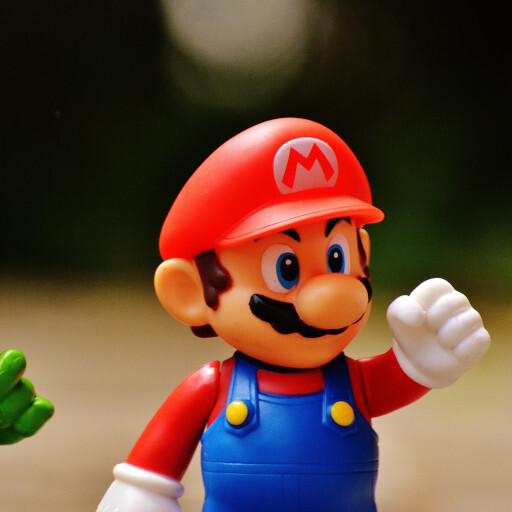
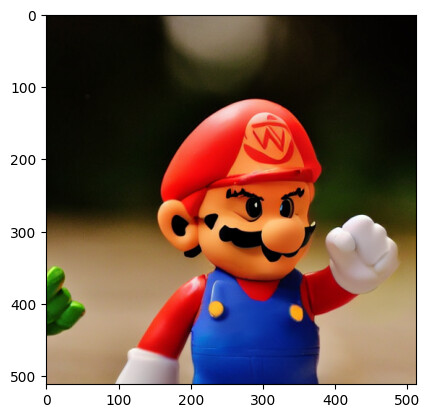
reference prompt: Mario; target prompt: Wario
Only Mario (postive and negative guidance scale) is used for mask generation.
Wario is just used for guiding the inpainting operation.
source image
generated grayscale mask
binarized scaled mask
inpainted image (Wario)
12 Likes
This is really interesting @johnrobinsn ![]() I tried to go this route (or something similar) but had trouble getting a good mask. So am really keen to go through your code and learn from it as to what I was getting wrong. Thank you!
I tried to go this route (or something similar) but had trouble getting a good mask. So am really keen to go through your code and learn from it as to what I was getting wrong. Thank you!
4 Likes
Experiment: changing the color of the horse to see how it effects the output.
Keeping everything the same and just changing the input image(tried to keep the background the same and just change the horse’s color using CLIPSeg)
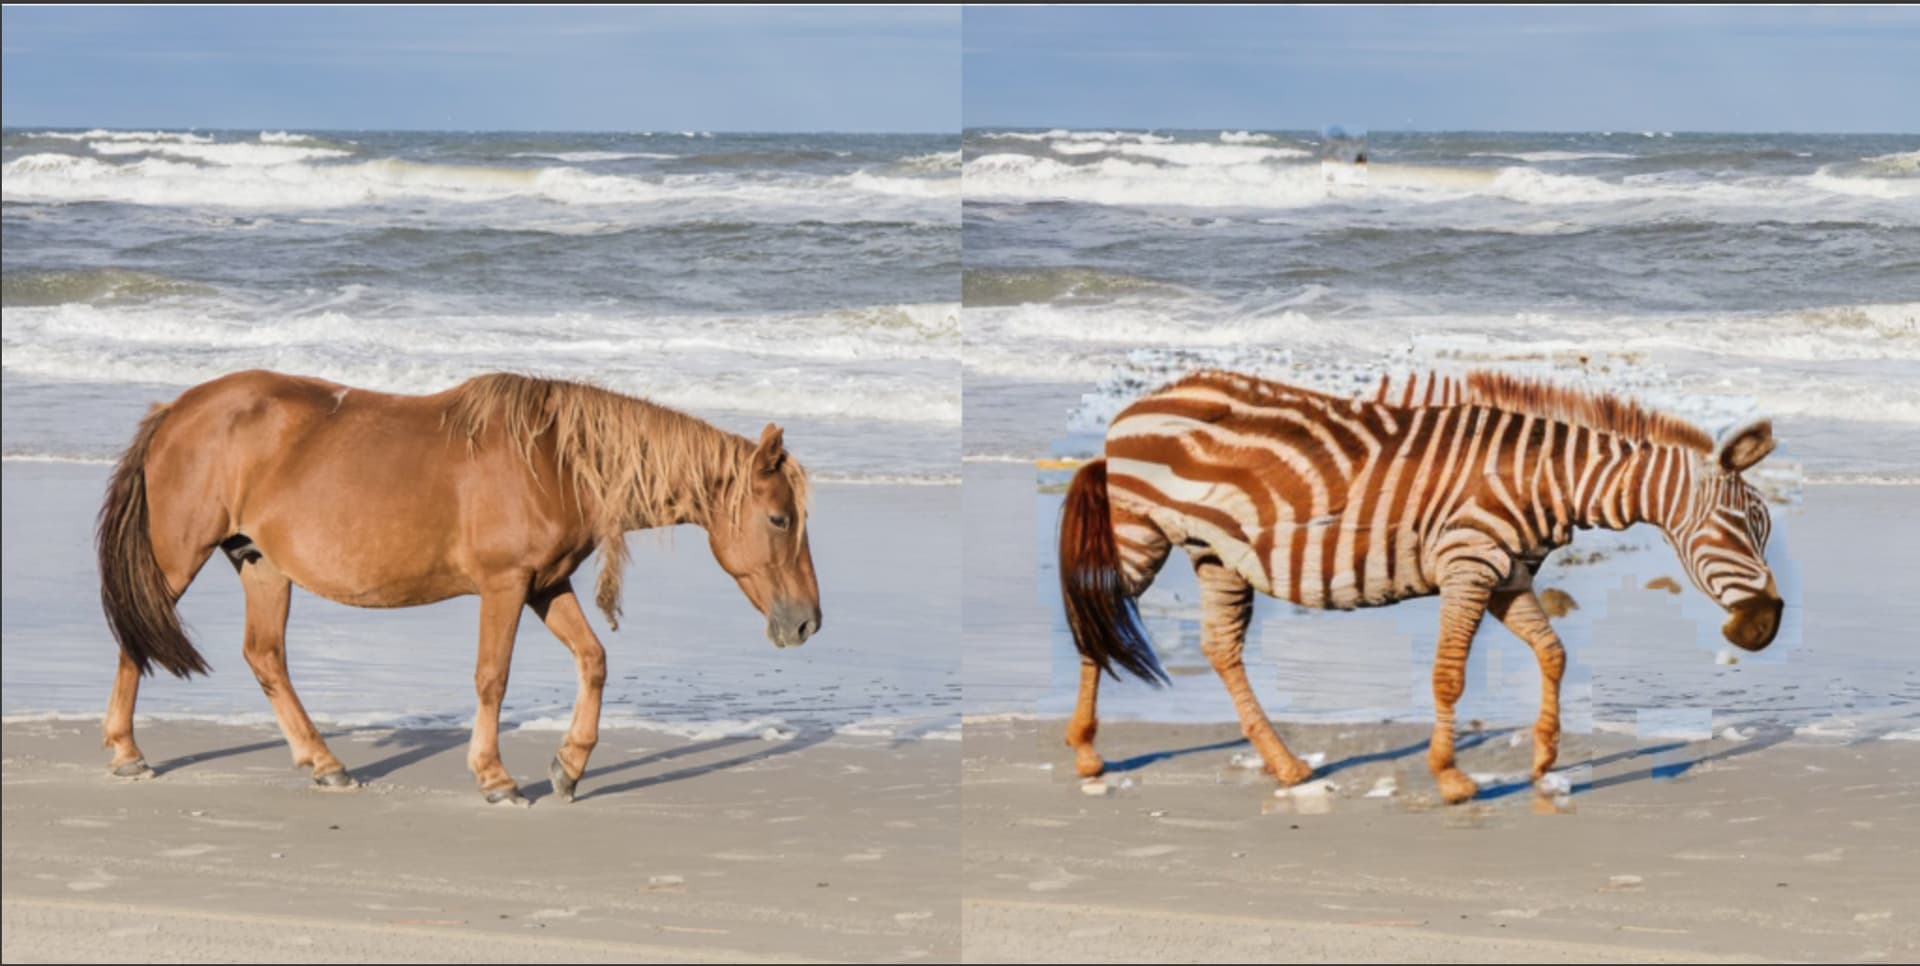


The mask generation struggles when the target query’s color(zebra) is the same as the input images color(horse).
To make the mask generation more robust we can use dilations, blurring, augmentations etc
5 Likes
Hi all - a bit late to the party but wanted to share my progress implementing DiffEdit. It’s not perfect but I’m pretty happy with the results so far. I focused on just the mask generation part and then used the existing StableDiffusionInpaintPipeline for inference given a mask.
My general approach for generating the mask was:
- noise input image by some
strengthfactor (proportion of total timesteps) - predict noise for the actual and target prompts and clamp output to [-3.5, 3.5]
- work out diff between two noise predictions
- repeat n times and average to get more stable noise diff prediction (typically n > 10)
- scale to [0,1] and apply threshold (typically ~0.55)
- take max across 4 latent channels and upscale back to 512 x 512 (just using PIL, not the vae)
I also played around with inverting the mask to replace the background instead which worked pretty well.
My code is available here if anyone is interested.


15 Likes
Hi, similar to DiffEdit, I was wondering how we could go about building a model where we can edit the colors of the generated image.
During the diffusion process, would it be possible to supply, e.g. a color palette image, so the generated image has those colors in it?
What sort of loss functions would work out best here for the palette?
1 Like
Are you trying to change the color of an object in the image? then one of the many options is Dreambooth
if it is more on a global scale then you can check out johno’s notebook
the last section talks about making the image more blue
2 Likes
Jeremy, you made me curious about editing a random image using PromptEdit and so I updated the code and implemented modifying the input image via just a prompt. It works fairly OK as far as I can tell … Not perfect but …
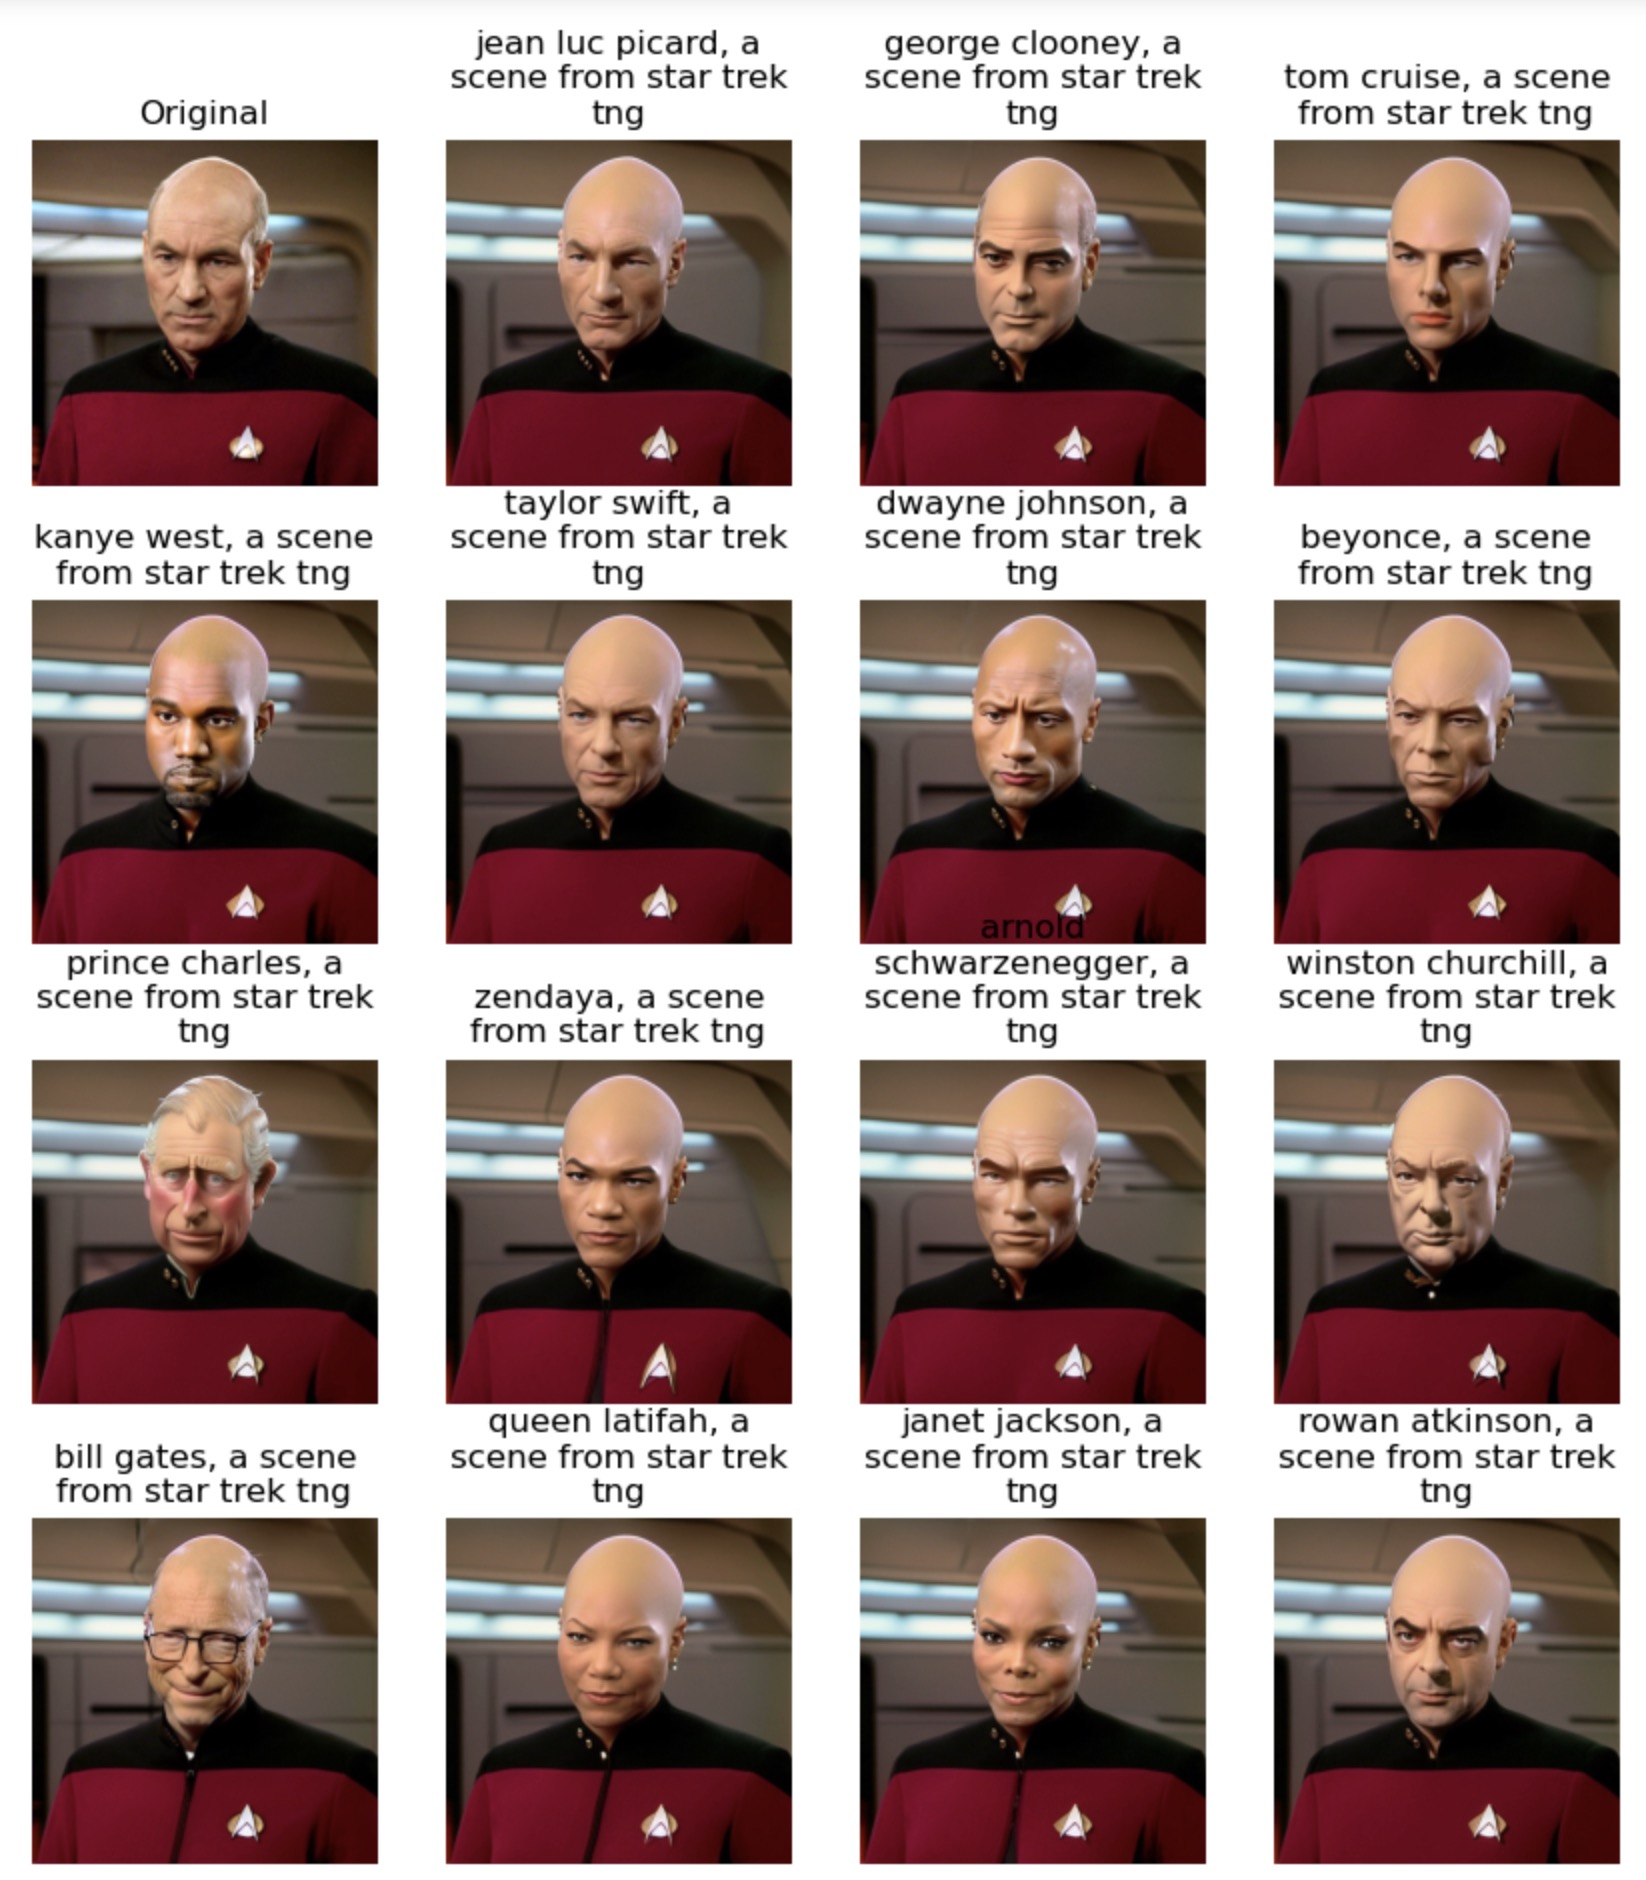
The original image is the first one, and the second one is the image created from it using the original prompt. The rest are images created using the original image and the edited prompt shown above the image.
2 Likes
Fahim what you have discovered is a principle advocated by ThoughtWorks 20 years ago. The idea is to write the tests before you write the code and make the code pass the tests. Today you see the similar procedure worked out by Jeremy in his notebooks, writing small distinct portions of code visible in one screen that gets the results he expects.
1 Like
On the topic of matrix multiplication: I recently learned that AI is now being used to discover more efficient matrix multiplication algorithms! See Discovering novel algorithms with AlphaTensor (from the DeepMind research blog). It’s like a snake eating its own tail ![]() .
.
The trouble, though, is that this system comes up with different algorithms for every pair of matrix sizes (e.g. the algorithms for multiplying two 3 \times 3 matrices are completely unlike those for multiplying two 4 \times 4 matrices, let alone for multiplying a 4 \times 5 matrix with a 5 \times 5 matrix). Actually, there are ways of combining the algorithms for smaller matrix sizes into algorithms for larger matrix sizes (as explained in Section H of the supplementary materials for the original research paper)—but it can get pretty complicated.
It would be cool if someone could implement a general matrix multiplication function based on the AI-generated algorithms, and check if it’s faster than the implementations we’ve seen so far! (Maybe I’ll have a go for some simple cases.)
2 Likes
