Thanks @arunoda for suggesting it. cv2 blurr + clip improved my mask as well (removed all the patches) -
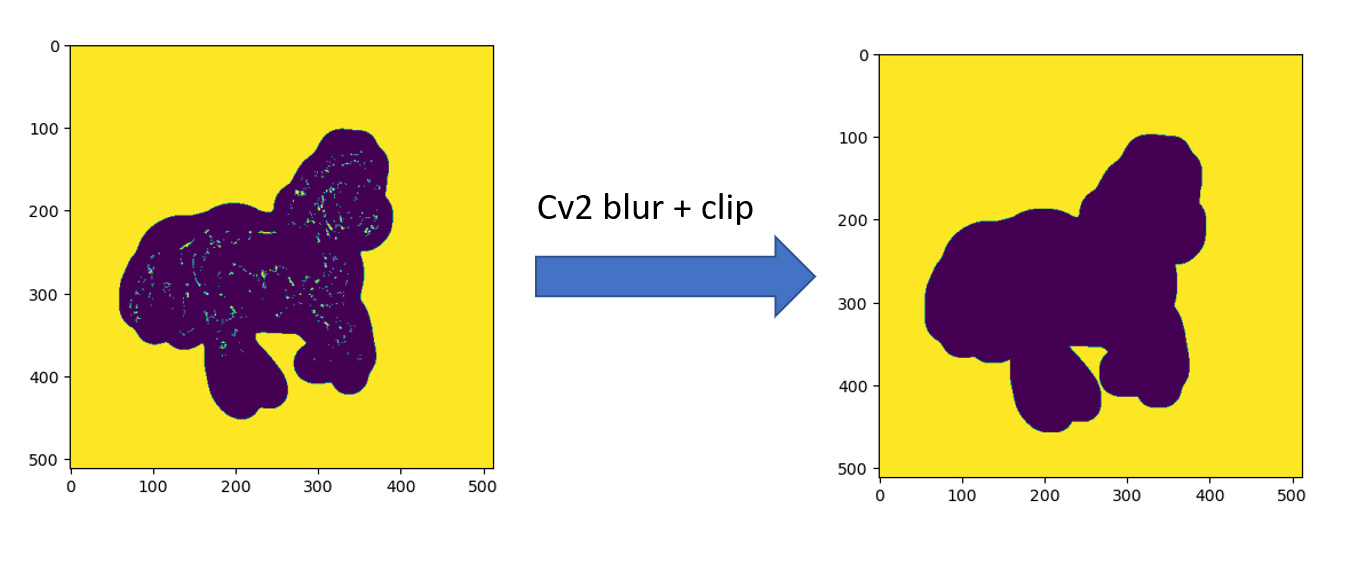
Code snippet -

Updated Notebook - Link
Thanks @arunoda for suggesting it. cv2 blurr + clip improved my mask as well (removed all the patches) -
Code snippet -
Updated Notebook - Link
Apologies please ignore this, its me not seeing that the following avoids the problem:
from transformers import logging
logging.set_verbosity_error()
I think this is doing something different from what I had interpreted the diffedit paper to describe. It looks like you’re getting a really nice mask though. My understanding was that we are suppose to create a mask based off what is getting removed as noise and looking at the difference between the zebra and horse image, but my understanding of what you are doing is that you are looking at the actual image that is generated and taking a diff of the actual image instead. I’m wondering if the technique you are using is actually more efficient or if it is the same thing that is described by diffedit and I misunderstand what they describe. Whether it matches diffedit or not, I am really impressed by the final mask you are generating!
I think it’s still using the idea in the paper.
noise_pred1
noise_pred2
What many of us have found though is that initial mask is missing chunks or has patches. So here, @aayushmnit (and others) are looking at how to further improve the mask with some cv2 vision tricks. But to get the initial mask, its using the core idea of the paper.
I agree with the explanation you are describing of what diffedit is, but my understanding of what aayushmnit’s implementation does is not using the noise outputs (noise_pred1 and noise_pred2 that you mentioned, but actually using the output image itself: scheduler.step(pred, timesteps, latents).pred_original_sample unless I am misunderstanding this line.
Till you pointed it out, I had not noticed this distinction ![]() I was doing all my testing based on the output image for each step too … Now I’m curious as to what the difference will be if I try the same on the noise generated for each step instead of the image from each step …
I was doing all my testing based on the output image for each step too … Now I’m curious as to what the difference will be if I try the same on the noise generated for each step instead of the image from each step …
@KevinB, That’s a good call out. I agree with your assessment, it’s not exactly what the paper suggested. My intuition is that when the paper says denoise it, it means running it through the diffusion process multiple steps and then repeat it 10 times (very time consuming) and then subtracting the outcome from the final diffused image. Since pred original sample cut those steps and try to give the preview aka final result in one step, I went with that. Now I am thinking about it maybe I have implemented something better/different than the original paper. Might want to call it as a FasterDiffEdit (Similar how they named FasterRCNN stuff)
![]()
I agree with @DrChrisLevy assessment as well, I am implementing the core idea from paper but taking advantage of some hugging face functionality to speed up the mask computation process.
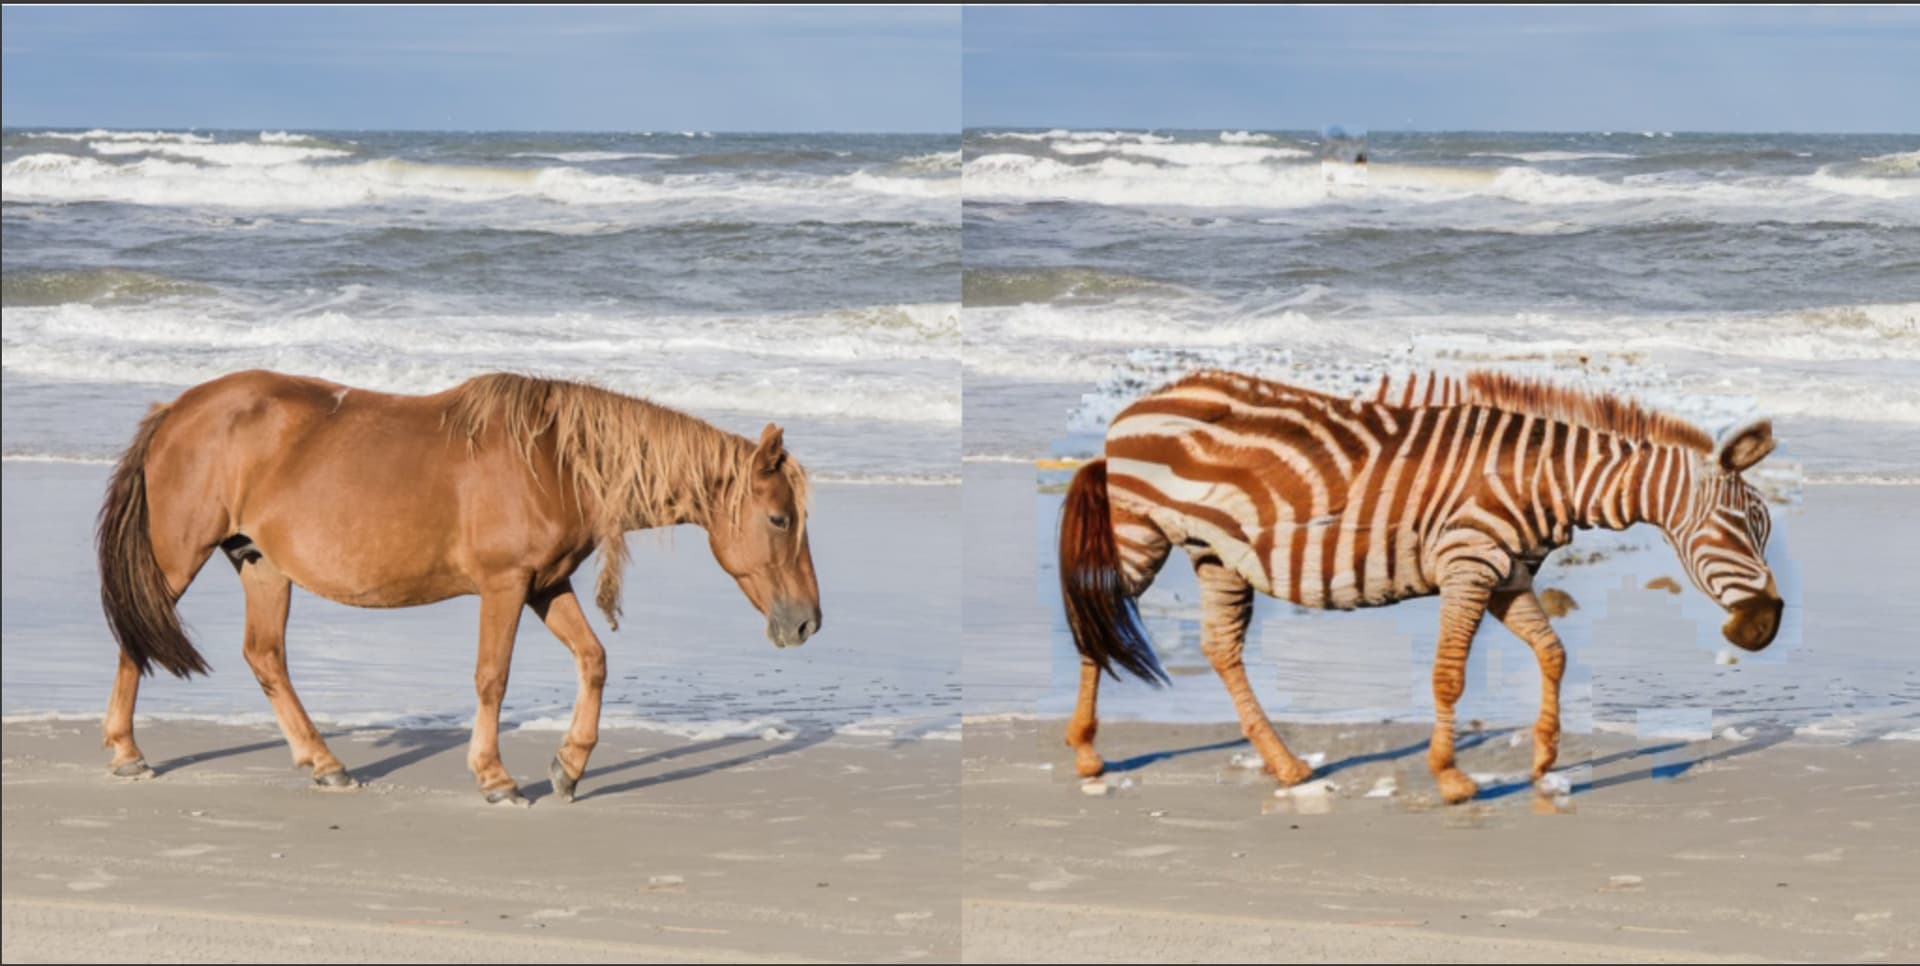
I think we will get different results depending on the color of the horse we start with, white, black or brown.
If we start with a black or a white horse which has a lot of color overlap with a zebra the noise predicted on the stripes of the zebra will be similar to that of the horse. So when we take the difference of the noise predictions it will be very low on these stripes. Very low values are an indicator that it is background and that is the part we don’t want to change. So i think we’ll get a mask with holes in them.
On the other hand taking a brown horse will have no color overlap with a zebra. So when we take the difference of the noise predictions we should get a much better mask.
I definitely think it is different enough to warrant a new name/exploration of results!
Nice work. Amazing.
From my understanding of the paper, I agree with what @KevinB is saying. @aayushmnit I don’t know if you were able to complete the implementation but when it comes to Step 3,
wouldn’t we need to denoise considering the mask (in vae latent space not image space) since we would need to interact with the results of the encoding process (which would be in vae latent space)? Its very possible I got this backwards but I appreciate you sharing and giving us something to think about. I personally was able to calculate the masks (in latent space) but I will now wake up in the morning and figure out how I did that ![]() I think I need a few more days with DiffEdit its such an interesting and clever idea!
I think I need a few more days with DiffEdit its such an interesting and clever idea!
There’s two ways you can go about implementing the final image generation:
Creating the mask in latent space and using it to filter out (or replace) only the parts of the image that are permitted by the mask for each timestep
Creating the mask in the image space and using the original final image, the mask, and the edited prompt as input for inpainting.
So slightly different approaches but both will work to keep the background intact and replace only the part you are interested in ![]()
Using inpainting to do DiffEdit, I ran into some interesting results like this:
While DiffEdit works well for replacing objects of comparable size, I was curious as to how it would perform if you wanted to replace objects of unequal size ![]() Here’s my original image that I was trying to edit:
Here’s my original image that I was trying to edit:
I was comparing the above to my own method similar to DiffEdit (which I’ll call PromptEdit) and I get this result from PromptEdit:
As you’ll notice, PromptEdit does keep the background somewhat similar but it does change it. But the replacement seems (at least to me) to work better.
But I think I need to do way more testing with both methods to see how consistent each one is …
AFAICT with PromptEdit it doesn’t work for inpainting on regular images, but requires that the image you’re inpainting is generated too - is that right?
PromptEdit doesn’t use inpainting at all - it just re-generates the image with the same seed (so you do have to have a seed before you try to to edit the image) but an edited prompt. Maybe this is a technique that is covered by some paper but I kind of stumbled into it ![]()
Basically, I generate noise for a given number of steps with the original prompt and then switch over to the edited prompt for the rest of the generation. It has given me fairly good results in maintaining the overall image and making the edit, but it does make changes to the background as well sometimes …
The following images (which I posted before — just apologizing for reposting …) were generated using PromptEdit (to give credit — prompts courtesy of @charlie):
Yes that’s what I meant - sorry for the confusion. I.e it requires that the image you’re editing is itself generated, afaict. You wouldn’t be able to use it on a regular photo, for instance?
Yep, you’re right. It won’t work on a regular photo/random image. You do have to generate the image first with a prompt, which is why I called it PromptEdit ![]()
But that makes me wonder if DiffEdit does work with a random image … I had not tried that. All my tests were done by generating the image based on a prompt and then using the DiffEdit logic. And I did use the same seed for all tests, I guess I should try again with a random image and see how it goes for DiffEdit …
diffEdit results:
I had to tweak a few things to get the mask “right”.
And since that was the novel part of the diffEdit paper i feel i shouldn’t be tweaking that so much.
Will spend sometime with trying to see if i can consistently generate results.
PS: I used some dilation, median filter, downscaling followed by upscaling to remove edges. Averaging surely helps(rem to use different random noise every time)
Few things i noticed with the image you choose to work with(i may be wrong about this) but it works better when the background is more constant and has lesser jumps. Choosing a brown horse rather than a black or white horse works better.
You bring up one of the points that I was wondering about for my own efforts to implement DiffEdit, which makes me wonder if I was doing it wrong … Basically, I had to do a lot of tweaks to get the mask right. So I did wonder if it would work the same way if it was a different starting image, or, not horse to zebra but maybe swan to duck, instead?
Also, I relied on generating the initial image myself using my own prompt. Jeremy’s question above makes me reevaluate my approach totally ![]() I wonder if perhaps I should have started with a random image with a horse and gone from there, but I’m not sure I would have gotten the mask right at all then … So I think I need to go back and read the paper more carefully …
I wonder if perhaps I should have started with a random image with a horse and gone from there, but I’m not sure I would have gotten the mask right at all then … So I think I need to go back and read the paper more carefully …
I am using a random online image with my version if it is helpful: diffedit implementation (github.com)
I am doing a couple post-processing steps and it seems to be working well so far at least. I haven’t done a lot of experimentation yet though as I am only on step 2 of diffedit
def extract_channel_mask(img):
    kernel = np.ones((3,3),np.uint8)
    img = (img*255).squeeze().cpu().to(torch.uint8).numpy()
    ret2,img2 = cv2.threshold(img,0,255,cv2.THRESH_BINARY+cv2.THRESH_OTSU)
    opening = cv2.dilate(img2, kernel)
    return opening