Thanks, I do have some experience with FastAPI so will be fun to play with this. Don’t have access to GPU server, so one question, does this work well with CPU inference?
Unfortunately CUDA is required. You might be able to make it work by changing the “cuda” lines to “cpu” and getting rid of the GPU checks.
1 Like
I found the following explanation helpful:
In my mind, an iterator would be a good candidate to iterate over existing content like that of a filestream or bytes off the wire in a network.
A generator is probably better suited to generate stuff which may appear like a stream of values, possibly lazily.
2 Likes
As @hackerfriendly mentioned, changing lines accordingly will do the trick. However, it’ll be quite slow.
Following the motivation from the previous post, I attempted at implementing a Mix Prompting pipeline based on the idea of mixed embeddings mentioned in the awesome SD deep dive notebook by @johnowhitaker.
The pipeline takes a list of prompts and it generates images based on a mix of embeddings of the prompts.
Here are some example outcomes:
Prompt 1: a mountain, cinematic angle, studio Ghibli, cinematic lighting, detailed oil painting, hyperrealistic, 8k
Prompt 2: A long and winding beach, tropical, bright, simple, by Studio Ghibli and Greg Rutkowski, artstation
Example 1
Prompt 1 only

Prompt 2 only

Prompt 1 + Prompt 2

Example 2
Prompt 1 only

Prompt 2 only

Prompt 1 + Prompt 2

Example 3
Prompt 1 only

Prompt 2 only

Prompt 1 + Prompt 2

It blends both concepts quite nicely. It was really fun trying this out; here is the notebook link for anyone interested in trying it out =)
15 Likes
Yep, I think you got that right. From my understanding, you first train the actual model (huge and slow), let’s call this teacher since it’s now full of learned ideas, then you train another model called student that figures out how to ‘distill’ the teacher knowledge into a smaller and faster model. In a sense, the student model doesn’t have to suffer through the entire training-from-scratch, but can relearn what the teacher has already learnt but skip a few steps while doing it.
The training time definitely is longer now that you also have to train the student after you’ve trained the first model (teacher). But, the inference should be a whole lot shorter, since you only do that using the lightweight student model that can skip steps confidently.
5 Likes
I was a bit suprised to see the random.random() implementation work as a user would expect after the os.fork() call in the child process.
From what I could remember in the past(in Python & other langs), most PRNGs that rely on global state don’t manage to do this very well right after forking, since forking makes a full copy of the process state and all that.
Either ways I got really curious to figure out how this actually worked under the hood, which took me on a long winded path with many detours and eventually a simple solution.
Attempt 1:
I tried viewing the docs for the random() function, saw that it was a builtin, which usually means that it’s directly implement in cpython. So, off I went cloning the repo and starting to rg around. After a while, found the module that implements the random module.
https://github.com/python/cpython/blob/main/Modules/_randommodule.c
After poking around for a bit, I couldn’t see anything forking related. Nothing unusual.
Attempt 2:
I assumed that some kind of hook/handler/callback etc. was calling the seed() function again, only in the child process for this to work. I inserted a bunch of print statements directly into the std. lib of my python installation to test this hypothesis. YES, that was indeed what was happening.
I figured there must be some kind of ‘after fork on child process’ handler or something defined in the cpython code itself that might be calling seed. After a bunch of rg-ing, I ran into the PyOS_AfterFork_Child which sounded exactly what I thought would be the thing.
https://github.com/python/cpython/blob/main/Modules/posixmodule.c#L576-L623
Unfortunately, I was not very lucky. Spent a lot of time walking through the branches here, but didn’t find anything that has to do with calling seed() again.
I kind of gave up at this point. At least for an hour.
Attempt 3:
It came to my mind that this implementation was buggy sometime ago in Python (that’s how I got interested in it to see how it was fixed). Quickly tested it out on Python 2.7 and indeed, it’s buggy.
I figured I could try to locate when this ‘fix’ was made by stepping through various Python versions. After runnnig several diff. Python versions (thanks containers), I was able to confirm that this fix was introduced in 3.7, it’s still buggy on 3.6.15.
I just had to look at the diff. now. ![]()
https://github.com/python/cpython/compare/v3.6.15…v3.7.0
Luckily enough, I saw that there were changes made in Lib/random.py. Lo and behold ! found the magic lines that registers a seed function to be re-run in child after a fork. The ‘after fork on child process’ handler hypothesis was correct, I just wasn’t looking at the right place. Nice and simple, written in the python module itself.
https://github.com/python/cpython/blob/main/Lib/random.py#L954-L955
## ------------------------------------------------------
## ------------------ fork support  ---------------------

if hasattr(_os, "fork"):
    _os.register_at_fork(after_in_child=_inst.seed)
Summary
If I only had grepped for fork support right in the beginning, this would have been a very short investigation. Sometimes, guessing what to grep for correctly in an unfamiliar codebase could mean the difference between instant answers and banging your head against the wall.
Part fun, part frustrating, hope this finding/journey was useful to somebody else as well. ![]()
I think I’ll wait with trying to figure out how 'register_at_fork` works.
(Introduced in python 3.7 according to release notes https://docs.python.org/3/whatsnew/3.7.html#os)
13 Likes
Jeremy giving us some specific To-Dos towards the end of the lecture was really helpful in being able to focus attention on a couple of tasks that we should be able to accomplish at a given time. Implementing and experimenting with the 1. negative prompt and 2. Img2Img pipelines was really fun and allowed me to peek deeper and better understand what is going on. Looking forward to more of such challenges and hopefully increasing in complexity as we all grow smarter together ![]()
5 Likes
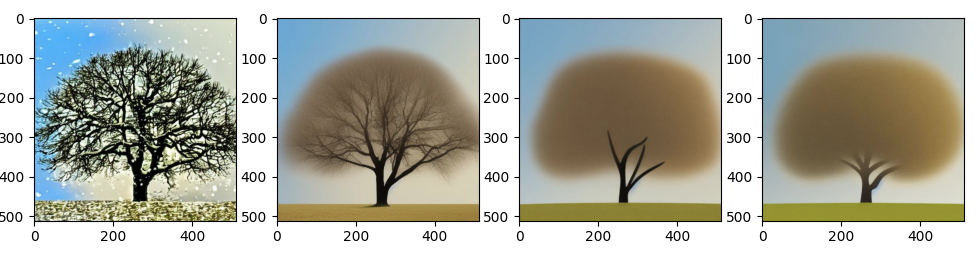
Tree Video and “Lossy Latent Artifacts/Degradation”
For my tree video that I shared the other day, I had mentioned that I was applying @jeremy’s idea of feeding in the latent from the previously generated frame into the current frame in order to improve “continuity/stability” of the video.
Unfortunately I found a silly bug in my code (python read-only globals are evil) that was causing my video generation code to always use the “original” image latents for every frame rather than using the generated latent from the previous frame as I had stated.
The bug resulted in a nice looking video.

However when I went to fix the bug, I ran into an interesting “numeric” issue which caused the generated latents to degrade frame over frame.
Let me describe more…
In order to get good frame to frame “stability” I’m adding the same noise to the input latent. It seems if you add the same noise to a “generated latent” that was used to create that latent you run into some degradation over time. I have to admit I don’t fully understand it yet.
If I generate different noise on every frame and use the previous frame latent. The degradation goes away… but the generated images vary quite a bit from frame to frame and don’t give the desired effect.
I’m not sure if this has something to do with the lossy compression that the latents provide exposing itself in this scenario? If folks have more insight I would love to learn more.
I"ve created a branch in my repo and notebook to demonstrate the issue.
Here is a link to the modified notebook if you’d like to see what I’m describing.
Thanks Much
John
2 Likes
Does using just slightly different noise each time help? E.g adding some noise to your original noise…
I’ve tried blending in new noise… I’ve tried something like …
0.9 * baseline_noise + 0.1 * new_noise
I didn’t get what I was after… But I don’t remember exact results…
Any suggested tweaks to this?
I’ll rerun experiments and variants along those lines and capture the results in my notebook…
Thx
John
Something is puzzling me regarding scale guidance parameter… As Jeremy mentioned, we’re using this parameter to do a weighted average:
pred = u + g*(t-u)
However, a weighted average coefficient is usually between 0 and 1. In this case, the guidance is generally set to 7.5, which means that we are amplifying a lot the difference (t-u) compared to u.
I tried to play a bit with the code, and I’m even more puzzled:
- Writing
pred = g*(t-u)(omitting the u term) gave complete trash - Writing
pred = t + g*(t-u)gave a fourth leg that was missing to the horse : (see before/after below)


5 Likes
Ok, so following up a bit on this, I tried to modify the formula so that the guidance_scale becomes a parameter between 0 and 1.
pred = u + g*(t-u)/torch.norm(t-u)*torch.norm(u)
With this reparameterization (which I find a bit more intuitive), I found that 0.15 gave pretty good results. Notably it re-created the missing 4th leg to those poor horses!
Before/ After with the 2 examples from the notebook:


11 Likes
I reran that experiment (with more variations to see what happens) and the results are captured in my notebook here.
https://github.com/johnrobinsn/diffusion_experiments/blob/scenario1/TreeDiffusion_scenario1.ipynb
It didn’t resolve the issue… but a few more observations. Using this blending approach…
0.9 * baseline_noise + 0.1 * new_noise
With small amounts of new noise I still see the degenerate behavior… But adding in larger amounts of new noise (>0.4) I start seeing a “diffuse pattern” emerge as follows.
Looking at this I suspected that the noise was no longer following a normal distribution N(0,1). Indeed the following doesn’t have a std dev of 1.
c = torch.randn(100000)*0.9+torch.randn(100000)*0.1;c.mean(),c.std()
(tensor(0.0074), tensor(0.9041))
It appears that since the samples are not uniformly distributed you can’t use a linear interpolation… So I tried this… which probably still isn’t quite right but it does give me something very close to a std dev of 1 with small amounts of update_noise
noise = baseline_noise+torch.randn_like(im_latents)*update_noise
The results of this are also captured in the notebook. But I’m still seeing the degenerate behavior.

Is there a better way to add in small amounts of additional noise and preserve the required noise properties (a valid gaussian sample)?
Thanks Much…
John
4 Likes
I also added a pdf render of this notebook so you can review my results easily without rerunning the notebook… github is timing out on rendering the notebook intermittently since the notebook has gotten a bit large.
2 Likes
I was following along lesson working on another dataset and realised that it’s a bit painful to load raw image bytes to multidimensional arrays(lists) purely in Python (obviously) without using libs like PIL & numpy.
After struggling a bit, I got curious about the datatype of the pickle object that we load in the lesson. Apparently, it’s of the type numpy.ndarray. We’re not really using numpy API after loading the data, so I guess it’s fine with the ground rules we’ve set(on not using numpy apis until we’ve sorta recreated them).
Either ways, I had a hard time loading PNGs directly to multidimensional lists, so I’m going to cut myself some slack and use PIL.Image and numpy.asarray for loading up the data. Just this one time. ![]()
3 Likes
Yes exactly - that was my theory anyways… Whilst I think it would be interesting and instructive to write a jpg or png decoder from scratch, it does feel rather out of scope!
2 Likes
I’m glad you tried that. I’ve been wondering about the same thing.
What if you scale the entire u + g*(t-u) instead of just the g*(t-u) bit?
BTW I tweeted your post here:
4 Likes
Thanks a lot for the tweet @jeremy !
Very interesting! so I’ve tried 2 things (hope they include what you had in mind): the bottom line is that your idea of rescaling the whole seems to work amazingly. The rescale factor I wrote previously might also help, but that’s less obvious ![]() .
.
I’ll try to do more robust experiments with all this, and see if we can prove more robustly that those rescaling factors help.
1. regular guidance (7.5) followed by rescale to match the original t
1.a Reminder: original images
pred = u + g*(t-u)
1.b With the “whole” rescaling
pred_nonscaled= u + g*(t-u)
pred = pred * torch.norm(u)/torch.norm(pred_nonscaled)


→ seems to add a lot of details, without changing the picture!!
2. rescaled guidance update (0.15) followed by rescale to match the original t
2.a Reminder: original images
pred_nonscaled= u + g*(t-u)/torch.norm(t-u)*torch.norm(u)
(note the rider’s foot missing on the right picture)
2.b With the “whole” rescaling
pred_nonscaled= u + g*(t-u)/torch.norm(t-u)*torch.norm(u)
pred = pred_nonscaled * torch.norm(u)/torch.norm(pred_nonscaled)


The whole term rescaling definitely seems to help here too! Notably, it fixed the foot artifact observed previously
8 Likes
This looks great.
Seems like increasing 3D normals intensity ![]()
1 Like