Lesson 1 In-Class Discussion ✅

Some of that is going to just depend on how close your images are to the problem that was already solved. The more different the problem, the more images you will need. Try it with however many images you have and if you need to get more images, you will have the pipeline to feed more images in easily.

With a lot of problems though, you should be able to build something decent with 50-100 images. The more you have, the better it would be

i have same question ,Jeremy talked about mobile devices and he said clean way is to keep models over on server and get predictions from them.Is it because even getting prediction may require gpu?

I’ve been able to run inference on images on a free Heroku instance, so it’s totally doable. Pytorch even makes a CPU-only wheel (Python package) to keep your bundle size low.

Great lecture)) tanks to fast.ai team))

I just read the source code, inside the function, it automatically takes the start and stop to form a geometric series.

1 Like

please take this to Fastai v1 install issues thread after you read/applied:
https://docs-dev.fast.ai/troubleshoot.html#correctly-configured-nvidia-drivers

basically you have an issue with pytorch, not fastai.

2 Likes

In the notebook you can doc or ??learn.lr_range.

From the code it slice with learn.layer_groups, which is 3 for the whole resnet34.

According to source code, the last number is the probability of the predicted class, not the actual class. I guess it should be fixed in the documentation.

self.probs = y_pred.sigmoid() if sigmoid else y_pred

f'{classes[self.pred_class[idx]]}/{classes[t[1]]} / {self.losses[idx]:.2f} / {self.probs[idx][t[1]]:.2f}')

I’m reading the documentation right now and I don’t think that’s the case probs[idx][t[1]] is the actual class (t[0] is the image, and t[1] is the label)

1 Like

Yes but the 1 is not for the predicted class but for the actual class (if softmax is used that number should be quite low)

So here is the source code:

def plot_top_losses(self, k, largest=True, figsize=(12,12)):
        "Show images in `top_losses` along with their loss, label, and prediction."
        tl = self.top_losses(k,largest)
        classes = self.data.classes
        rows = math.ceil(math.sqrt(k))
        fig,axes = plt.subplots(rows,rows,figsize=figsize)
        for i,idx in enumerate(self.top_losses(k, largest=largest)[1]):
            t=self.data.valid_ds[idx]
            t[0].show(ax=axes.flat[i], title=
                f'{classes[self.pred_class[idx]]}/{classes[t[1]]} / {self.losses[idx]:.2f} / {self.probs[idx][t[1]]:.2f}')

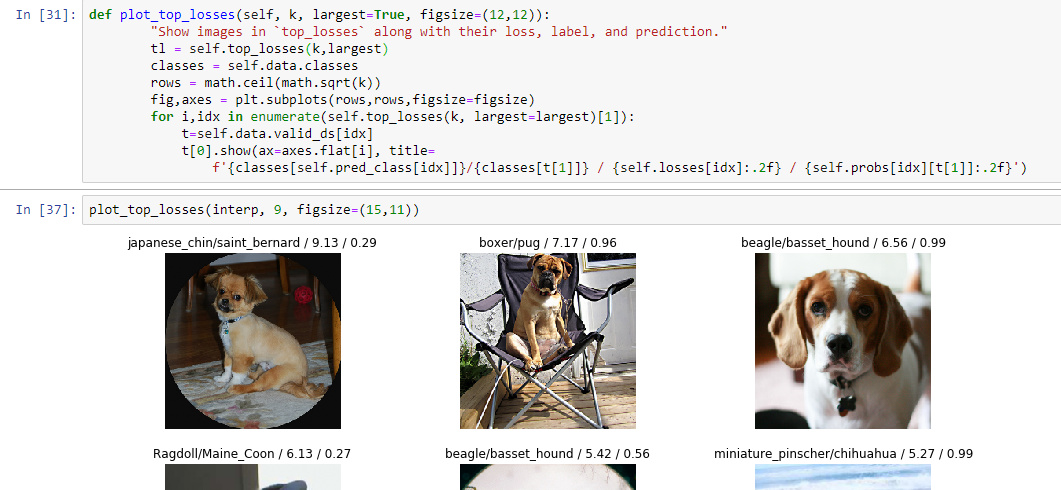
The first thing I do with this is look at what is generating this. So I ran the notebook up to the point where it runs the interp.plot_top_losses and I copy and pasted that code into the notebook so I could mess around with it.

So this is what that looks like for me:

You’ll notice I had to feed interp to it instead of doing interp. (there is probably a way to change that, but this works)

So now, I start looking at the individual lines so the first line for me now looks like this:

interp.top_losses(9,True)

So basically that is taking the 9 largest losses and it looks like you could pretty easily take the smallest losses by changing that to false.

Onto the actual answer to your initial question:

Here are the four things:

f'{classes[self.pred_class[idx]]}/{classes[t[1]]} / {self.losses[idx]:.2f} / {self.probs[idx][t[1]]:.2f}'

The first is the prediction of each image: classes[self.pred_class[idx]]
The second is the true value: classes[t[1]] (t is pulled earlier and has the image in t[0] and the true value in t[1])
The third is the loss of that specific image
The fourth is the prediction percentage of the true value.

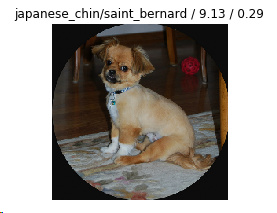
I verified that with the following image:

image

#predicted value
print("Predicted value: "+str(interp.pred_class[tl[1][0]].item()))

#Actual value
print("Actual value: " + str(t[1]))

#Prediction is 99.95%
print("Prediction Percentage: " + str(interp.probs[tl[1][0]][32].item()))

#Prediction of actual value is 28.51%
print("Prediction of Actual Percentage: " + str(interp.probs[tl[1][0]][13].item()))
Predicted value: 32
Actual value: 13
Prediction Percentage: 0.999451220035553
Prediction of Actual Percentage: 0.2851499915122986
11 Likes

What I think is actually happening is that it is not using softmax so there can be several predictions close to one. The predictions are using a precision of 4 decimal points, but plot_top_losses is only showing 2 decimals, so things like .996 get rounded up to 1 even though there’s an actual 1 pred on another class

1 Like

It doesn’t appear to be using softmax. Here are all the predictions from one of the top losses:

tensor([0.3264, 0.2563, 0.1582, 0.6725, 0.2951, 0.7129, 0.9065, 0.0242, 0.5720,
        0.6499, 0.8420, 0.0214, 0.8863, 0.2851, 0.5912, 0.0969, 0.1997, 0.1187,
        0.9825, 0.9605, 0.9389, 0.3934, 0.7918, 0.0380, 0.0469, 0.6889, 0.9309,
        0.4574, 0.3413, 0.1025, 0.9994, 0.4466, 0.9995, 0.8380, 0.0583, 0.2427,
        0.7572])

So my guess is that there were multiple that had 1.0 for that example you were looking at.

3 Likes

Thank you for your dive into the code, I’m in it myself right now. I agree that the fourth number is the percentage of the true value, but that doesn’t explain why it’s so high right ? Like 1.00. I think that’s only a rounding error isn’t it ? Because of the .2f

1 Like

I had the same problem earlier. The solution is to update it to the latest version NOT using conda update -c fastai fastai suggested by others (it will update fastai to 1.0.6), but use the dev install option.

A simpler approach I used is to simply install using pip install git+https://github.com/fastai/fastai
Then when you run python -c "import fastai; print(fastai.__version__)" you should see 1.0.12.dev0

If you installed fastai using conda, for some reason it only installs v1.0.6 like the one you have, but that version is at least 4 days behind (if you take a look at your own your_conda_env_path/fastai/vision/models/__init__.py and compare it with the latest one). The one from 1.0.6 doesn’t import any torchvision models. I think it may have been due to Github’s recent server issue and it may be fixed by tomorrow (as of now it hasn’t been fixed).

3 Likes

Sure but the value don’t add up to 1 here, see KevinB answer just below !

Yeah, my thought is that multiple breeds were very close to 1.0 (>0.995)

1 Like

Next time we might need to have a separate forum thread Lesson 2: Questions to Jeremy.

9 Likes

This is caused by an outdated anaconda package

try to

conda install anaconda

and then it should work.

2 Likes