Just following up for anyone else wondering, I set up a new VM instance in my existing fastai project with the commands outlined in step 3 of the GCP Start Guide. I set IMAGE_FAMILY=“ubuntu-1804-lts”, renamed INSTANCE_NAME and set --image-project=ubuntu-os-cloud. Otherwise, I followed the instructions exactly for creating a new instance. Then installed everything per Jeremy’s gist and was successfully able to start the first notebook.
6 Likes
I’m trying to setup Swift (v0.4 of S4TF), I’ve managed to get the notebooks running but I am running into a strange error in 00_load_data.ipynb
When I try to define the new protocol:
protocol ConvertibleFromByte: TensorFlowScalar {
    init(_ d:UInt8)
}
I get this error:
error: Couldn't lookup symbols:
  protocol descriptor for TensorFlow.TensorFlowScalar
  protocol descriptor for TensorFlow.TensorFlowScalar
  protocol descriptor for TensorFlow.TensorFlowScalar
  protocol descriptor for TensorFlow.TensorFlowScalar
TensorFlow.TensorFlowScalar is defined but the error message suggests that doesn’t have a protocol descriptor?
Hmmm… it seems that I had not installed cuda 10 into my system properly. Installing cuda10 by more carefully following jeremy’s minimal installation subset has helped and I’m on to the next error 
I managed to get s4tf working on my desktop. I don’t have a step by step guide, but here are a few tips that might help you
I was mostly following the script that jeremy posted at the top of this thread, but a few things caught me up, probably because I was not running on a clean dev environment. One thing I’ve skipped here is setting up Cuda, don’t forget to do that
swift-jupyter is really important, make sure you get this running. Note that it requires Python 3.6 (not 3.7 which is current anaconda python 3), so check your python version.
python --version
One quick way is to create a new anaconda environment with the command:
conda create -n swift-tensorflow python=3.6
Don’t forget to install tensorflow and any other libraries you want into the new environment.
conda install matplotlib scikit-learn tensorflow-gpu jupyter numpy
When you finally setup swift-jupyter (using the command python register.py --sys-prefix --swift-python-use-conda --use-conda-shared-libs --swift-toolchain ~/swift) it prints a bunch of environment variables, make sure to capture these and you can put them into your ~/.bashrc. For me the variables were:
export PYTHONPATH=/home/john/swift/usr/lib/python3.6/site-packages
export LD_LIBRARY_PATH=/home/john/swift/usr/lib/swift/linux:/home/john/anaconda3/envs/swift-tensorflow/lib:$LD_LIBRARY_PATH
export REPL_SWIFT_PATH=/home/john/swift/usr/bin/repl_swift
export SWIFT_BUILD_PATH=/home/john/swift/usr/bin/swift-build
export SWIFT_PACKAGE_PATH=/home/john/swift/usr/bin/swift-package
export PYTHON_LIBRARY=/home/john/anaconda3/envs/swift-tensorflow/lib/libpython3.6m.so
If you use these, don’t forget to change the paths to your home folder and your anaconda environment.
After doing this, I was able to compile the s4tf example swift -O inference.swift in the s4tf usage instructions. This should let you compile swift code from the command line as well as using the jupyter notebooks locally.
Also, don’t forget to replace any reference to fastai_docs to course-v3 as the notebooks have been moved.
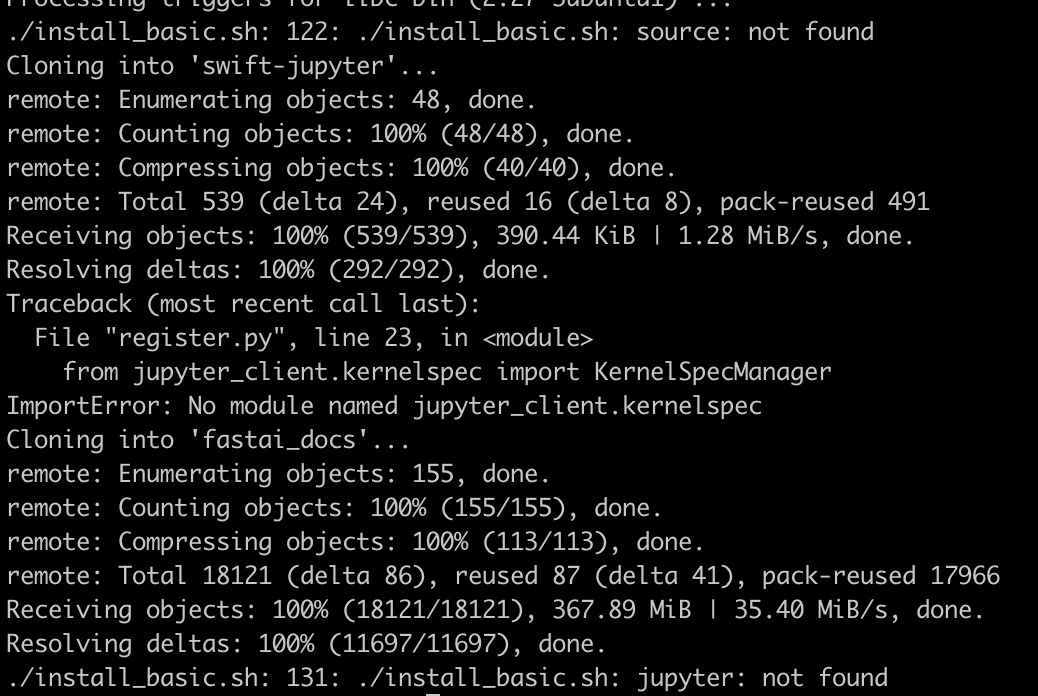
Hard to say what went wrong as most of the output is missing. From what you posted it looks like anaconda may not have been installed (perhaps the download failed) but the script continued working, cloned a few repo’s but then since anaconda hadn’t installed, jupyter wasn’t available at the end.
The error “source: not found” worries me abit, what shell/OS are you using?
Hi,
Great to hear, I have the same set up as yours.
can you please explain the steps you took ?
I didnt find any “conda create”
Thanks!
Nadav
Anyone working on setting up S4TF on macOS? Seems trivial inside Xcode and horribly painful outside.
@ricvolpe I was able to land some commits in the repository that allow you to run swiftai in a docker container including exposing the Jupyter notebook through your browser.
You should be able to run
make jupyter
then visit http://127.0.0.1:8888
Also, any changes you make in the docker container will automatically persist back into your swiftai directory where you executed make from.
2 Likes
@fkautz do you have a link to such commit / repository? (Are you talking about fast.ai repository?) Thanks for the help!
Yes, I run it on MacOS in a terminal. No issues. Perhaps if you indicate what issues you are having I may be able to help.
1 Like
@stephenjohnson Do you run an older version on OSX? The newer versions of S4TF and FastAI have had problems compiling and running even on command line.
I’ve been sticking with the .4 version. I did sometimes have issues with their interim releases having compiling issues that’s why i’ve stuck with the stable version. I might give the .5 version a try and if I do I let you know how it goes.
I’ve now installed the .5 release of S4TF and it is working fine for me from command line. (Note: I’m not trying to run the Swift version of FastAI.)
Here’s my setup: Mac OS 10.14.5 and XCode 11.0.
Also, here’s some things to make sure you have set to get things working:
-
Make sure that in XCode that on the Preferences -> Locations dialog the Command Line Tools setting is set to XCode 11. If you have multiple versions of XCode then it could be set to something else or if you previously had the Beta, this may still be pointing to a now non-existent location. That happened to me when I upgraded from Beta to the release of 11.0.
-
When in the terminal window make sure to run the following command to make sure your command line toolchain is pointing to S4TF 5.0. For each revision of S4TF you need to make sure to point to the correct toolchain.
export TOOLCHAINS=com.google.swift.20190919
1 Like
I had CUDA 10.1 installed as well, but I found that, although neither the REPL, nor the notebooks, nor the compiler complained, it just wasn’t using the GPU. Everything was done on the CPU. After installing CUDA 10.0, compiled code started to use the GPU. But the REPL, and the notebooks (which launch the REPL in the background) are still only using the CPU.
I’m using a nightly build dd Oct 6 of swift-tensorflow-DEVELOPMENT-cuda10.0-cudnn7-ubuntu18.04.
Maybe I should try the RELEASE. Anyway…
Update: Problem solved. Apparently this had nothing to do Swift (Python workbook did not work either) but of my browser. Swtiching to Chrome solved it. Sorry for the irrelevant post.
Hello here
I am playing around with the Swift notebooks for course Part 2.
I had succesfully set up a VM with all the Swift components and the notebooks, all worked wonderfully until all of the sudden my Swift Kernel does not respond anymore (did not do anything more than running cells).
Does anyone have any hint on what could be causing this?
Jupyter log error is
[W 20:40:28.650 NotebookApp] 400 GET /api/kernels/280757dc-c2da-445f-8a60-22eced89b074/channels?session_id=7a459967f7eb449882e2bf7a8a649a69 (82.132.221.86) 2.13ms referer=None
[W 20:40:29.899 NotebookApp] Replacing stale connection: 280757dc-c2da-445f-8a60-22eced89b074:7a459967f7eb449882e2bf7a8a649a69
Notebook looks like this
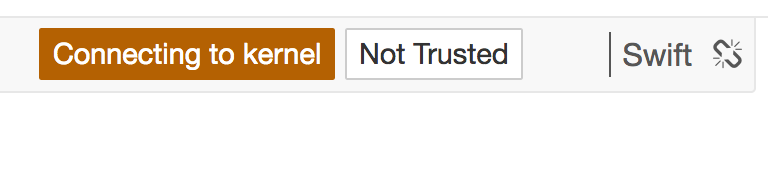
Thanks for any help!
For those wanting to get Swift4TF running on Debian Buster here’s a possible solution (I needed a local setup to test things out quickly). Tested with v0.6.0.
It seems the Swift4TF binaries are linked against libpython3.6, libtinfo5, libncurses5 (these are the main ones I had issues with). Debian system doesn’t provide libpython3.6, so I installed it via conda. Then symlinked it into the swift’s usr/lib directory. This way there was no need to edit LD_LIBRARY_PATH.
If you did want to use LD_LIBRARY_PATH then you need to specify the system path before the anaconda path so the swift binaries find the correct version of ncurses and tinfo. e.g. LD_LIBRARY_PATH=/usr/lib/x86_64-linux-gnu:/foo/bar/anaconda/envs/swift/lib
apt install libblocksruntime-dev libtinfo5 libncurses5
conda create -n swift python=3.6 jupyter
cd ~/swift/usr/lib
for i in $HOME/.local/anaconda3/envs/swift/lib/libpython3.6m.*; do ln -fs $i $(basename $i); done
Has there been any hope of getting a working swift for Tensorflow environment on Arch Linux? I’ve tried multiple times to get an environment working, but jupyter still does not detect the environment, even though it has been registered as a kernel. I’d hate to have to partition out my disks, and install another operating system like Ubuntu, especially because my drive is nearly full.
Just want to say that this has worked for me and I am very happy
I took quite some time to make it work, but basically following Jeremy’s install guide did the trick.
I used a Deep Learning base ami on AWS EC2 (Ubuntu 18.04) and ran Jeremy’s command. Also, one important thing to note is to install swift nightly build which comes prepackaged with LLDB Python3 support. Without this, I was running into weird errors.
2 Likes