Docker for fast.ai

Edit:

Paperspace has a Dockerfile for fastai on GitHub - Paperspace/fastai-docker: Fast.AI course complete docker container for Paperspace and Gradient. If you have nvidia docker, you can get started immediately with:

sudo docker run --runtime=nvidia -d -p 8888:8888 paperspace/fastai:cuda9_pytorch0.3.0

Any code you edit in the container however will be in the container’s file system, and will disappear if you delete the container without moving it out first. If you’d like to keep your code and data on your main file system you can follow my setup. You can also edit Paperspace’s Dockerfile accordingly to allow for this setup.

(End edit)


For those familiar with Docker, here’s a Dockerfile for the fastai library and the Dockerfile’s README for setup details.

Jeremy’s warning

I haven’t experienced any perceivable issues, but I haven’t investigated Docker’s interaction with CUDA to any detail. I’m using NVIDIA’s CUDA 9.0 image as a base image, which might be helping. @jeremy Could you elaborate on these issues? Maybe I’m suffering performance losses from Docker without realizing it.

The beginning of the README

2018-01-12: The Docker image works with the lesson1 notebook. It’s untested for other notebooks.

Why Docker


To not let dependencies slow you or anyone else down.

  • If you make a mistake while sorting out a mess of dependencies, you can just delete the Docker container and start from a fresh one; as opposed to trying to undo it on your operating system.
  • Once you sort out a mess of dependencies, you’ll never have to do it again. Even if you install a new operating system or move to a new computer, you can quickly recover your environment by downloading the corresponding Docker image or Dockerfile.
  • Also, no one else will have to go through that mess, because you can send them the Docker image or Dockerfile.

For more information, check out this Docker tutorial for data science.

Assumptions


How to use the Docker image


If you’ve followed the setup:

  1. Enter fastai into a terminal.
  2. Enter j8 into the container’s terminal that popped up as a result.

A Jupyter server will now be running in a fastai environment with all of fastai’s dependencies.


For those unfamiliar with Docker but would like to learn it, @hamelsmu wrote a great Docker tutorial.
7 Likes

I was hoping to build an image or dockerfile, built from NVIDIA’s GPU Cloud Container for Pytorch. Supposedly NVIDIA’s containers are more optimized. Additionally, as NVIDIA updates every month, things could run even better. However, when I ran some lines from the paperspace setup script (outside of the container), I wasn’t careful and something broke docker-ce. I have been able to run the class outside of my initial intentions, but still want to try it the docker way. Maybe this weekend I will start from scratch/clean ubuntu installation. Any words of advice?

  1. Could you enter docker run hello-world and paste the output here? I’d like to see if it’s so broken that it can’t run the basic hello-world image.

  2. Could you do the same with docker version? I’d like to see whether your version is up to date.

  1. Do you remember any of the lines you ran? And, are the lines from files.fast.ai/setup/paperspace or from another file?

As for potential performance hit regarding docker: Xu et al. did a thorough analysis in November and put simply they didn’t detect a substantial performance hit.

3 Likes

@Matthew Hi,
i’ve followed your instructions on github, everything went well, downloaded all your files and when it finished i got:
docker: Error response from daemon: OCI runtime create failed: container_linux.go:348: starting container process caused “process_linux.go:402: container init caused “process_linux.go:385: running prestart hook 1 caused \“error running hook: exit status 1, stdout: , stderr: exec command: [/usr/bin/nvidia-container-cli --load-kmods configure --ldconfig=@/sbin/ldconfig.real --device=all --compute --utility --require=cuda>=9.0 --pid=8182 /var/lib/docker/overlay2/b4f46fcd7d6f8809c2296fd114401215ac9c6267ef1182c20dc4c20cc2aa9078/merged]\\nnvidia-container-cli: initialization error: driver error: failed to process request\\n\”””: unknown.

I tried nevertheless to run the next command, jupyter_notebook_GPU_0_PORT_8888, then i get:
jupyter_notebook_GPU_0_PORT_8888: command not found

Any idea ? I’m new to Docker.

thanks a lot

Not sure, what to make of this, but it may be that your nvidia-driver is not properly installed.

I run my stack as follows:

  • Use nvidia-docker which keeps only the nvidia-driver on the ubuntu host and everything else, including cuda in the docker container - very handy if you like to run docker containers with tensorflow and pytorch on the same machine, because they have different requirements
  • Begin your Dockerfile with FROM my_favorite_nvidia_ubuntu_version_cuda_version_cudnn_version to start building on top of a ubuntu system with CUDA pre-installed by NVIDIA
  • Start your docker container with docker --runtime=nvidia my_docker_image **further_options

Not sure if it solves your problem, but it saved me a lot of headache trying to get the nvidia/cuda base ready.
Oh, and in the mean time I install nvidia drivers through their official ppa.

thanks @iNLyze for your feedback,

I did install nvidia-docker from the link you supplied as i’m running Ubuntu 18.04

i’m completely new to Docker, please allow me some questions:

  • where can i find my Dockerfile ? i searched for a file called like that but nothing comes back
  • Or is it called fastai ? i searched for fastai, i can find a number of folders, but no files named like this.
  • i don’t have a file called my_docker_image , do i need to create one ?

sorry for the newb’s questions,

i did run docker run hello-world, and it returns ok with message:
Hello from Docker!
This message shows that your installation appears to be working correctly.

Small consolation i guess. But fastai returns the error in my first post above.

thanks for your guidance

You create your Dockerfile yourself. It is just a text file called Dockerfile or anything, really.
It is like the template from which you build your docker image. By default docker expects above naming and the Dockerfile to reside in the same folder as your are building. In this case the basic command is:

docker build -t my_image_name .

The dot is important and is the path from which you are building (i.e. your current directory).

You can specify further flags like:

-f my_Dockerfile

--network host # Use this option only if you must. By default docker uses its own subnet with IP forwarding.

I used Matthew’s Dockefile as a starting point and worked my way from there

i’m surprised we have to go through all that, i thought the point of using Docker was for other users to avoid to rebuild everything.

I saw the dockerfile on Matthew’s Git folder, where should I save this file ? Why isn’t it installed in the first place. I’m a little lost really.

thanks for your guidance

You can download Matthew’s docker file and place it anywhere, really, like ~/Dockerfiles. This is then your build directory.
There you type in the above and get a docker image.
You run this image using

docker run --runtime=nvidia my_image_name # and add tons of options if needed.

See the Get Started part here to get an overview of the logic.

It may seem daunting at first, but it isn’t much different from putting all the commands one would execute on the command-line and put a RUN command before it. If you are not experienced with Ubuntu bash then maybe just stick with Matthew’s file. It has got most of what you need. Maybe go for Anaconda-5.1. (latest release) instead of the putatively older one in his repo (check his repo).

Could you kindly post the output that you get when you run the command nvidia-smi in your terminal? That would help in diagnosing the problem.

Hi Phil,

Nvidia-smi returns:
NVIDIA-smi has failed because it couldn’t communicate with the Nvidia-driver.

While reading on the side line, i might have found out the reason for my troubles. I have installed Ubuntu in a Virtual Box (Oracle) and it appears it’s “close to impossible” to access your GPU in any decent manner this way. Some might have succeeded but it’s far from trivial.

So I will roll back my setup and forget the Virtual Layer for now. I have installed Ubuntu on a USB stick, it’s far from ideal but it gives me a “cleaner” installation. I will then install the drivers and docker on this and give it a go.

Not sure about your virtual box setup. But even with a direct install, you need a properly installed driver before @Matthew setup instructions will work. You will know that your driver is properly installed when you see an output something like this:

+-----------------------------------------------------------------------------+
| NVIDIA-SMI 396.26                 Driver Version: 396.26                    |
|-------------------------------+----------------------+----------------------+
| GPU  Name        Persistence-M| Bus-Id        Disp.A | Volatile Uncorr. ECC |
| Fan  Temp  Perf  Pwr:Usage/Cap|         Memory-Usage | GPU-Util  Compute M. |
|===============================+======================+======================|
|   0  GeForce GTX 106...  Off  | 00000000:01:00.0  On |                  N/A |
| 41%   58C    P2    29W / 120W |   2833MiB /  6075MiB |      0%      Default |
+-------------------------------+----------------------+----------------------+
                                                                               
+-----------------------------------------------------------------------------+
| Processes:                                                       GPU Memory |
|  GPU       PID   Type   Process name                             Usage      |
|=============================================================================|
|    0      1052      G   /usr/lib/xorg/Xorg                           177MiB |
|    0      2346      G   compiz                                       129MiB |
|    0      6777      C   /opt/conda/envs/fastai/bin/python           2507MiB |
|    0     12352      G   /opt/teamviewer/tv_bin/TeamViewer             14MiB |
+-----------------------------------------------------------------------------+

Hi @P_Wes

i now got rid of virtual box and made a clean instalation of Ubuntu 18.04 on USB stick.
Managed to install the 390 Nvidia driver through the Ubuntu software update.
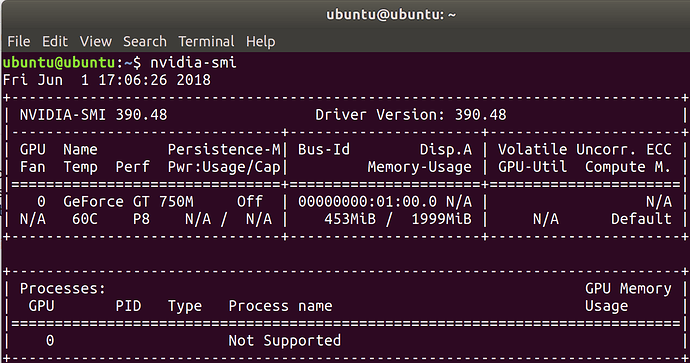
Now when i run Nvidia-smi I get:

So now i will proceed with Docker installation.

TLDR;

Yeah!
My own part 1 server ran the first cats and dogs in a dockerfile!

Experimenting via notebooks inside task specific docker containers is absolutely the cat’s meow!

@Matthew Thanks for the dockerfiles/fastai and instructions!
When I got to that point, it worked perfectly to get me running.

@fastai-community Wow! Thanks for the zillions of posts helping each other ( and indirectly me ).
It took me a while to figure out how I wanted to approach using a personal machine.
All of your inputs were help filled.

A longer story:

A month or so ago I watched part 1.
I was hooked on fastai.

I haven’t written much code for a number of years.
So, getting up to speed will likely be slower than it once might have been. :wink:
Looking up every little thing uses a lot of time.

Given my anticipated speed I knew that I would quickly tire of paying for compute cycles by the hour.
Otherwise, I would have just used paperspace for part 1.

While researching what to build,
I found the posts of community members helping each other to be a wonderful resource.
Thanks to everyone!

Boy it sure can be a time sink going down hardware choice and software configuration rabbit holes.
It can be tricky to determine the contexts in which community posts and internet search results apply.
I can see why it is recommended to start in the cloud.

However,

My own part 1 Server is now Running Fastai !!!

As a quick test I just trained the first dogs and cats classifier in lesson 1.
So far, its working great!

Software:
dockerfiles/fastai
running on Nvidia Docker 2
on Ubuntu 18.04 LTS server with Nvidia drivers
normally boots into console for headless operation
manual invocation of Gnome for non-headless operation using CPU integrated graphics

Hardware:
single 1080Ti GPU
16GB system ram
500GB NVMe SSD (Samsung 960 Evo M.2)
installed Ubuntu here
system i7-6700K, Z170
purchased from a local gamer that was moving back to Europe
mechanical disk
installed windoze here for hardware testing/verification

The hardware is not quite as nice/flexible as the system builds I spent week(s) researching.
But this way I saved some money and spending additional time.
So far the only hardware I added was an SSD and some fans.
System ram can expand if needed and the 1080Ti will accept a watercooling modification

In any event the box seems to be performing its’ task of becoming a 1080Ti compute server!

Next up will be to establish an ssh tunnel to my laptop and some rudimentary temperature monitoring.
Oh. And finally start lesson 1!

At some point I should poke a hole in my router so I don’t have to be at home to work.

Sad I need to defer this for a week or so to tend to some other things.

I’m excited!

And Thankyou all!

-Terry-

@tthrift
cool, how long does it take for your machine to run the 3 epochs of lesson 1 ?

my gear arrives tomorrow, so next week-end i’ll start my build.

@tthrift @Hugues1965 Have fun, I always love to build my machines :star_struck: I’m running a 1080Ti with a i7-5930K and 32 GB RAM. I’m also using nvidia-docker, but I’m using a pre-build pytorch image from nvidia. The 3 epochs (directly above the cyclic LR schedule image in the notebook) take 2:33 minutes. Would be interesting to see if nvidia has used some “secret optimizing sauce” or if it’s just the same in comparison to the cuda images from docker hub!

@Hugues1965 @kai I took a break from my other stuff and saw your messages. On my machine 3 epochs of the “quickstart” model ran in 7 seconds. The cyclic learn.fit(1e-2, 3, cycle_len=1) ran in 2:52 seconds. The scaling cyclic learn.fit(lr, 3, cycle_len=1, cycle_mult=2) ran in 12:40. Kai’s machine seems to run more quickly. I might try the nvidia/pytorch image sometime on this machine to compare apples to apples. (go docker! It’s not a huge task to just try it. ) It would seem like for the highest possible performance a person might need to compile binaries for their particular machine. For now I’m just thrilled that everything in lesson 1 seems to work!!!

edit: while training the Link Status of my 1080Ti is 8x instead of 16x. Hmm. it’s in the correct slot.
sudo lspci -vv | grep -P “[0-9a-f]{2}:[0-9a-f]{2}\.[0-9a-f]|LnkSta:”

@tthrift Is the variable torch.backends.cudnn.enabled True? If you want to try the pre-build pytorch image from nvidia, I posted a tutorial on that:

1 Like

@kai Thanks for your interest and helpful input.

I may have asserted reduced bandwidth too quickly last night.
I don’t know yet.

torch.backends.cudnn.enabled ==> true
nvidia-smi finds the GPU and seems to look normal.
lspci finds 2 Nvidia controllers for the 1080ti.
(1 VGA compatible at 8x and 1 HDMI Audio at 8x)
For all I know, this is to be expected.
( sleepy + ignorance ~ mybad )

Since, I haven’t yet tunneled out to my laptop. I’m running the fastai notebook in gnome on the GPU’s machine. nvidia-smi shows XServer to be using the GPU (even though the only display is on the integrated graphics port). So that might be affecting things.

Does the pytorch image that you use happen to have the cuda dev tools installed?
The examples have some tests in them.
I’ll probably try loading a cuda dev docker image and run some performance tests.
But first I plan to setup an ssh tunnel removing Nvidia X Server from the context.