Dataset discussion: German Traffic Signs


Name: The German Traffic Sign Recognition Benchmark
Task: Image classification
Training size: 39,209 images (263 MB)
Test size: 12,630 images (84 MB)
Number of classes: 43
State of the art (2011) [1]: 99.46% (“Committee of CNNs”)
Human performance: [2] 98.84%


My attempts

Lesson 1 VGG-16: 62.15%
Notes: (12 epochs) (2016-01-09) (fine-tuning)
My notebook

Lesson 3 VGG-style CNN with batchnorm: 93.51%
Notes: (1 epoch) (2016-01-17) (see TODO) (no fine-tuning; i.e. random initial weights)
Similar to the CNNs in the lesson 3 MNIST notebook

Lesson 3 VGG-style CNN with batchnorm: 97.58%
Notes: (30 epochs) (2016-01-18) (the same as the above network)


Image format caveat

The images are in the PPM format, which appears to be incompatible with Keras. I used the following code to convert them to PNG. It took about 45 seconds. The first wildcard is for the image folders and the second is for the images:

         mogrify -format png */*.ppm

Image “track” caveat

For each physical sign recorded, thirty images were taken. Each set of images is called a “track”. It’s important to keep the images of a track together when splitting the data into a training set and a validation set, otherwise the validation accuracy will greatly overestimate the test set accuracy.

Jupyter collapsible headings

It’s convenient to be able to collapse sections of a Jupyter notebook. Here’s a way to enable this feature:

conda install -c conda-forge jupyter_contrib_nbextensions jupyter nbextensions_configurator enable --user
Go to http://localhost:8888/nbextensions
Check the box next to “Collapsible Headings”

(Jupyter notebook extensions documentation)


Thanks to Jeremy and Rachel for lesson 1 and for demonstrating the Jupyter collapsible headings feature.

4 Likes

I forgot to train the network on all the data for the submission. I’ll consolidate the training and validation data, refit, and resubmit.


Here are the top confusions for the lesson-1–vgg16–4-epochs–20%-validation model:

Format: True sign, predicted sign, number of confusions

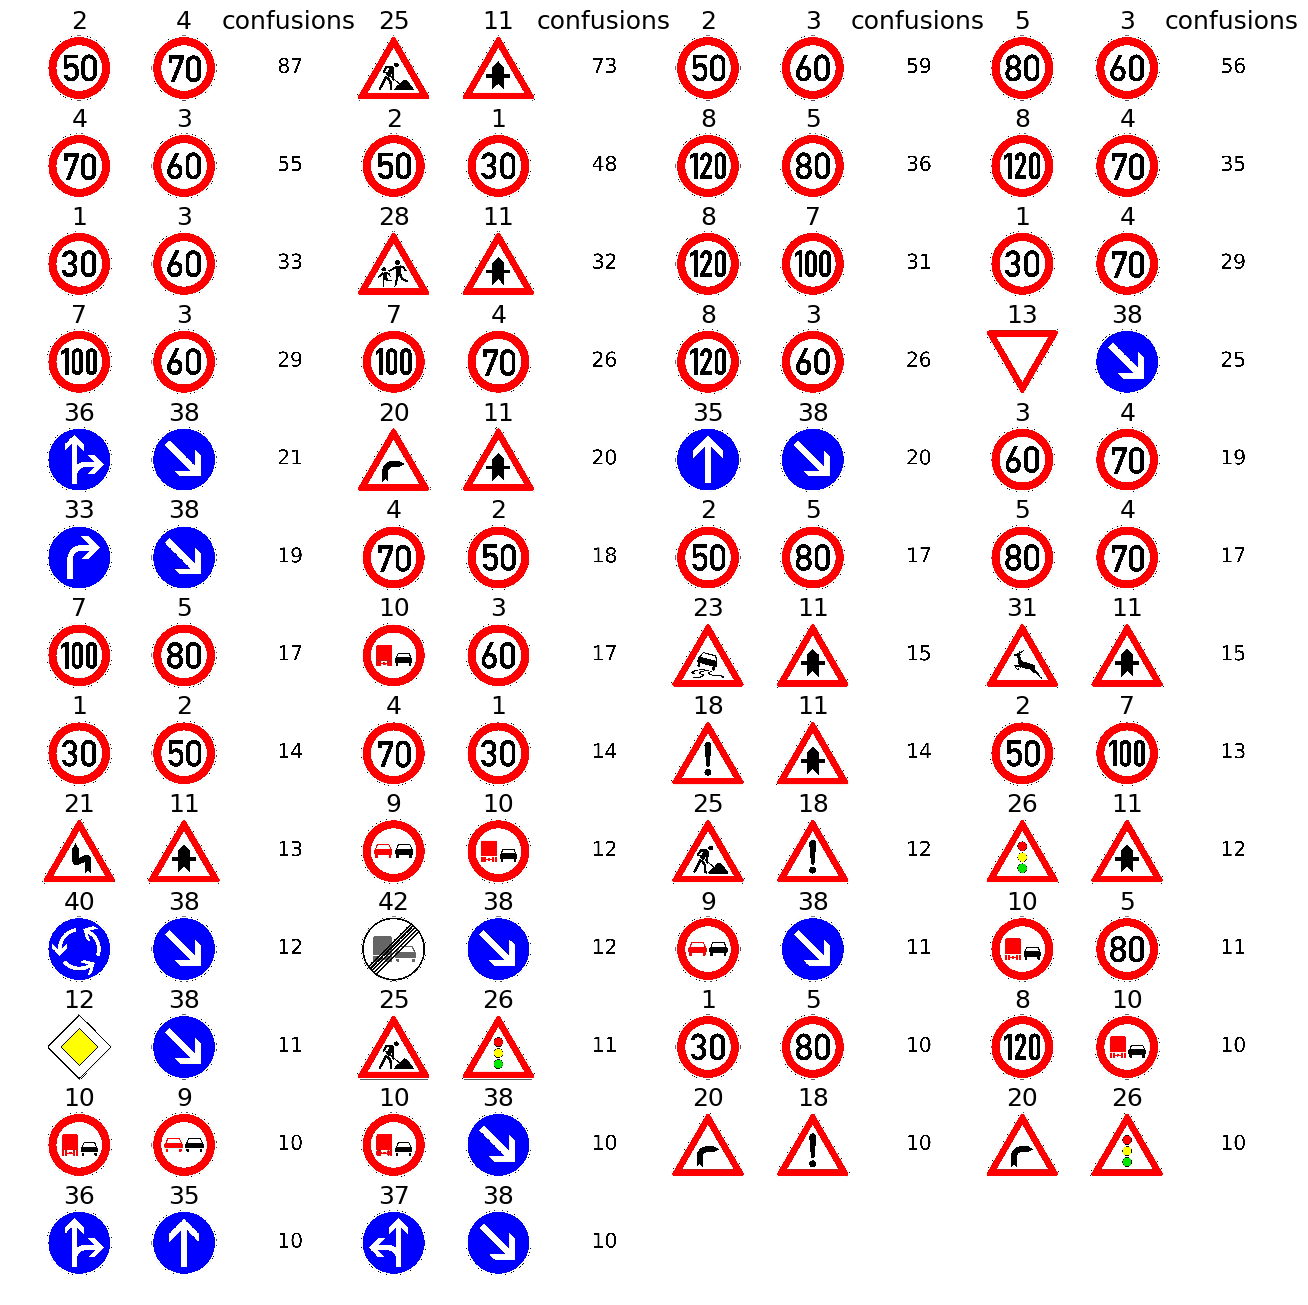
An example reading of the chart:
The model labeled the 50km/h sign as the 70km/h sign 87 times, but labeled the 70km/h sign as the 50km/h sign only 18 times.

Thanks for sharing!

How does this compare to the winning entries from the original competition?

Very cool project and nice notebook! The visualisations are really good.

It looks like your loss was still decreasing with the last fit in the notebook, so maybe try training it a bit more?

@jeremy

62.15% as compared to 99.46% in 2011. This was a drop from the 81.80% validation accuracy. I’m looking forward to applying the skills from later lessons to improve the performance. Maybe I did something wrong, though, even for lesson 1. Here’s the notebook: https://github.com/MatthewKleinsmith/fast-ai-MOOC/blob/master/german-traffic-signs.ipynb

@aha

Thanks for the tip! I’ll run more epochs now and resubmit.

Edit:
01 :val_loss: 1.0928 - val_acc: 0.6614

05 :val_loss: 0.7206 - val_acc: 0.7643
06 :val_loss: 0.6283 - val_acc: 0.7966
07 :val_loss: 0.6115 - val_acc: 0.8019
08 :val_loss: 0.6348 - val_acc: 0.7921
09 :val_loss: 0.6627 - val_acc: 0.7855
10 :val_loss: 0.5719 - val_acc: 0.8102

Some questions:

  • Which model should I use to guide my choices when training on all the data?
  • Should I use the 7th model, because the one after it decreases in performance?
  • Or should I use the 10th model, because it has the best performance?
  • In what way should the chosen model guide my choices when training on all the data?
  • Should I use the same number of epochs as the chosen model?
  • Or should I use 20% more epochs because I’ll be using 20% more data?
  • Or something else?
  • Should I run more training epochs because the last model was the best?
  • Should I train until the validation loss is the same for at least two epochs?

Some hyperparameters I haven’t been tuning:

  • Batch size: 64
  • Specified in vgg16.py:
  • Learning rate: 0.001
  • Optimizer: Adam
  • Loss function: Categorical cross entropy
2 Likes

From lesson 3, I’d say don’t just look at validation accuracy. Compare it to the training accuracy to see whether you’re overfitting or underfitting, and then act accordingly. See lesson 3 on how to deal with either situation.

Update: From 62.15% to 93.51% accuracy

Differences:

  • Instead of fine-tuning VGG, I used the VGG-style CNN with batchnorm from the MNIST notebook.
    • I think this worked better because traffic signs are must simpler than cats, dogs, flowers, and so on. This allowed for a simpler network like the one Jeremy and Rachel used for MNIST. The simplicity of the network allowed me to retrain all the filters instead of fine-tuning them. One epoch from random weights took 51 seconds.
  • Only did one epoch! (see TODO) (learning_rate == 0.001)

TODO:

  • Apply more lesson 3 skills/ideas/tips/tricks:
    • Do more than one epoch!
      • Use the learning rate pattern that Jeremy used (0.001, 0.1, 0.01, 0.001, …)
    • Data augmentation
    • Dropout
    • Ensemble
  • Input normalization (I didn’t subtract the mean or divide by the standard deviation)

Update: From 93.51% accuracy to 97.58% accuracy

Differences:

  • 30 epochs instead of 1 (same learning rate, 0.001)

TODO:

  • Same TODO
2 Likes

Love how you were able to improve the accuracy from 62.15% to 97.58%, one step a time!

1 Like