SSD Object Detection in V1

Professor Howard, in the 2018 Advanced Course (Part 2) presented an example of SSD Single Shot Object Detection. It was a very interesting albeit complex notebook; unfortunately, it was written in Fastai V0.7.

I have ported the SSD notebook into Fastai V1 and it works very well. You can find it in my GitHub at https://colab.research.google.com/github/jav0927/course-v3/blob/master/SSD_Object_Detection.ipynb

This was the most challenging model in the course and also a wonderful learning tool. I hope it will be of value to the community. In developing the model, I was inspired by previous work by Henin.

15 Likes

page note found! please check the link

1 Like

My apologies. Try again and let me know.

1 Like

Jose: It looks like you have put a tremendous amount of work into this notebook. It runs smoothly
There is, however, a typographic error on code line number 39. It is:
learn.load(F’/content/gdrive/My Drive/model-SSD/ssd_unfreeze_2_2’, strict=True)
Line number 39 Should Be:
learn.load(F’/content/gdrive/My Drive/ssd_unfreeze_2_2’, strict=True)
IN addition line 66 is:
learn.save(F’/content/gdrive/My Drive/ssd_unfreeze_7)
Line number 66 should be:
learn.save(F’/content/gdrive/My Drive/ssd_unfreeze_7’)
Please keep up the great work!

1 Like

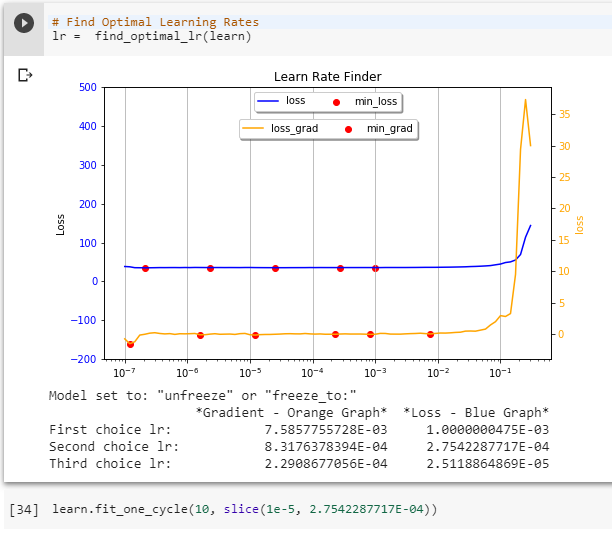
Thank you for pointing out the errors, Allan. I believe they are leftovers from my debugging frenzy.

In the mean time, I discovered another bug of my own:
Line 105: if is_unfreeze(learn):. The correct statement should be: if is_unfreeze(learner):
As it is, the method works because learn is a valid variable used elsewhere in the notebook, but if you lift the find_optimal_lr method for use in another notebook, it will fail.

If you are interested in object detection, you’d know that SSD is fast and relatively accurate. However, it is not very good detecting small objects in images. I have been playing with the model and found that by adding a couple of extra conv2 layers to the layers that detect small objects, I can improve the model’s small object detection power. I call them “booster layers” .Try it. Replace the ssd_model method with this one:

class ssd_model(nn.Module):
def __init__(self, arch=models.resnet34, k=9 , drop=0.4, no_cls=21):
    super().__init__()
    self.k = k
    self.body = create_body(arch)
    self.drop = nn.Dropout(0.4)   # it was 0.25

    self.std_conv_0 = conv2_std_layer(num_features_model(self.body), 256, drop=drop,stride=1)
    # Dimension-reducing  layers
    self.std_conv_1 = conv2_std_layer(256, 256, drop=drop, stride=2) # 4 by 4 layer
    self.std_conv_1_1 = conv_layer(256, 256, stride=1)  # Booster layer
    self.std_conv_2 = conv2_std_layer(256, 256, drop=drop, stride=2) # 2 by 2 layer
    self.std_conv_1_2 = conv_layer(256, 256, stride=1)  # Booster layer
    self.std_conv_3 = conv2_std_layer(256, 256, drop=drop, stride=2) # 1 by 1 layer
    # SSD layers
    self.ssd_conv_1 = conv2_ssd_layer(256, k=self.k, no_cls=no_cls)
    self.ssd_conv_2 = conv2_ssd_layer(256, k=self.k, no_cls=no_cls)
    self.ssd_conv_3 = conv2_ssd_layer(256, k=self.k, no_cls=no_cls)
    
def forward(self, xb):
    xb = self.drop(F.relu(self.body(xb)))
    xb = self.std_conv_0(xb)
    xb = self.std_conv_1(xb)
    xb = self.std_conv_1_1(xb)
    bb1, cls1 = self.ssd_conv_1(xb) # 4 x 4
    xb = self.std_conv_2(xb)
    xb = self.std_conv_1_2(xb)
    bb2, cls2 = self.ssd_conv_2(xb) # 2 x 2
    xb = self.std_conv_3(xb)     
    bb3, cls3  = self.ssd_conv_3(xb) # 1 x 1
    
    return [torch.cat([bb1, bb2, bb3], dim=1), 
            torch.cat([cls1, cls2, cls3], dim=1)]
2 Likes

Thank you very much for this, Jose. This is great. Please, could you explain us how to use the learning rate finder?

Hi, Alonso,

As you know, a learning rate value is most effective when it is selected at a point in the lr graph where the negative slope is largest. What the find_optimal_lr function does is calculate all these inflection points along the lr graph and display them for you to choose.

To use the function, first run lr_find, then run find_optimal_lr.

When you start training a model, you should choose the largest lr value possible. So, looking at the graph, you should choose one of the rightmost inflection points, with the caveat. Do not pick up a point that is too close to where the lr or gradient graph shoots up (an order of 10 or closer). These points train the model poorly.

You can pick up points from either graph: the loss (blue) or the gradient (yellow). You will notice that there are points on the blue and yellow graphs that have almost the same lr value. These are the stronger points of inflection.

I usually select a lr value and then train the model for 10 or 20 epochs. Then I run again lr_find and find_optimal_lr and select another lr rate. I do this because inflection points tend to drift along the graph as you train the model.

As a general rule, you choose the largest lr value possible, specially when you start training the model; however, once your model has been trained after multiple epochs, it is sometimes best to choose a lr in the middle or left side of the graph. You have to play it by ear. AI is full of caveats.

If you select a pair of values for use in a slice, choose two inflection points that are 10 or 100 orders of magnitude apart.

By the way, there is another post in this blog, entitled Selecting Learn Rates in FASTAI, that contains additional details about what the function does.

Hope this helps.

2 Likes

Thank you very much, Jose.

Thanks a LOT for your notebook, it really helped me, great job!!!
But how can I predict new images using this model? I’v been trying to use this code


but got this error
I found how to predict validation dataset, but I need to predict completely new images

UPD: Solved!

Sorry for the delay in answering. I am traveling in Russia, armed with an iPad only. I am glad you found a solution using Torch. If you want to use Fastai to test, the easiest way is to use the power of the Data Block to normalize and prepare the input images. The procedure is as follows:

  1. Go to the folder where the Pascal dataset is kept. I believe it is .fastai/data/Pascal_2007. Create a folder with a name other than Test (Test is used by Pascal to hold the validation images)
    I named it “test_real”. Use this folder to keep all the external images you want to test.
  2. Create a simple databunch to read the test images.
  3. Cycle through the test_dl that was created by the databunch
  4. Display the image without NMS
  5. Predict the test images using NMS
    The complete code is shown below:


1 Like

Edit: There is an easy fix for this, replace following in the function def single_ssd_loss(pbox,plabel,box,label)

gt_clas[1-pos] = len(data.classes)
gt_clas[~pos] = len(data.classes)


I tried to run your notebook, but encountered this error at Cell 24 …something with the Loss Function … what does it mean?

1 Like

Hi, I am sorry you are having trouble running the code. It is my fault. I should not have given advice when I did not have a computer at hand or access to the code. Please bear with me for a few days. As soon as I get back to the US, I will consolidate all changes and enhancements into a single notebook. It will then be easy read and test. Regards

1 Like

SSD Object Detection in V1 (Version 2.0)

I have consolidated all changes made to Version 1.0 and added a number of enhancements:

  1. Changed the architecture to RESNET50 to improve training accuracy
  2. Enhanced the model with a couple of booster conv2 layers to increase the power of the model to recognize small objects
  3. Added prediction code at the end of the notebook to test external images with and without NMS
  4. Added a model export section that creates a .pkl file. This file is read by the external image prediction section, which can be in a separate computer

I am working on Version 3.0 that will include:

  1. Enhanced data augmentation. Implementation of the paper “Learning Data Augmentation Strategies for Object Detection” by Barret Zoph, Elkin Cubuk, et. al.
  2. Mechanism to calculate Mean Average Precision mPA

You can find Version 2.0 in my GitHub at https://github.com/jav0927/course-v3/blob/master/SSD_Object_Detection_RS50_V2_0_Fixed.ipynb

As always, I welcome your comments and suggestions.

4 Likes

Really hoping someone is able to help.

I’m working on an object detection tasks where there is an imbalance of instances across classes (DOTA dataset). Has anyone tried using weights for each class to address this problem? Or indeed, are there any practical strategies for addressing this problem?

Thank you for this, but page not found.

Hi all. I’m trying to replicate the SSD from the old 2018 course to the latest fastai (the notebook is here: SSD Implementation using fastai · GitHub). I have a question related to bias in the classification head.

 class OutConv(nn.Module):
    def __init__(self, k, nin, bias):
        super().__init__()
        self.k = k
        self.oconv1 = nn.Conv2d(nin, (21)*k, 3, padding=1)
        self.oconv2 = nn.Conv2d(nin, 4*k, 3, padding=1)
        self.oconv1.bias.data.zero_().add_(bias)
        
    def forward(self, x):
        return [flatten_conv(self.oconv1(x), self.k),
                flatten_conv(self.oconv2(x), self.k)]

What is the purpose of self.oconv1.bias.data.zero_().add_(bias) here?

Bias is -3. in onehead model and -4 in multihead in the course

Thanks

The statement inserts a bias to conv1. It first resets it to zero, and then it adds the bias. Otherwise, the bias would accumulate incorrectly.

Thanks. But how do we find these values? Why not just zero?

Trial an error. You run the model and, if the result is off, you alter the value of the bias. You run again and repeat the process

1 Like

Thanks. As bias is not something I would try when the model doesn’t work, do you have any intuition of when we should change the default values?