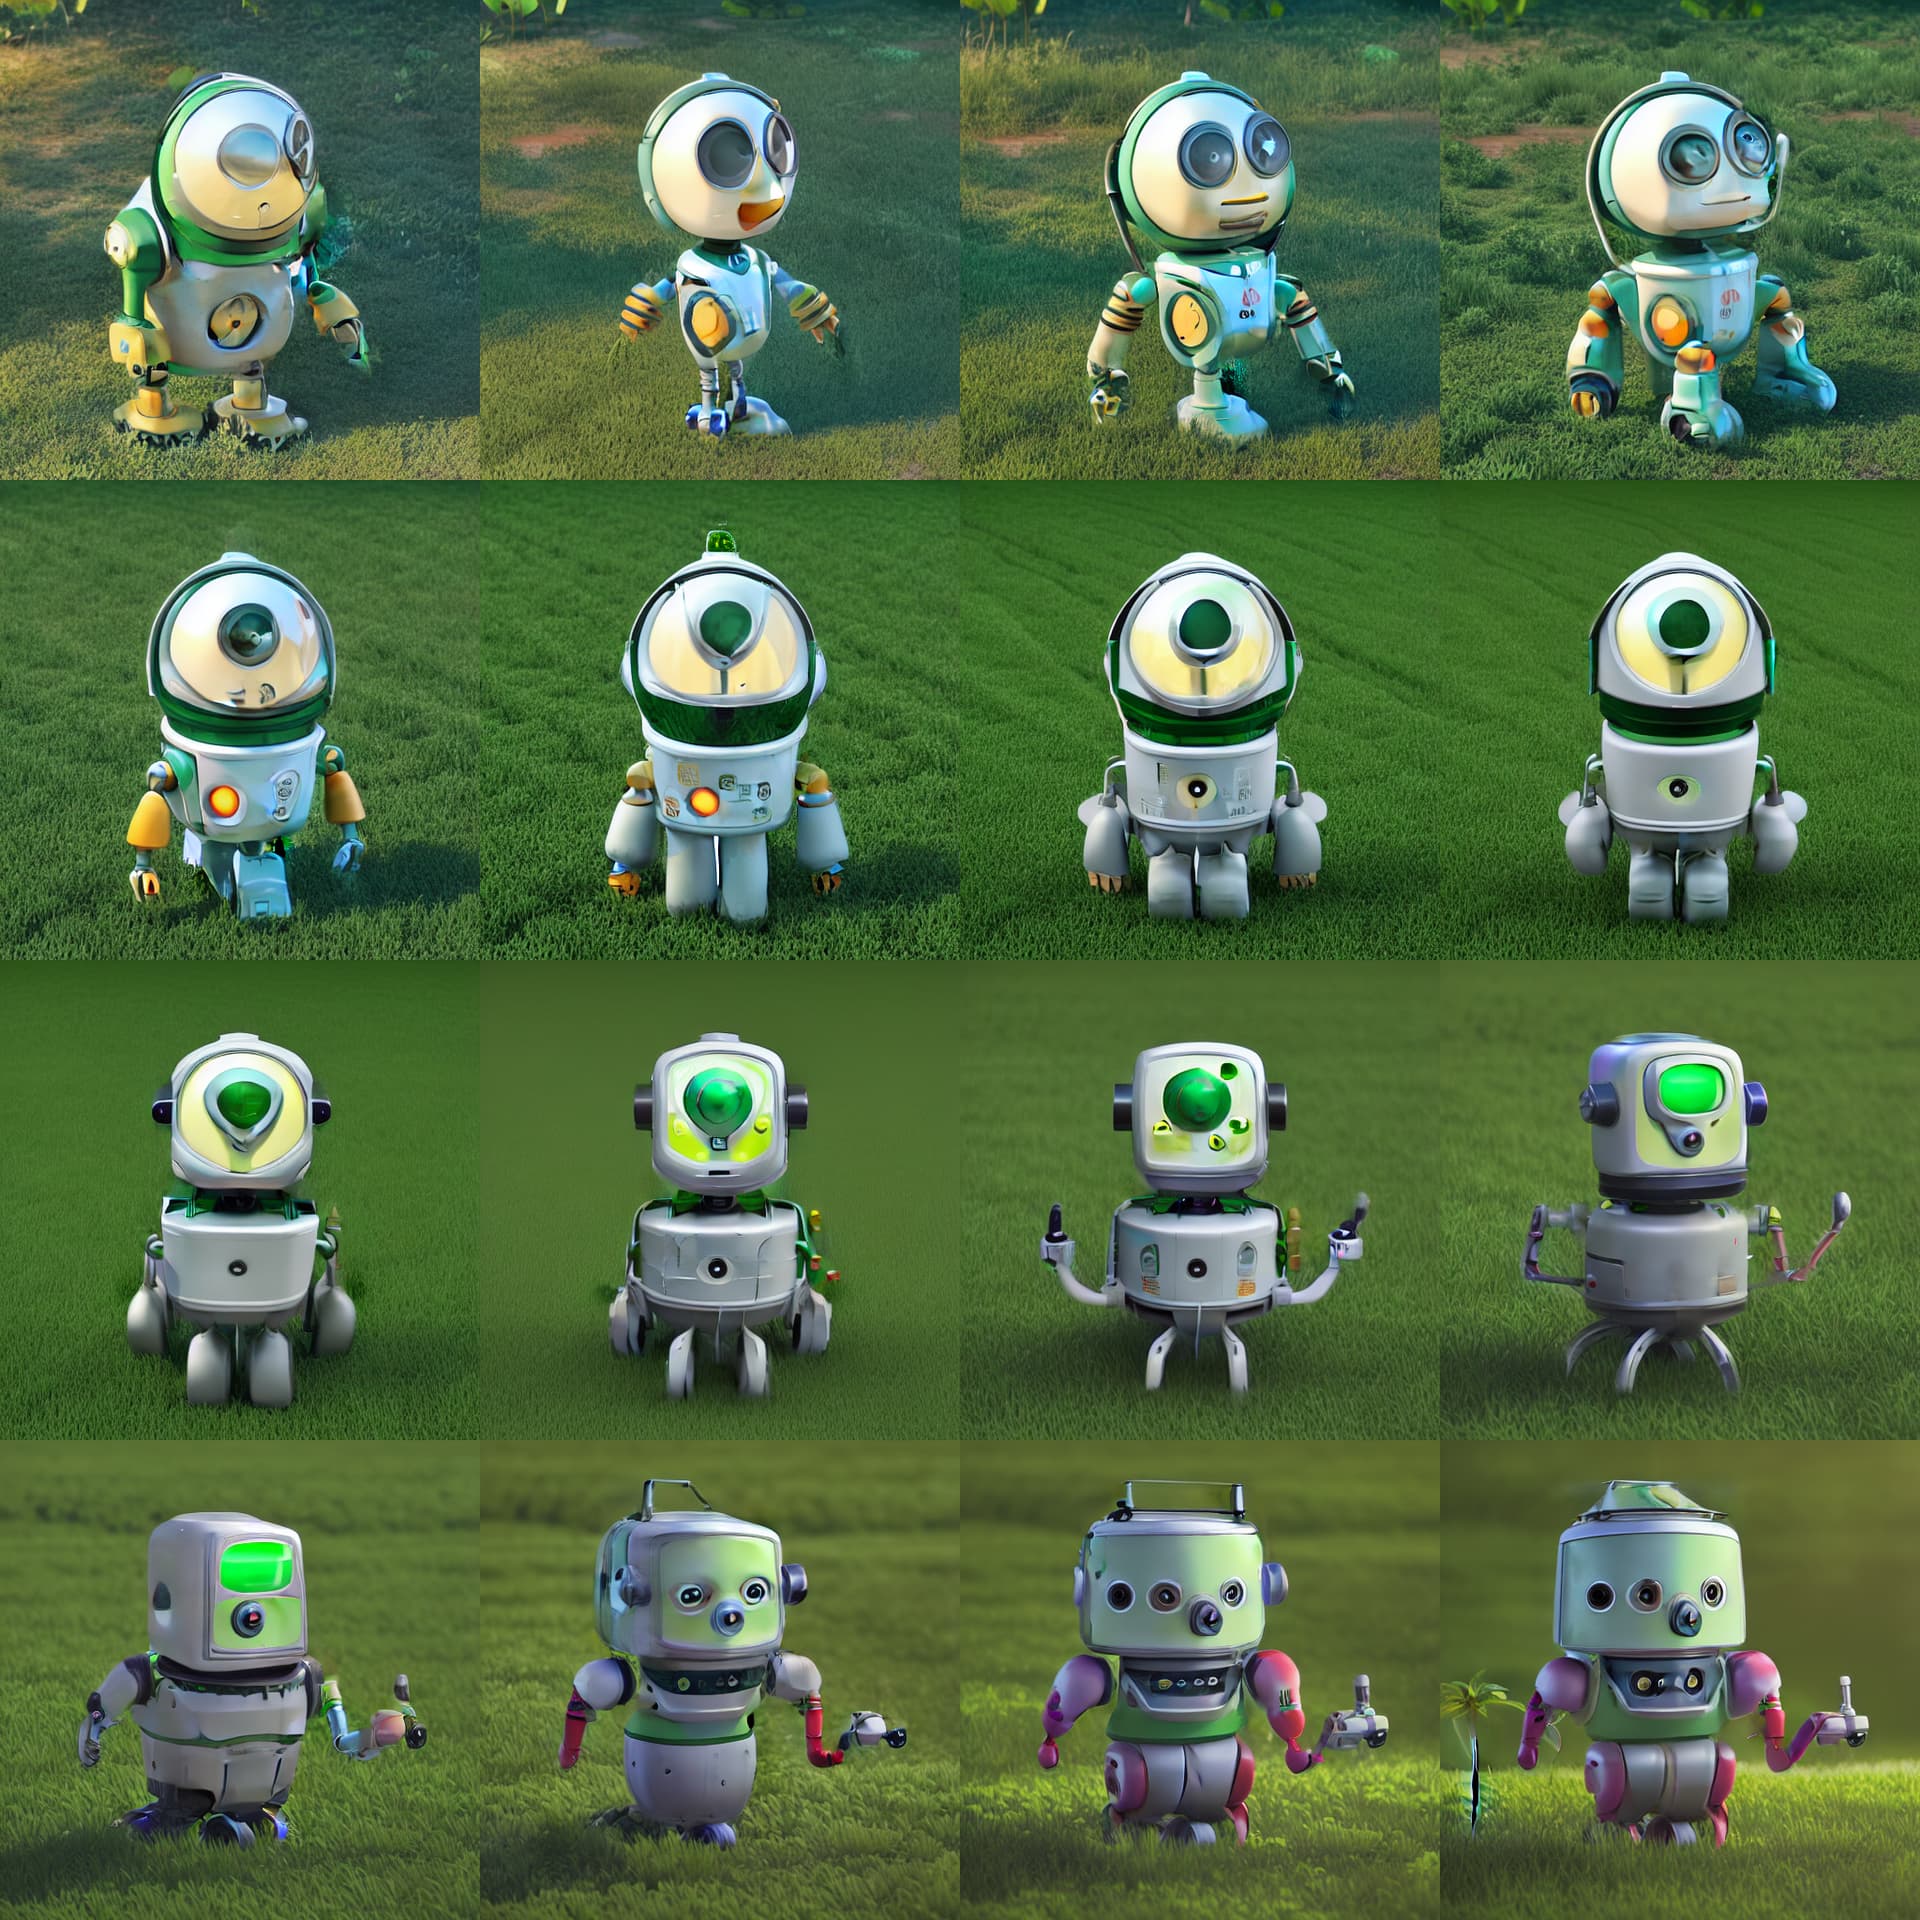
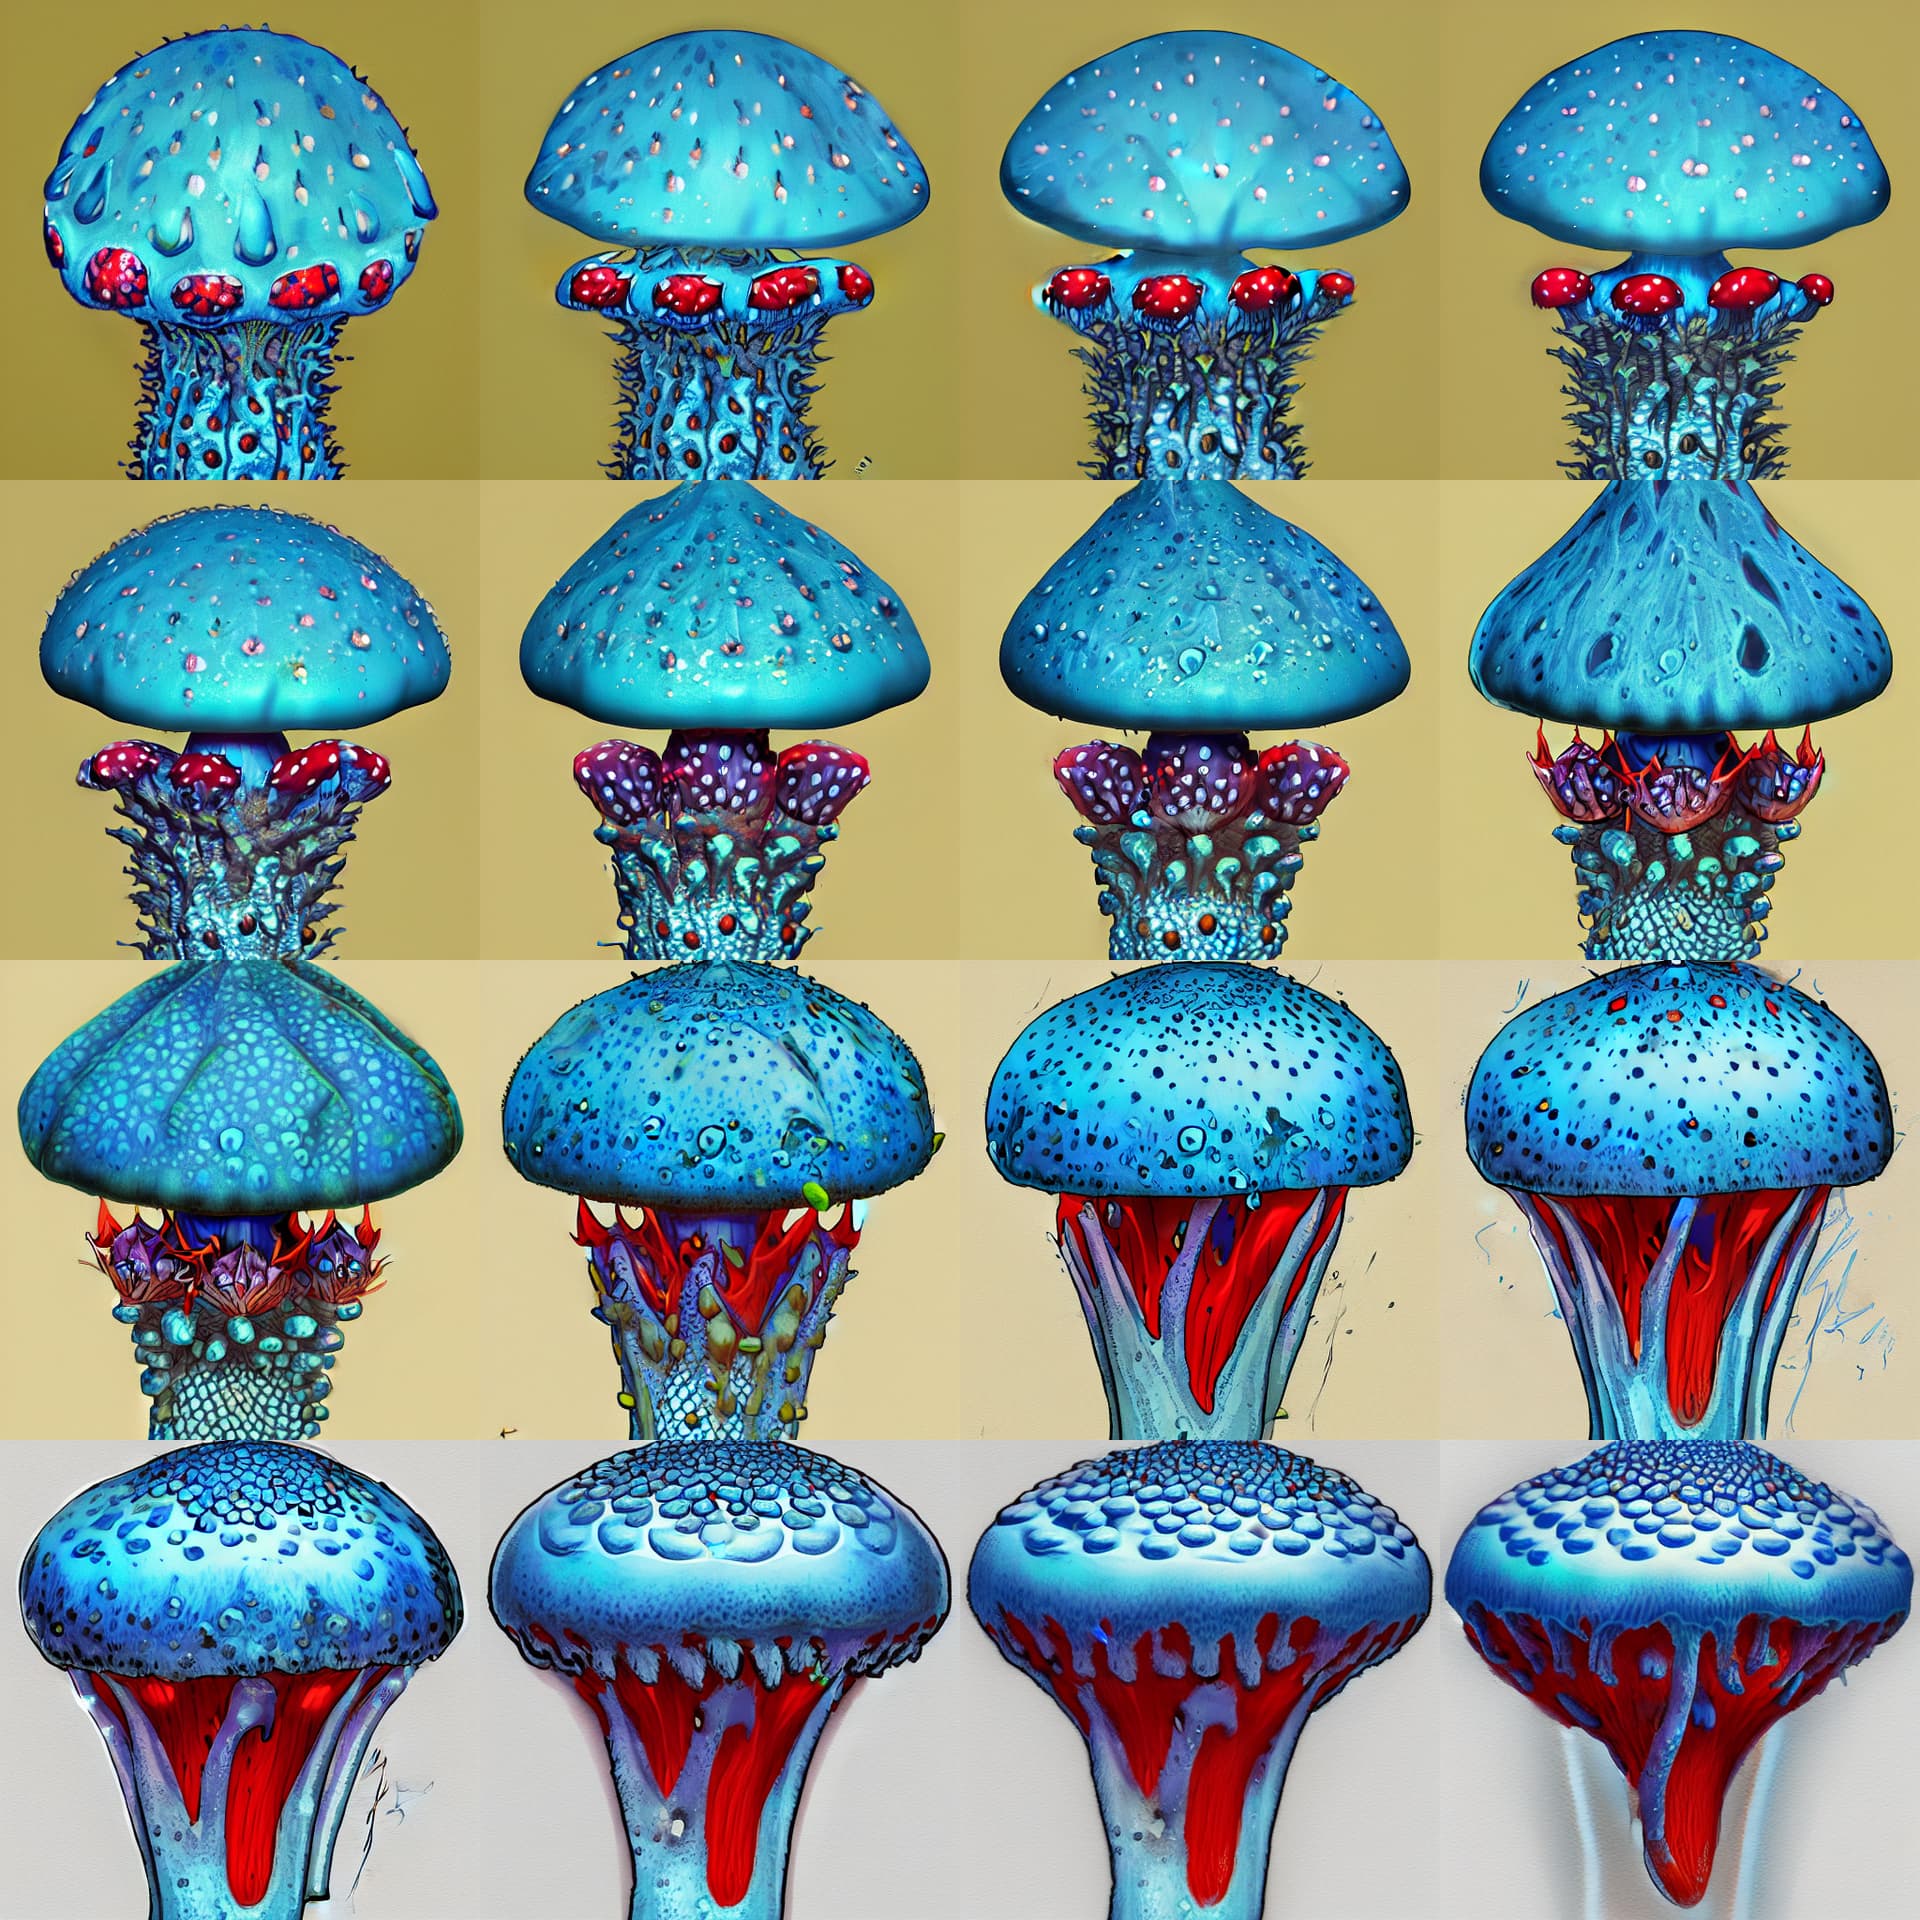
Here are some additional interpolations I did, using other prompts:
prompt:
“solarpunk cute farmer robot. pixar style. octane render. 8k. palette: white, gold, dark green”
I have a feeling there should be other interesting ways to explore the latent space more intelligently to better control image generation results. Maybe I’m not understanding latent vectors correctly, though. I’ll run some experiments and report back.
I’m also playing with some latent space interpolation.
In case it helps others, I put together a PyTorch-friendly version of SLERP. It is based on code I found in the pytorch forums together with a popular numpy SLERP implementation. The code here avoids casting tensors to/from numpy, but still has the appropriate threshold check for when vectors are too close to parallel.
def slerp(v1, v2, t, DOT_THR=0.9995):
    """SLERP for pytorch tensors interpolating `v1` to `v2` with scale of `t`.

    Reference: https://splines.readthedocs.io/en/latest/rotation/slerp.html
    """
    # take the dot product between normalized vectors
    dot = torch.mul(v1/torch.linalg.norm(v1), v2/torch.linalg.norm(v2)).sum()

    # if the vectors are too close, return a simple linear interpolation
    if torch.abs(dot) > DOT_THR:
        res = (1 - t) * v1 + t * v2

    # else, apply SLERP
    else:
        # compute the angle terms we need
        theta   = torch.acos(dot)
        theta_t = theta * t
        sin_theta   = torch.sin(theta)
        sin_theta_t = torch.sin(theta_t)

        # compute the sin() scaling terms for the vectors
        s1 = torch.sin(theta - theta_t) / sin_theta
        s2 = sin_theta_t / sin_theta

        # interpolate the vectors
        res = (s1 * v1) + (s2 * v2)
    return res
I’ll have some more examples and functions in a blog post, hopefully soon
There is a “natural” curve in latent space for all latents: Take a latent, diffuse it, then map the resulting image back to latent space (and repeat). This tends to take the images into a “cartoon” region of the latent space. See this for more details: Share your work here ✅ (Part 2 2022) - #156
Interpolation: once both images are in cartoon space, interpolating between the images seems to work better.
Here are some other ideas that may improve interpolation:
Instead of interpolating along a straight line between fixed latents, update the latents after each diffusion run (as in 1)) and interpolate between the updated latents. I think this helps keep frame to frame consitency.
Instead of interpolating from img1 latents to img2 latent directly, take turns updating the latents and reverse the direction of interpolation at each step. One update step for img1 → img2, then one for img2 → img1.
During this process, gradually relax the guidance scale down to 0. This allows a nice, abstract transition of the image without it having to follow any prompts.
Eventually the two diffusion processes converge on the same point in latent space (this is the middle of the video - usually the most abstract part).
Concat the diffusions together, reversing one of them.
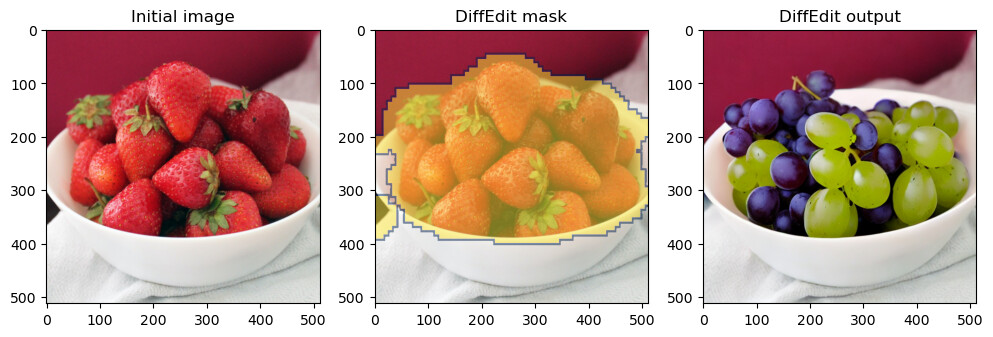
I just finished writing the DiffEdit blog - Stable diffusion using Hugging Face - DiffEdit paper implementation. Here are the highlights, I first do a purist implementation and then propose a FastDiffEdit method which significantly reduces the mask creation time. (5x improvement).
Few learnings while doing the purist implementation which I got wrong when I did implementation the first time -
When we do iterate 10 times for getting the difference, we get 10 4x64x64 latents, instead of directly averaging them if we do averages of absolute value it gives much better results
Everybody is using the min-max scaler for normalization, I realized that this scaling technique is not great as it just brings the values b/w 0 and 1 and does not change the distribution of values itself. Hence, there is no guarantee that the 0.5 thresholds to binarize will hold true. Instead, if you use z/standard scaling that guarantees the final values to be distributed around zero and we can safely take a >0 threshold for the binarization step.
The above two changes are producing much better masks than any implementation I did previously.
Next, I propose a new method called FastDiffEdit . realizing that the masking process is extremely slow (takes ~50 sec on my machine). The reason is we are running a diffusion loop (25 steps for each iteration => a total of 250 steps). My take is we don’t need to run a full diffusion loop to denoise the image but just use the U-net prediction of the original sample in one shot and increase the repetition to 20 times. In this case, we can improve the computation from 10*25 = 250 steps to 20 steps (12x less loop) and the mask produced is more or less the same. Here is an example =>
and tokenizer.decode([7982, 627 , 1397]) results in astronauta (7982: “astron”, 627: “au”, 1397: “ta”).In english there is a specific token for astronaut, token 18376.
The text_encoder will generate similar embeddings for prompts in different languages.
I had a similar thought about speeding up, as in why run the loop for each step instead of taking the prediction for the step we are interested in, but never followed through on experimenting with it Looking forward to reading your article over the weekend and doing some experimenting …
Try generating images of your dog in different settings. When I was playing with TI, it was generating good stylistic images but would have issues with settings.
For the rest of the course, I am focussing on implementing Stable Diffusion from scratch. Learning from videos, but in the end, I implement things in my way.
I have always loved the QuickDraw dataset. It is simple and fun. But still has ~50M data points. I will try to implement StableDiffusion on this dataset. Quick, Draw! The Data
Memory efficient. I can implement random IO without loading all the underlying arrays to memory.
Since it’s a Map-style dataset, I can easily use all Pytorch framework support, like multi-processed Dataloaders, without worrying about per-process data order and distribution across GPUs when using multi-GPU training.
I added the repo with the training notebook and another notebook for using the embedding. Some of the prompts I used to make the images are in there.
I agree, it makes awesome images with style transfer but struggles making a scene out of it. I tried prompts to have my dog chasing a squirrel or driving a car and the results were hit or miss.
Last weekend I and @bahman_apl participated in our first-ever hackathon and we finished top 4 of 770 participants. This wouldn’t have been possible without attending this course. We would like to thank @jeremy and everyone involved for creating this amazing course.
The theme of the hackathon was stable diffusion and was hosted here.
We tried to create a tool to automate social media ad creation for small businesses. Here is our video presentation for the hackathon.
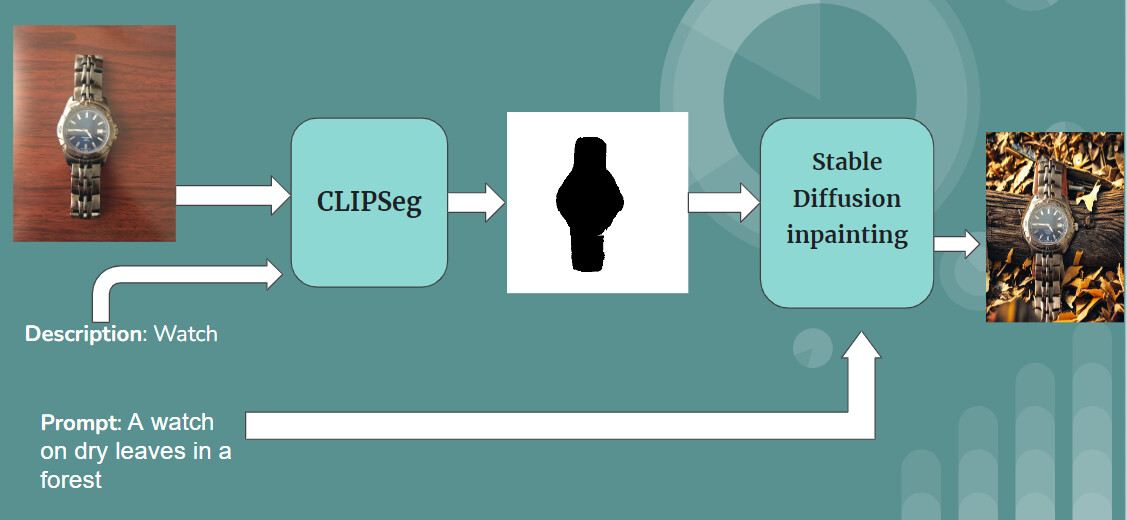
We used CLIPSeg to create a mask from an image of our target object and its text description and we then used Stable diffusion inpainting model by runwayml to paint the background.
I have been experimenting with some more interpolation ideas, let me know what you think!:
Horizontal panning while maintaining frame-to-frame consistency.
Basic steps:
Take a starting image and shift it to the left.
Run diffusion to fill in the newly exposed part of the image.
Repeat and stitch frames together.
[Fields to mountain interpolation]
[Jungle]
Note:
This is similar to inpainting, but I think that the resulting videos have a different style because the whole image is subtly changing in every frame.
I don’t understand how that worked yet, I just thought it would do something different - certainly didn’t expect such a dramatic result! I will experiment with more of the suggestions that have come after then see what happens
Are you using a mask to target the revealed area… And using inpainting? I’d expect the mask to protect the retained area better … now I want to give this a try… Thx for sharing!
It is not using the diffusers inpainting model. I think it would be interesting to use this and compare results! I believe in this case the mask would perfectly protect the retained area.
I am using a kind of “leaky” mask with the standard diffusion model in the examples above. The leakiness is a parameter that can be tuned, and different styles seem to benefit from different values.
I came across this tweet a few days ago, saying that no one (apparently) has ever used stable diffusion for zero-shot learning (=classifying with 0 training data examples).
I’m not really sure it makes sense to use SD for this, since it is based on CLIP, which is itself quite good at zero-shot classification… But I thought it would be cool to try!
Define 2 prompts “a photo of a dog”, “a photo of a cat”
Take an image you want to classify
Modify the image using the img2img pipeline with those 2 prompts (if possible, give several images for each prompts)
Use a standard off-the-shelf network to embed the original image (found a handy library for that), as well as all the SD-modified versions.
Use cosine similarity in order to find the best ones.
This zero-shot classification method performs unfortunately worse than CLIP (it got an accuracy of 93% vs 100% for CLIP on 100 random validation images), and takes A LOT more time, so not sure that it’s a promising research direction, but if you guys have ideas on how to improve this pipeline, I’d be happy to hear!!
PS: retrospectively, I think the fact that I’m using a resnet18 pretrained on ImageNet may be kind of cheating, since it has actually seen many pictures of dogs and cats with their labels before… Maybe it would be “cleaner” to replace the resnet with a self-supervised network that hasn’t seen any label before (I think it should work as well if not better). Another possibility to make things cleaner would be to apply this classification procedure to a dataset with labels that don’t appear in Imagenet.