Could we pin this topic to the top? A very interesting topic for anyone who wants to bring ML from notebooks into the real world!
Also, I wonder, is it possible to somehow “extract” preprocessing pipeline from the learner? I guess this question was already discussed a lot in the thread about ConvLearner. However, it would be really handy to have something like:
# on a training machine
learn = ...  # trained model
learn.export(model_path)

# on server
inference = fastai.load(model_path)
test_images = load_data(path)
predictions = inference(test_images)
Of course, it is just an example but would be great to have something similar. The main idea to be able to load the whole pipeline without a need to re-create data loaders, transformations, etc. Like, having a single “executable”-like to keep everything required to run the model. Like, computational graphs in TF.
Also, does anybody tried to use learn.model directly, i.e., pytorch model itself? I remember that I had some problems when tried to load image manually (using PIL) and feed into the model. I’ve normalized data but the predictions were wrong. I guess I’ve missed some other preprocessing steps.
Talking about pythonanywhere, I was trying this thing to host a site with static content using this platform. Quite intuitive, I would say. I was able to deploy web app without any issues. I guess the same should be true for any Python package if don’t need a GPU support.
Am entirely not sure if I can post this here. Would move if it belongs to the Class 1 chat.
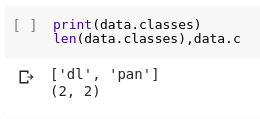
The work on your repo putting the model to production was really really good. I was following your repo trying to do inference from my model (on my CPU after downloading the model from Colab)from the Class 1. I’ve two classes
Driving Licence
Pan Card
I’m bit confused on the way the order of the names in the fnames is affecting the results
Order 1
dl_pan_fnames = [
“/{}_1.jpg”.format(c)
for c in [
“Driving Licence”,
“Pan Card”
]
]
dl_pan_learner = ConvLearner(dl_pan_data, models.resnet34)
dl_pan_learner.model.load_state_dict(
torch.load(“dl_or_pan.pth”, map_location=“cpu”)
)
For the image I was using, Pan Card is the correct answer. The data classes during training the model was as below.
Are the losses printed according to the order of the data.classes?
Also I’m used to the kind of results of a classifier finally adding upto 1. I understand that we’re calculating the losses here. So what does a strong negative value imply vs a strong positive value?
I noticed that the you cougar model was 83 MB and my model is also 83 MB. Do all the resnet34 model have the same size ?
Yes Jeremy. This is doable and pretty easy. I was trying to do this with the free account but had issues with space. The free account comes with 512MB storage.The memory is getting consumed during fastai installation itself. Most of the fastai pre requisites are installed. I tried installing individual libraries, but could not go through spacy. It ends with the quota error.
So a Hacker account($5.month) which comes with 1 GB storage would be sufficient to start the work. Also I noticed that there are lot of libraries that are pre-installed including tensorflow. So we’re facing conflicts if we try and install fastai globally.
I think virtualenv will be the way to go. But if there could be a variant that comes with fastai pre installed like paperspace, even the free account would be enough to start with. Will keep posted if I can get fastai working on free tier.
I’ve been working a bit with ULMFiT and I’m curious what is the preferred way to use the resulting LM or classifier model for inference. From what I’ve gathered, the preprocessing pipeline (tokenizer, vocabulary selection, numericalization) is a part of the DataBunch object, but I’m not yet sure how to extract all this into some kind of inference function which @devforfu mentioned.
I guess my ultimate goal/wish would be to perform something like:
data = ['sentence 1', 'sentence 2', 'yet another sentence', ...]
predictions = inference(data)
which probably is a common use case.
Any suggestions which components are required to build a function like this?
Also, another thing - I’ve tried to move the model to cpu by doing:
but the last line failed with RuntimeError: Expected object of backend CPU but got backend CUDA for argument #4 'mat1' - do you have any suggestions what steps are needed to amend this?
Motivated by @simonw’s great “cougar or not” webapp featured in lesson 2 Part 1 v3, I tried to set up a “Starlette” app on pythonanywhere, but that does not seem to be possible on that platform.
Sadly, pythonanywhere doesn’t support ASGI, so no “asyncio”.
fastai-1.0 and pytorch-1.0 installation worked for me with a paid “Hacker” account - I can confirm @vijaysai’s observation that the free account disk space on pythonanywhere is insufficient.
I played a little more with the solutions discussed in this thread and have a webapp up and running: yourcityfrom.space; see also the repo.
Some observations:
I didn’t spend a lot of time optimizing my DL docker image (ended up being close to 1G) - that said even if it were smaller, I found having to deploy an image that includes pytorch to be super cumbersome; had to rebuild it a bunch of times and wish it had been smaller and more nimble; even for “exploration” havine to wait 10 minutes for it to build was not fun. I’m going to try and deploy something C++ based and see how that goes.
The serverless solutions discussed here (like now) are really cool, but somehow unsuited to the deployment of large docker images. Even if there’s a workaround to deploy a 700MB to the free tier right now, looking at the pricing page doesn’t make me feel comfortable that this is a “safe” solution. I ended up going docker-compose with three containers on a DO droplet.
The deployment experience is pretty rough generally, and it feels like it shouldn’t be. Even though now looks super easy, if you want to deploy a real webapp there’s still a lot of stuff to take care of (CORS, local VS deploy envs, port configs, non-standard APIs, docker caches, . . . )
I was having a problem adapting 104c_single_image_pred.ipynb to my data: the original model performed well, but the loaded model performed badly, always predicting a single class.
The issue was that I had mismatched .normalize(): I forgot it on save, but used it on load. Matching them up solves the issue. I can now use single_from_classes and predict as recommended above.
I used resnet50 (image size 299) instead of Jeremy’s resnet34 (224) example, which is trained on 200 images for each class of ['baby', 'boy', 'man', 'woman']
It can do better with a larger number of training images, but I was delighted that now, thanks to Jeremy, I have a way to deploy my future DL future projects.
I get this same error following the tutorial. i tried deleting the directory and starting fresh and got the same error. I don’t know anything about web deployments or apps or docker for that matter and spend my time doing data science related coding so i’m flailing a bit.
(base) will@DaltonAI:~/zeit$ now ls
> 1 total deployment found under xxxxxxxx@gmail.com [249ms]
> To list more deployments for an app run `now ls [app]`

app     url                      inst #    type    state    age
  zeit    zeit-2wx8oei0g.now.sh         0    -       READY    9m

(base) will@DaltonAI:~/zeit$ now scale $NAME.now.sh sfo 1
> Fetched deployment "zeit-2wx8oei0g.now.sh" [187ms]
> Error! Cannot scale a deployment containing builds
this last now scale $NAME.now.sh sfo 1 command is only for scaling the deployment such that it never sleeps
the url you alias-ed to before this step, should still be working if you try
(without the scale, if the webapp is not used for sometime, the deployment goes to sleep, and wakes up when requested - just that the waking up takes a few seconds and is not the best user experience)
That said, the scaling should have still worked - @arunoda any ideas what might have happened?
now scale $NAME.now.sh sfo 1 should be one time command. Here we set the scaling rule to the alias.
So the aliased deployment always has a single instance running everytime.
For all other past instances have 0-1 scale rule. Basically, they’ll sleep after some inactive time.