Persistent AWS Spot Instances (How to)

Hi,@guydav
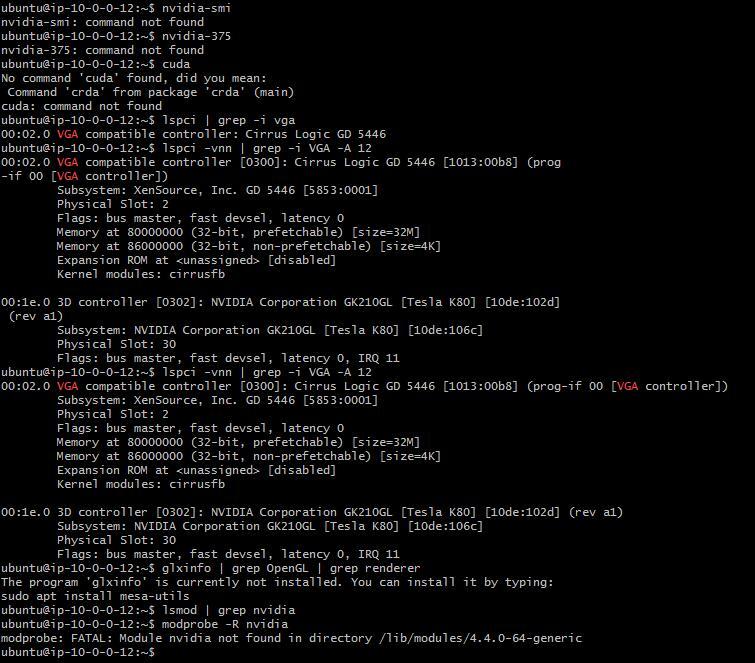
I got the same problem as yours, yesterday I spend 5hours in this problem but it didn’t work. I googled many solutions, such as purge all Nvidia packages, and sudo apt install nvidia-375,even I reinstall CUDA! Everytime I type nvidia-smi, it comes up nvidia-smi has failed to communicate to the driver.

I even try to recreate the vpc and create new spot instance and new volume , I noticed that the first time I start the instance, everything is just fine. But when I terminate the instance, and start another spot instance, nvidia-smi will dead no matter how many times I reinstall driver, CUDA and reboot.

Can anyone help us ?@slavivanov @jeremy

Here’s how to install CUDA and drivers from scratch:

sudo -s
sudo apt-get purge nvidia*
sudo apt-get autoremove
cd ~/downloads/
wget https://developer.nvidia.com/compute/cuda/8.0/Prod2/local_installers/cuda_8.0.61_375.26_linux-run
killall -9 jupyter-notebook
sh cuda_8.0.61_375.26_linux-run
exit
nvidia-smi
2 Likes

Thank you jeremy, I’ll try that. And I will let you guys know the result later.

sorry @jeremy , I did the exactly the same with you, but it said command not found


After I reboot the instance, it’s still ‘conmand not found’

edit:
here’s some clue:


You’ll need to follow nvidia’s installation docs to add the appropriate stuff to your PATH etc.

Thanks for a such great work, @slavivanov

On last weekend I’ve finally managed to get spot instance running with persistent storage.
It was a long way, with obstacles as nvidia-smi command showing errors. So, maybe my experience could help somebody.

Note: If you are looking for exact solution, just jump to the part “How I managed to get rid of nvidia-smi problem” and skip failure experience.

For all steps described below I was using guides from the article: https://medium.com/slavv/learning-machine-learning-on-the-cheap-persistent-aws-spot-instances-668e7294b6d8

First of all I’ve tried to create an instance from the Step 1: https://medium.com/slavv/learning-machine-learning-on-the-cheap-persistent-aws-spot-instances-668e7294b6d8
As you can assume, I already had some instances, keys and VPC generated by fast-ai scripts
So, I need to clean the environment for seamless experience. Yes, lost some data, but it wasn’t something, what I’m able to recover easily.
If you want to follow the same step, there is a really helpful guide in the wiki: http://wiki.fast.ai/index.php/Starting_Over_with_AWS

Note: Don’t forget to clean not only AWS environment, but also to delete local “aws-key-fast-ai.pem id_rsa” key. Otherwise create_vpc.sh script will fail with an keypair problem error.

After cleaning environment and creating VPC, start_spot_no_swap.sh script works as a charm. Instance is created just by calling one command.

Note: Play with bid_price value here. By default, it is 50 cents, you can make lower or higher, based on demand in your area.

Flushed with success, I got Step 2 - having persistent data storage. I’ve skipped approach with mounting disk and got directly to automated root volume mount and hit the bumpy road.
I’ve tried to follow instructions from section 3.1 - cloning config from the instance. Script worked fine, old instance was terminated and new one was created.
I was able to login, but unfortunately when I tried call nvidia-smi, it showed me the same error as @slazien and @justinho had.

I tried to call ‘sudo dpkg --configure -a’, but result was the same.
I’ve tried different approaches and here are my series of unfortunate events:

  1. I assumed that I called config_from_instance.sh too earlier and package installation was still running on old instance. So I’ve created new one, ran top command and waited until all process are finished. Cloning from such instance resulted with the same error.
  2. I assumed that maybe something is wrong with drive mount, so I’ve tried to follow steps from section 3.2 with detaching and renaming the drive. Cloning from such instance resulted with the same error.
  3. I assumed that something is wrong with configuration generated from running instance, so I’ve tried to change AMI to ami-a58d0dc5, as it was said in the article.
  4. Running such instance resulted with the same error.
  5. I’m not going even to mention different tries to install/reinstall nvidia stuff. It never helped

Sorry for such a long list of failures, but I had to share this pain with somebody.
¯\_(ツ)_/¯

How I managed to get rid of nvidia-smi problem

So, after all these failures I was really ready to give up, but decided to try one more time with AMI provided by fast-ai

Here are my steps, which led to finally working instance:

  1. Clean your environment
  2. Run script to create VPC
  3. Run script to create Spot instance.
  4. Let all installation scripts finish. By my measurements it can take from 10 to 15 mins (until last dpkg appearance in top command)
  5. Do your stuff on the instance: clone git, download cats and dogs and so on.
  6. Stop instance and rename the drive, as described here: https://medium.com/slavv/learning-machine-learning-on-the-cheap-persistent-aws-spot-instances-668e7294b6d8#9f6d
  7. Clone configuration file to my.conf, as described here: https://medium.com/slavv/learning-machine-learning-on-the-cheap-persistent-aws-spot-instances-668e7294b6d8#9f6d
  8. Change values to appropriate ones. Pay attention that in article doesn’t say anything about changing key name ec2spotter_key_name, but it is required. It should be: ec2spotter_key_name=aws-key-fast-ai
  9. And now a trick which worked for me: put for ec2spotter_preboot_image_id, AMI provided by fast-ai, for example I’m using ec2spotter_preboot_image_id=ami-bc508adc
  10. As this AMI is large one, you’ll need to change default volume size in the ec2spotter-launch script. By default, it is 8 GB, we need to put 128

Change it here:

"BlockDeviceMappings": [
  {
    "DeviceName": "/dev/sda1",
    "Ebs": {
      "DeleteOnTermination": true,
      "VolumeType": "gp2",
      "VolumeSize": 128
    }
  }

After all these changes, I’m able to start instance using start_spot.sh script and have GPU accessible by theano, having all changes saved … at least it worked out few times :sweat_smile:

Hope, all this information will help somebody to save few bucks.
5 Likes

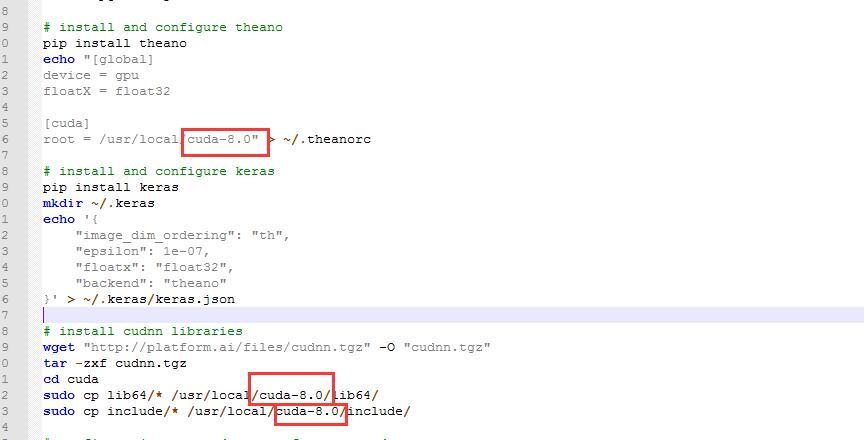
@gaiar I found my problem maybe is the cuda dir is not correct, in the original dir is ‘/usr/local/cuda’, but the cuda is already update to cuda-8.0, so I change the cuda dir as ‘/usr/local/cuda-8.0’, everything works fine !

Wow @gaiar, thank you so much for sharing! Clearly it was a bumpy road. I’ll add a note in the article (and credit it!) about your solution.

Appreciate that! Also I’m looking into solution mentioned by @justinho and wanna give it a try.

Sigh. Unfortunately none of these have worked for me.

I’ve tried all the methods mentioned above and not got anywhere.

@justinho I don’t think the directories should make a difference as there is usually a softlink setup between /usr/local/cuda and /usr/local/cuda-8.0, maybe you interrupted a piece of the setup code on the initial Spot instance that didn’t set this up. Unfortunately running ./install-gpu.sh again did not give me a whole fix, I got rid of the modprobe: ERROR: ../libkmod/libkmod.c:514 lookup_builtin_file() could not open builtin file ‘/lib/modules/4.4.0–64-generic/modules.builtin.bin’ errors but still couldn’t connect to the GPU using nvidia-smi.

@gaiar I liked your interesting trick with the fast-ai AMI, I tried it but it caused the root swap code not to execute, so I always end up with a new volume without my data on it.

@slavivanov I noticed a user commented with this same problem on your medium post: > Is there anything specific to your preboot image to make root swap successful? Or is there an easy way to get the version of your preboot ami with the specific kernel?

Do you have any answers yet? :slight_smile: I think I’ve done enough banging my head against the wall it’s time to reach out.

@benjaminramsden I have to mention that I didn’t use the install-gpu.sh, instead, I download the latest version of cuda from nvidia website, following the advice from jeremy:

sudo -s
sudo apt-get purge nvidia*
sudo apt-get autoremove
cd ~/downloads/
wget https://developer.nvidia.com/compute/cuda/8.0/Prod2/local_installers/cuda_8.0.61_375.26_linux-run
killall -9 jupyter-notebook
sh cuda_8.0.61_375.26_linux-run
exit
nvidia-smi


And then, I open the isntall-gpu.sh, copy and plaste the code to install cudnn\theano\keras(changing the directories from 'cuda' to 'cuda-8.0'), and it worked!

I've spent 30 hours to solove this problem, I'm so pissed off at that time, and I even wanted to buy the geforce1080 to abandon the aws. Anyway, reinstall the cuda from scratch is best way, remember to purge and autoremove all of the nvidia component before you reinstall the cuda.
1 Like

Thanks @justinho for the clarification. So I don’t waste too much more time with this, did you run this once you created a Spot instance with the root swap having been completed? Or did you run this on the very first Spot instance you created? I.e. am I trying to get this config added by the cloning config from the instance script?

I run this after the spot instance with the root swap having been complete, so that you can connect your instance.But in the first time you created the whole new instance, nvidia-smi wont have any problem, instead, when you terminated and recreate spot instance again, nvidia-smi can’t be used anymore. At that moment, I reinstall the cuda.

Thanks for all your help :slight_smile:

I feel really sorry for anyone who comes up after this… I couldn’t get it to work your way or anyone else’s way and in the end had to go my own way! Which consisted of:

  1. Purge all nvidia/cuda stuff as advised by Jeremy
  2. Follow http://docs.nvidia.com/cuda/cuda-installation-guide-linux/index.html
  3. Reboot
  4. Follow your instructions about lines in install_gpu.sh

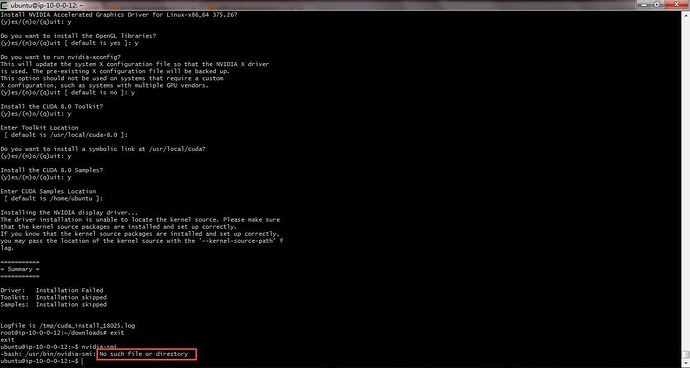
So basically using the sudo apt-get install cuda method instead. The reason I had to go this way is because I would consistently fail the sh cuda_8.0.61_375.26_linux-run command with Installing the NVIDIA display driver... The driver installation is unable to locate the kernel source. Please make sure that the kernel source packages are installed and set up correctly.

Whatever horrendously hacky way I’ve used, I’m finally there! Thanks a bunch @justinho!

1 Like

you are welcome, many people met with different situation, your way are also a good solutions to other people !

@benjaminramsden It was my fault: the preboot images for Oregon and Ireland were incorrect (I tested only on N. Virginia). The correct preboot AMIs are ami-d8f4deab (Ireland) and ami-7c803d1c (Oregon). I’ve updated the script in github.
So sorry about this!

I am not sure it is fully solved now, the kernel versions seem to be still mismatched in Ireland (fast.ai 4.4.0-36 vs your preboot 4.4.0-59). But having said that, just reinstalling CUDA after root swap as per @justinho’s and Jeremy’s advice seemed to work well. Thank you!

@michpunk Dmitry, they are not the same but work fine.

Facing the same issue. @justinho Did you solve this?

reinstall cuda is one of the solution, see my previous talk with benjaminramsden, it maybe can inspire you.