I’m hoping there’ll be a chance to cover this on Monday since we didn’t get to it last week. This is one of the key missing pieces for me in terms of scaling training.
1 Like
Yes we will. Sorry about the delay!
1 Like
No worries! I’m always amazed by how much we cover, and that there’s the chance to ask questions and interact along the way. I’m also very grateful for all of the help you’ve provided. I’m sad the course is ending, although I’ve got a page worth of possible projects that should keep me busy until next year.
1 Like
Did you make any headway? I’d be very interested in an update 
There was a paper at ICLR which talked about GAN convergence, and said that if you normalize the weights by dividing by the spectral norm, it converged a lot better.
3 Likes
I’ve tried this with 0.4 - installed using conda install, and it still fails. Jeremy must have been compiling from source when he was experimenting with 0.4, so is it possible that the in-place worked for him because of that - that the code was specifically compiled for his GPU?
Interesting. I still haven’t gotten to updating to 0.4, so thanks for the heads up.
I’ll definitely share the update as soon as I’m done. I’m currently stretching a lot at work and not finding much time. Sorry for the delay.
In the meantime I can share a new thing I came across
It can help us learn and create at the same time. You can play around and share something new you come up with.
Yeah… I’ve seen that.
It looks really nice, visually.
Unfortunately it’s only for images and raw vector data, so you’d need python to do preprocessing on data to begin with and I’m not convinced losing pytorch, in addition to not being able to use your own hardware would be worth it putting everything else aside.
Looks great for beginners wanting to do deep learning for images though!
Yep, which also means we have to be careful to denormalize our generated data accordingly.
I also tried to find the reason why using tanh instead of sigmoid, but no success yet (the DCGAN paper you refer to just mention that bounded activations are better, but it’s also the case if we use the sigmoid which is bounded between 0 and 1).
The only reason I can think of is that it works better experimentally on some dataset, maybe because the activations are close to zero, which means that the sigmoid will get saturated, which won’t be the case for tanh as it is define between -1 and 1.
Is there any particular reason why dropout is not used in the Darknet notebook? The training loss is significantly lower than the validation loss at the end, so I would expect dropout to help…
More generally, are there cases where dropout shouldn’t be used? I thought that if we take a network without dropout, make each layer x% wider, then add 1/(1+x%) dropout probability, we should get better results. Is this true?
Thanks!
1 Like
My intuition would be, because batchnorm is used, and it requires some additional work to make it work together.
But people had some success using dropout with batchnorm on Cifar10
This is a paper discusing it:
Understanding the Disharmony between Dropout and Batch Normalization by Variance Shift
As @jeremy said, there is a room for experimentation in deep learning 
I am trying to understand cycle gan, and reading the source code. I dont understand why their generator model has so many of these layers (see bottom) compare to the one we got in wgan. I also couldn’t find things about this on their paper. Does anyone know??
Input size is one factor from the loop, but the layers are more than I would expect.
ref:
ResnetBlock(
  (conv_block): Sequential(
    (0): ReflectionPad2d((1, 1, 1, 1))
    (1): Conv2d(256, 256, kernel_size=(3, 3), stride=(1, 1))
    (2): InstanceNorm2d(256, eps=1e-05, momentum=0.1, affine=False, track_running_stats=False)
    (3): ReLU(inplace)
    (4): ReflectionPad2d((1, 1, 1, 1))
    (5): Conv2d(256, 256, kernel_size=(3, 3), stride=(1, 1))
    (6): InstanceNorm2d(256, eps=1e-05, momentum=0.1, affine=False, track_running_stats=False)
  )
)
Is this generator model code more similar to super resolution model we see in lesson 13 as input and output of the model is also an image.
Hello everyone, @jeremy,
I have a question regarding the loss functions for the WGAN.
In Jeremy’s code, the gradients are updated as follows:
-
For the discriminator training:
Loss = Dis(real_sample) - Dis(Gen(seed))
To minimize the loss, the optimizer will push the value of Dis(real_sample) to low negative values and Dis(Gen(seed)) to high positive values to that the difference becomes large but negative. -
For the generator training:
Loss = Dis(Gen(seed))
To minimize the loss, the optimizer will change weights so that the value of Dis(Gen(seed)) becomes small or negative.
This is the opposite direction as above, and to me makes sense because the 2 optimizer work against each other, and therefore they aim at pushing a same value in opposite directions. This can be seen after the 2 epochs ran in the notebook. We see that after the second iteration “real loss” is pushed to smaller negative values and “fake loss” becomes a larger positive number.
Now looking at the paper (see 1:37:00 in the video), the loss for the discriminator is given as MINUS Dis(Gen(seed)), i.e. same direction as the discriminator. Basically this would mean that (intuitively) it would push the weights of the generator in order to improve the score of the discriminator during the generator phase, which does not make sense to me.
Is the paper wrong or am I missing something?
nevermind - just noticed the paper updates Theta with “minus” the gradient while they update W as “plus” the gradient and that is where they achieve the opposite direction.
My bad - leaving this here for everyone in case anyone wonders the same thing.
Do cycle Gans strictly need two discriminators? Could you build a cycle Gan using a pretrained classifier as your discriminator?
1 Like
Has anyone successfully applied the GAN code to grayscale images (single channel)?
@jeremy I have a question about mean and std in couple lines of code. You said not to use loops, but what about list comprehensions? They are still loops for me
train_imgs = np.array([(cv2.imread(str(fn), -1)[:, :, [2, 1, 0]] / 255) for cls_n in (PATH/'train').iterdir() for fn in cls_n.iterdir()])
train_imgs.mean(axis=(0, 1, 2)), train_imgs.std(axis=(0, 1, 2))
1 Like
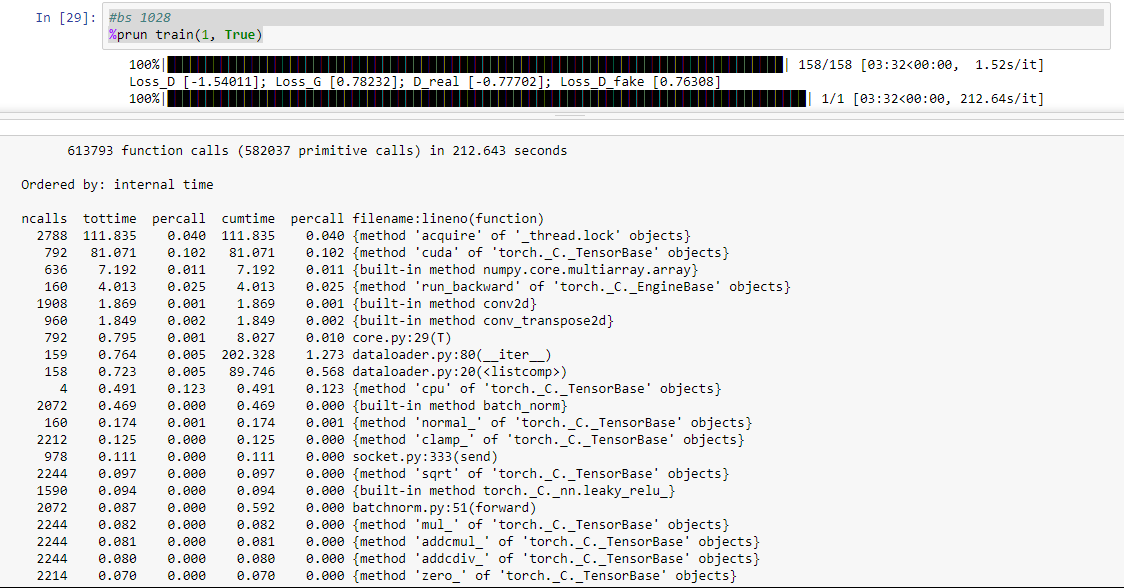
I’ve been trying to implement the wgan on the celeb faces dataset but I’m running into some speed issues.
With a batch size of 128, one epoch takes 3:49. With a batch size of 1028, one epoch takes 3:32. I think something is getting bottlenecked somewhere but I don’t know what.
Speed issues seem to be related to loading the data. The model will run 8 iterations really fast (8 being the number of workers), then hang, then do another 8 really fast. Changing the number of workers in the dataloader doesn’t affect epoch time, but it does affect how many fast iterations happen before the next hang.
I’ve attached a typical prun output. If anyone has ideas on how to speed things up they would be appreciated. From what I’ve read it seems 2000 or so epochs on this dataset are needed for good results, which at current speeds would be almost 5 continuous days of training.
@Chris_Palmer Did you ever figure this out? I’m having the same issue…