Absolutely - as we progress, when we start looking at using some libraries, let’s chat about that. Join the sessions if you can, so you can ask about this when it comes up.
1 Like
Yeah, I probably should have done that ![]() I started an instance, was able to access it via browser, but then I noticed it didn’t have:
I started an instance, was able to access it via browser, but then I noticed it didn’t have:
- fastai
- nvtabular
It was the data science stack image. I couldn’t quite figure out how I would go about for instance pulling repos from github… or using a custom docker image… There are some instructions about pushing to a registry or something but it all seemed fairly involved…
I think it is more a situation where every new environment requires a bit of time investment, there is a bit of friction that feels painful ![]() You also have to invest the time where generally my answer right now is when it comes to new tools “no, thank you, I’d rather not spend the time to figure out your crazy (new) way of doing things that I can already do on my hardware
You also have to invest the time where generally my answer right now is when it comes to new tools “no, thank you, I’d rather not spend the time to figure out your crazy (new) way of doing things that I can already do on my hardware ![]() ”
”
But maybe learning how to use paperspace is worth the investment ![]() If I wouldn’t mind spending $100 - $200 dollars a month such a thing as paperspace would completely have no use for me, as I could just use GCP for everything.
If I wouldn’t mind spending $100 - $200 dollars a month such a thing as paperspace would completely have no use for me, as I could just use GCP for everything.
But being part of a class will definitely speed up the process of learning the ins and outs of using the platform, plus hacking on things together can be fun, so definitely looking forward to that! ![]()
4 Likes
Yeah, I noticed if I hit the “advanced” slider it started asking for a docker image even though I had already selected the FASTAI image. So I just refreshed that page and selected the fastai+free gpu option without touching the advanced button and it fired up a notebook env with fastbook/fastai already installed. It’s a p4000 mind you so it’s rather slow. I probably won’t be using it for tonight’s walkthru but just wanted to fire it up and see what happens. I use a paperspace docker image on my local machine anyway so it’s pretty close to what they have on paperspace and my 1070ti is still slightly faster than the free GPU there.
YouTube Live is now streaming.
4 Likes
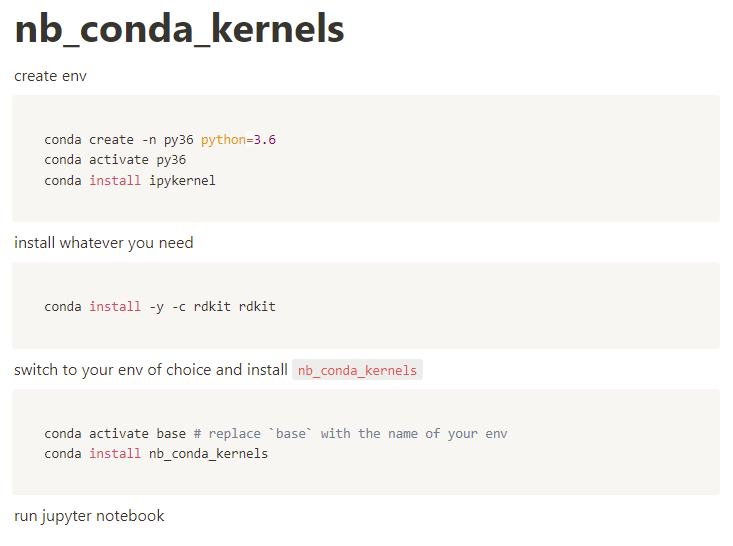
This is how I believe this can be achieved ![]() (minus the
(minus the rdkit thing – that was just something I wanted to use some time ago)
2 Likes
What is rdkit and nb_conda_kernels? I see you are switching to a virtual environment with different python version. Was it the trick to change kernels you mentioned during walk-thrus session?
Yup, that’s it. Essentially, how to have one conda env but multiple python versions. You can have one nb running python 3.5, and another python 3.7. Very rarely is this useful, but in the scenario where you want to run some old python code, there is a solution without having to set up a new environment ![]()
(also, if you have two envs and want to work on the code at the same time or execute files in succession – for instance to process some data in one notebook and continue in the other --, it gets painful… this is just a cleaner way to achieve it, though it is a super rare case that this might be needed)
rdkit is just some random repo I wanted to use for a Kaggle competition, not sure I will use it ever again in my life ![]()
In fact, this is such a niche case I don’t even think it is worth covering this in the walk-thrus, but probably good to know this solution exists if you ever encounter a situation where it might be helpful (googling for this is not that easy).
2 Likes
I’ve used this feature especially when I’m either taking a course which has its own python version and its interdependent packages. So you create a new conda env at that python version and do a pip install with the requirements.txt file provided by the course/hackathon.
For example, if you were to clone out Jake Vanderplas’ book repo from github, it uses an older version of python and packages. Using Conda makes it very easy to create an environment at the right python/pip/package level so you can run those notebooks without running into issues that you’d encounter if you used the latest versions of packages.
2 Likes
Thanks for sharing. Since I play occasionally with some legacy project, I find it very useful rather googling. Bookmarking it.
1 Like
Sorry to clarify - I know how to do it, but I wanted to keep a list of things we’ll cover in future sessions.
2 Likes
I am working on an ARM64 Mac and had previously had python environments setup for miniforge and anaconda. Reason being some packages like tensorflow had been written to make use of the M1’s GPU and at the time I set this Mac up other packages such as PyTorch weren’t supported so I was able to install with Anaconda.
After running the https://raw.githubusercontent.com/fastai/fastsetup/master/setup-conda.sh from the home directory using > source setup-conda.sh some unexpected things happened. I could no longer see these environments and my default shell had changed to bash. My .zshrc that had some customisations had disappeared. Changing the default shell back to zsh recreated this file that was now empty. Fortunately I had made a backup of this file before running the script.
After installing Mamba I could see the original miniforge anaconda environments again and activate them using there own shell scripts.
I didn’t mention the M1 specific issues during the talk because it is possibly a rabbit hole you don’t want to go down just yet. But for others with M1’s there may be a few additional steps not covered.
Eg: The installation of PyTorch requires something called wheels that we didn’t discuss. Cutting and pasting the script will not work for M1s - at least not for me. The installer wasn’t able to locate torchaudio with conda or mamba.
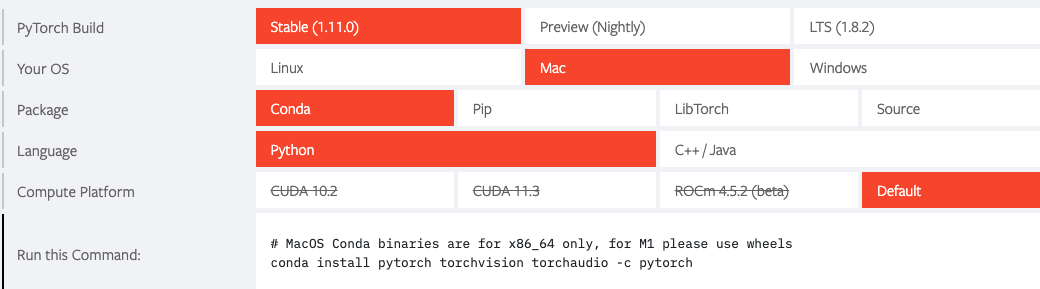
How to install PyTorch from wheels? Is it back to pip for me?
3 Likes
Ah yes, sorry, I didn’t think you didn’t know how to do it ![]() My only thought was to share useful things in this thread and also I felt a bit sorry for suggesting we cover something that niche, I thought that maybe posting it here might be a better idea
My only thought was to share useful things in this thread and also I felt a bit sorry for suggesting we cover something that niche, I thought that maybe posting it here might be a better idea ![]()
But based on people’s responses turns out that this is maybe not that niche after all ![]() this actually can have more use cases than I thought
this actually can have more use cases than I thought ![]()
EDIT: Now that I think about it, probably we want to discuss the stuff from the list in the walk-thrus so me posting it here were doubly non-sensical ![]() Ah I just can’t get over the excitement of these walk-thrus happening, it’s all
Ah I just can’t get over the excitement of these walk-thrus happening, it’s all ![]()
1 Like
Thank you so much Jeremy for the walkthrough. Managed to catch up the recording.
Q: I can understand the benefits of using mamba over conda for setting up and and managing the dependencies in development environment. Wondering about when you would use pip and when you would not use pip?
1 Like
I just removed “toruchaudio” from the command and torch and torchvision installed fine for me. I was also stumped by the wheels so I used the path of least resistance. I think tourchaudio is not needed for now so I skipped it. HTH
3 Likes
Generally speaking I wouldn’t use pip if there’s an up-to-date conda package available, except for specialised situations like doing an editable install.
5 Likes
That sounds like a very sensible solution.
4 Likes
I’m thinking of putting time-stamp on the Youtube video for easy search, as there are some really useful and practical tips. Is the Youtube Live video the final version?
2 Likes
Is it only next week Tuesday to Friday, or all weeks, till before the next session at the end of June?
You’re really kind, Jeremy! Thanks a million - sure, will do that… will all the video recordings be posted here, in this post? Pinned at the top?
Oooh ! that’s going to be pretty hard to join in live, 3AM here. will have to be happy with the recordings.
3 Likes