Looks like these models like 'convnext_tiny_in22k' are available if you do pip install timm but not in mamba install timm
1 Like
For the notebook “How does a neural net really work?”:
When looping to compute the function parameters, wouldn’t it be better practice to add “abc.grad.zero_()” in the loop? In the example it works fine because we only loop 10 time so we don t reach the optimum values, but if we increase the number of loops to 1000, then better reset the gradient I guess ?
abc = torch.tensor([1.1,1.1,1.1])
abc.requires_grad_()
for i in range(1000):
loss = quad_mae(abc)
loss.backward()
with torch.no_grad(): abc -= abc.grad*0.01
#abc.grad.zero_() #<=== line to add?
print(f’step={i}; loss={loss:.2f}')
2 Likes
Hi there,
The excel example was quite nice, I created my own sheet to understand what @jeremy was doing. The regression one was quite straightforward. The SUMPRODUCT function of the params with the entire table does nothing but produces a line of the form ax1+bx2+cx3…+d, when all such lines are added, it is still a linear function of the form AX1 + BX2 + CX3 + …D
To bring non-linearity to the system, he introduces ReLU in NNET part of the sheet.
He creates 2 sets of weights, calculates the SUMPRODUCT, calculates the ReLU transformation and adds the results of two ReLUs together.
From my understanding, this addition of two ReLUs is what makes the entire ‘fitment of data’ non-linear in nature.
In the lesson as well, if you use the interactive widget on double_ReLu method, you can create something similar to a crude quadratic. Adding more and more ReLUs will bring more non-linearity and one can imitate/approximate almost any function.
Now, what I understand is this is the addition of two ReLUs, there is no stacking of layers on top of each other, so it isn’t a deep neural net but a single layer neural net.
Can anyone please vet that my understanding is correct?
Hello Everyone,
I did the regression in shown in excel in Python.
Here is the colab notebook Linear
Can anyone check and see some parts where I’ve missed and doing it wrong.
Thanks.
Hello from my side! I am trying to experiment with the pet detector that Jeremy is showing in lecture 3 of 2022, however, I am a bit lost.
First, let me say that the corresponding HuggingFace space, shows a Runtime error ! Additionally could you suggest alternatives for cloning a space? I was thinking about experimenting with the detector eg. in Gradio.
Thank you in advance and apologies if those are already mentioned somewhere I am missing right now.
Forgot to mention that looking more specifically at the HuggingFace instructions for “Getting started”, it suggests a normal git clone: git clone https://huggingface.co/<your-username>/<your-model-name> cd <your-model-id>.
When running git clone https://huggingface.co/spaces/jph00/pets/tree/main, it tells me that the repository cannot be found…
1 Like
You dug too deep into the repo.
Try… git clone https://huggingface.co/spaces/jph00/pets
3 Likes
I was blind folded, you are right! I will try it a bit later. Do we know anything about the runtime error in HuggingFace for this space?
I love the little snippets like this.

A number of time I’ve dug into some complicated sounding concept only to realise “oh, X is just another name for Z? Why didn’t they just say so!”.
1 Like
Hello. I’ve just finished part 3 of the course, and chapter 4 of the book, and I now have a lot of questions. I’ll limit myself to the following 2, and hope my other questions will be answered by continuing the course and doing more Kaggle projects:
- Chapter 4 of the book mentions SGD has been covered, but I don’t understand what the “stochastic” part is of the described algorithm. As far as I understand, stochastic refers to adding some noise into the gradient descent. Maybe I missed where this is done in the algorithm in chapter 4.
- If we add ReLU layers, does this not conflict with the previously presented argument that we want smooth functions to facilitate calculating gradients (i.e. when discussing the sigmoid function)?
Thanks a lot for the great course!
Max
2 Likes
I think the reason is because convnext_tiny_in22k was supported from timm version 0.6.2 onwards. In conda, the package is not updated while the packages in pip are updated.
1 Like
The “stochastic” part is when we just pick a few rows at a time to do each backward step. If we use the whole dataset, it’s just “gradient descent”; if we use a subset (mini-batch) it’s “stochastic gradient descent”.
3 Likes
Kinda. But they’re smooth and pointing in the right direction everywhere, except for one infinitely small place. OTOH, “accuracy” as a metric has a gradient of zero in most places!
2 Likes

The issue is in your loss function. torch.where returns the broadcasted shape of ‘condition’, ‘x’, ‘y’.
https://pytorch.org/docs/stable/generated/torch.where.html
If you add targets.unsqueeze(dim=1) then you don’t have to do it in your dataloader.
1 Like
Thanks Jeremy. I think I’ll have to revisit chapter 3 a few times before I fully get it. ![]()
1 Like
I have finished lesson 3 and trying to run through the lecture once more and practise the steps. Re notebook app.ipynb, even though I could create a space in HuggingFace, when I try to run the notebook in my local computer, the cell learn.predict(im), which comes after importing the model, throughs an error, of which I am showing the last part below:
Learner._do_epoch_validate(self, ds_idx, dl)
    234 if dl is None: dl = self.dls[ds_idx]
    235 self.dl = dl
--> 236 with torch.no_grad(): self._with_events(self.all_batches, 'validate', CancelValidException)

File ~/mambaforge/lib/python3.9/site-packages/fastai/learner.py:193, in Learner._with_events(self, f, event_type, ex, final)
...
   1206         return modules[name]
-> 1207 raise AttributeError("'{}' object has no attribute '{}'".format(
   1208     type(self).__name__, name))

AttributeError: 'GELU' object has no attribute 'approximate'
Has anyone gotten something similar? Is it a matter of the version of either timm or fastai?
Regarding the PClass and Embark in Titanic example, why can’t we just have one feature with multiple possible values (0, 1, 2, …)? But instead two features were created with 0 and 1 as values.
Yes I think there’s an incompatibility in the latest pytorch.
2 Likes
I still don’t think that I entirely comprehend this lesson. Conceptually, it can be straight forward but implementation isn’t esp. the parts where loss and accuracy functions need to be written.
I tried the further research question in the questionnaire which asks you to expand it to all 10 classes instead of only 3 and 7. I changed the dataset, instead of using the usual MNIST, I used Hindi MNIST which is written in the Devnagri script - not entirely tangential but just a different flavour of MNIST.
I have mostly used Keras till now, PyTorch feels like a different language(maybe requires a few days of familiarity with it), so it took quite a while to implement basic stuff.
There were many learnings, some as basic as PyTorch doesn’t accept float value as the target variable(wonder what was I thinking using numpy) and the other one was loss function.
I was assuming a simple loss function would work but it didn’t learn.
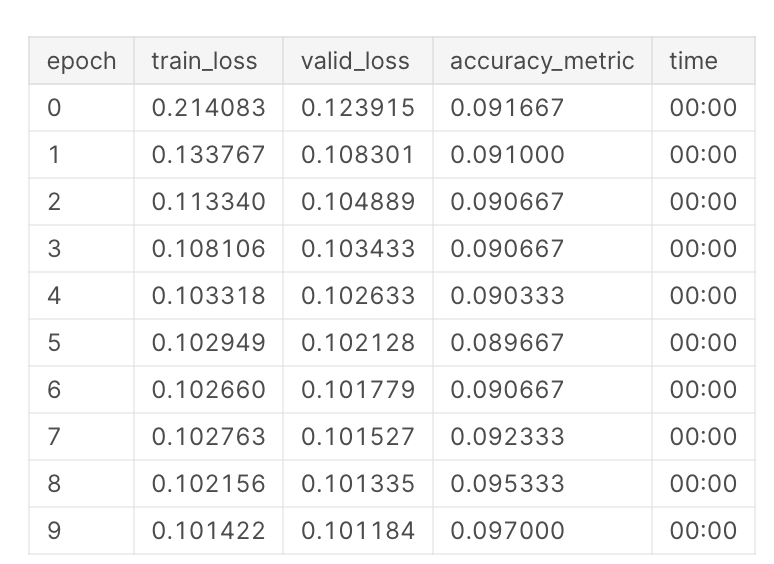
After watching the 2020 course video of the same lesson - Lesson 4 - Deep Learning for Coders (2020) - YouTube
I tried softmax which also didn’t work.
On forums,
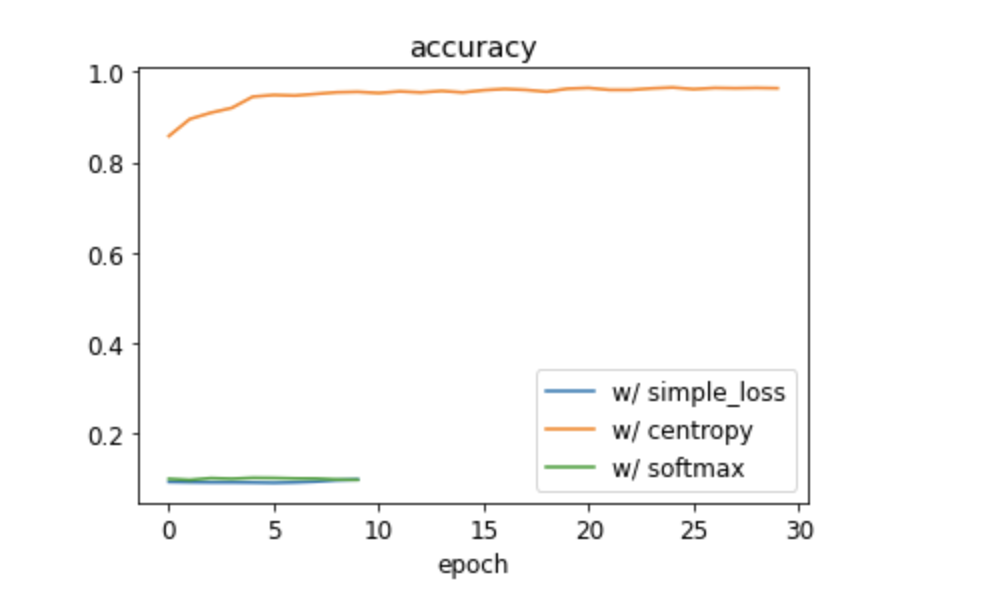
someone suggested using entropy as the loss which I did and it immediately improved the performance.
I am not really sure, why this has happened.
The relevant Kaggle notebook is present at - Hindi MNIST Computer Vision from Scratch_FastAI | Kaggle
Please feel free to use, comment, and provide insights that I might be missing here.
We discuss the use of softmax and cross-entropy in a later lesson.
1 Like