How to train a model with GPU locally on Windows 10

Hello everyone,

I’m running a Jupyter Notebook file locally with VS Code on Windows 10. I’m developing my first ever project using Deep Learning to train a Lung Detector model.

The issue I have is that when I run the function fit_one_cycle() the training is too slow and I hear noise on the PC. After 44min of execution of the function and completing 25 of a total of 100 epochs there 's still expected 2h29min more left to finish the execution.
Previously, the execution of the function learn.lr_find() took 14min to end.

Checking the Task Manager of Windows I figured out that the notebook wasn’t being executed on my GPU, instead it was executed on the CPU because the CPU use was at 70% and the GPU at 1-3%.

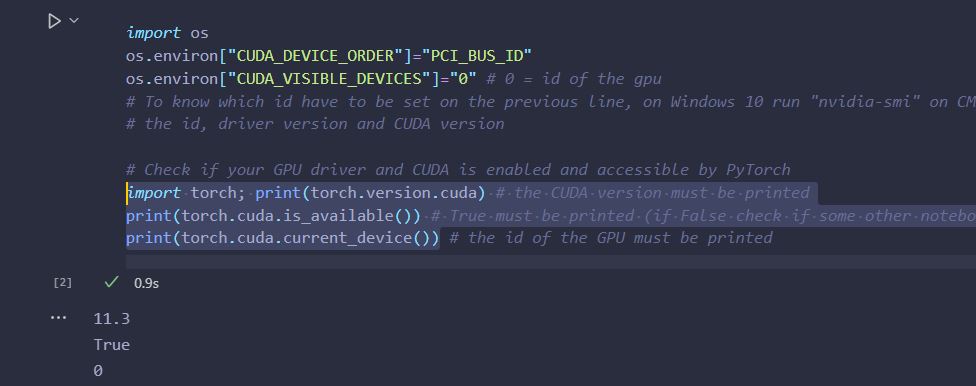
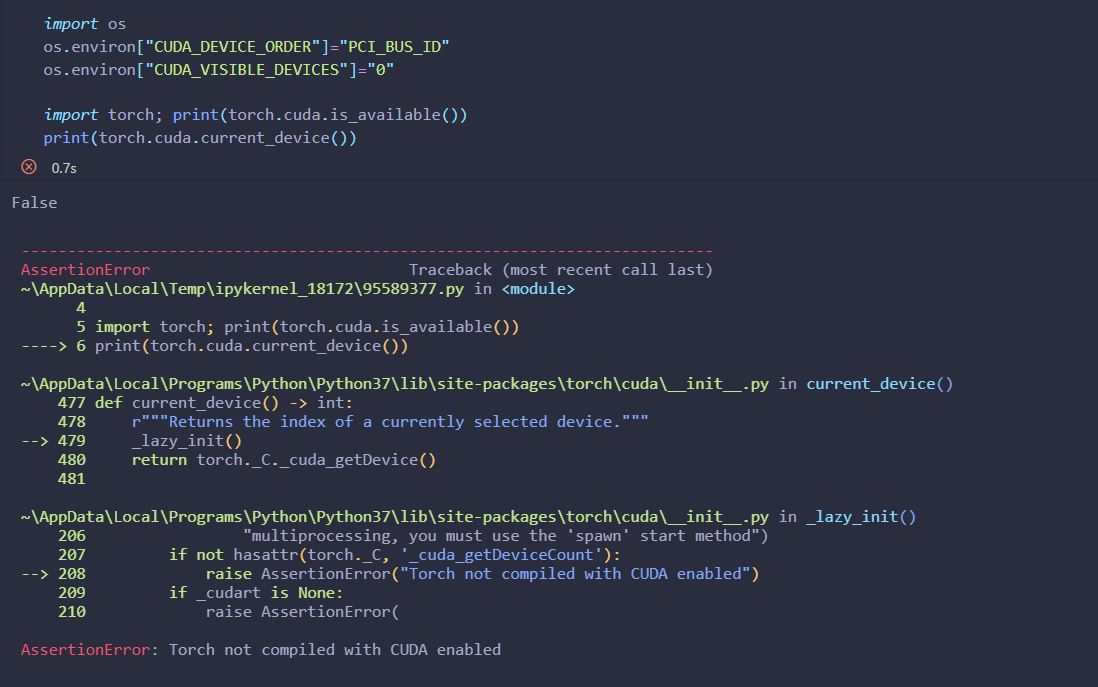
I’ve also executed the function “torch.cuda.is_available()” following tutorials and the function returned False as you can see on the next image. But I’m only using PyTorch to use the L1Loss function.

My GPU is a Nvidia GTX 1060 6GB. While running the lr_find() function I’ve run the command “nvidia-smi” on CMD to check the CUDA version of the GPU and the active processes. The results have been the following:
nvidia-smi-executant_notebook

I don’t know what do I need to change of the notebook’s code or if I have to re-install fast.ai with CUDA to be able to run on my GPU at least the complex functions of the notebook such as fit_one_cycle.

I post the key parts of my notebook at the end of this post.

I would appreciate any suggestions on how to solve this problem.

Thank you.

Notebook’s Code

%reload_ext autoreload
%autoreload 2
%matplotlib inline

import os
os.environ[“CUDA_DEVICE_ORDER”]=“PCI_BUS_ID”
os.environ[“CUDA_VISIBLE_DEVICES”]=“0”

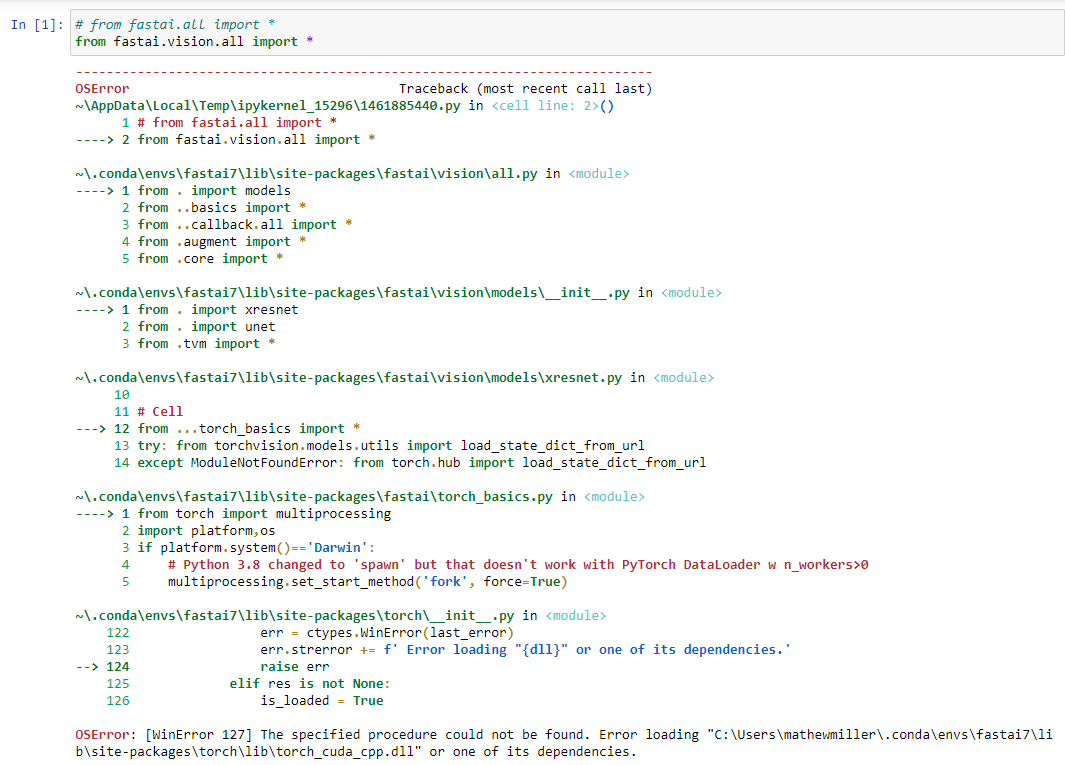
from fastai.vision.all import *
from fastai.vision import *
from torch.nn import L1Loss
import cv2
from skimage.util import montage

data = DataBlock(
blocks=(ImageBlock, BBoxBlock,BBoxLblBlock),
get_items=get_image_files,
n_inp=1,
get_y=get_y,
splitter = RandomSplitter (0.1),
batch_tfms= [*aug_transforms(size=(120,160)), Normalize.from_stats(*imagenet_stats)]
)

dls = data.dataloaders(path_dl, path=path_dl, bs = 64) # bs: how many samples per batch to load
dls.show_batch(max_n=20, figsize=(9,6))

class LungDetector(nn.Module):
def init(self, arch=models.resnet18): # resnet18 has 18 lineal layers
super().init()
self.cnn = create_body(arch) # cut off the body of a typically pretrained arch
self.head = create_head(num_features_model(self.cnn), 4)
def forward(self, im):
x = self.cnn(im)
x = self.head(x)
return 2 * (x.sigmoid_() - 0.5)

def loss_fn(preds, targs, class_idxs):
return L1Loss()(preds, targs.squeeze())

learn = Learner(dls, LungDetector(arch=models.resnet50), loss_func=loss_fn)
learn.metrics = [lambda preds, targs, _: IoU(preds, targs.squeeze()).mean()]

learn._split([learn.model.cnn[:6], learn.model.cnn[6:], learn.model.head])
learn.freeze_to(-1)
learn.lr_find()

lr_max = 1e-2
%time learn.fit_one_cycle(100, lr_max, div=12, pct_start=0.2) # find this function at schedule.py of callbacks dir (div_factor is obsolete)

Hi Marc, I’m not a huge expert but my guess is that you’ve got the cpu-only version of Pytorch installed, or possibly have a version conflict somewhere. There are a great many suggestions in this thread, with this comment from ssabatier (to create a new environment from scratch) seeming the most promising:

I haven’t kept up with Pytorch in a while but it looks like the version numbers are crucially important. Once you have the new environment, try installing fastai in it and see if it works. Comments from “kimcdata” and “Mwni” may also help. [Edit: Would this require installing fastai without fastchan, to avoid overwriting the existing Pytorch install? Maybe someone with more experience can comment on that]

Hi @crayoneater,

Thank you for your suggestions.

I’ve readen the comments of the Github thread you attached and I got to understand how to install pyTorch with CUDA support.
The last comment of the thread has a link to the CUDA Toolkit from Nvidia. I got to install the CUDA Toolkit 11.6 Update 1. After the installation finished the CUDA version of my GPU has become 11.6. I thought only a toolkit would be installed, but after the installation ended the CUDA version got changed from 11.4 to 11.6 and also the driver version of the GPU got upgraded (now is 511.65).

Now I have the doubt if I can install PyTorch with CUDA support having the CUDA 11.6 because on PyTorch website (Start Locally | PyTorch) the latest CUDA version for Windows is 11.3. My package manager is pip.

Hi Marc, I’m not as well versed with pip. You might want to try installing Anaconda or Miniconda, because then you can create separate “environments” (hard to describe, but I think of it as an imaginary space, each one designated for a specific work purpose) and install the exact version of whatever you need in each environment. For example, if you ran this line from the Github comment:

conda install -c conda-forge cudatoolkit=11.3 cudnn=8.2.0

you would ensure that the CUDA version in that environment is limited to 11.3, even if your card’s main installed version is 11.6. Then you could install Pytorch there and it should work. You could also set up other environments specifically for when you need CUDA 11.6. I don’t know how to do that with pip. (Also edited my previous reply - it’s the fastchan part I’m worried about, not the conda/pip)

I was going to suggest using the fastai docker container but seeing that you’re running Windows, it may not work for windows machines.

To avoid all these issues with anaconda/pytorch/nvidia/nvidia-toolkit/fastai/pip etc I ended up just installing:

  • docker engine
  • Nvidia Driver
  • Nvidia docker
  • Fastai docker container.

on my Ubuntu 20.x.x machine with a 1070TI … It’s a slightly longer route, but I was having a heck of a time trying to install it directly on my machine (even with the Anaconda path). There are too many blog posts floating around without proper date/time stamps and for beginners it’s quite difficult to figure out what version of anaconda with what channel with what version of nvidia drivers etc etc for a given OS should be installed.

Good luck with your journey! hope you figure it out soon!

1 Like

Hi @crayoneater & @mike.moloch,

I inform you I managed to solve the problem of the installation of PyTorch with CUDA.
At first, after uninstalling the PyTorch version I had installed without CUDA I was running the installation command "pip3 install torch==1.11.0+cu113 torchvision==0.12.0+cu113 torchaudio===0.11.0+cu113 -f https://download.pytorch.org/whl/cu113/torch_stable.html
" on the VS Code terminal but an error was produced refering to a problem with permissions.

Then I tried running the installation comand on CMD as Administrator and there wasn’t any error.
To confirm CUDA was installed correctly I run the functions selected on the following image:


The functions returned the right values.
So, I can confirm that it’s possible to install a PyTorch version with CUDA 11.3 on a GPU with a higher CUDA version (11.6 on my case). The installation command I used with ‘pip’ can be found on Start Locally | PyTorch.

I’ve noticed a huge difference between running the notebook with GPU instead of CPU. For example, on the execution of the function learn.fit_one_cycle(100 epochs) that with CPU was expected to take 2h30min, now with GPU it takes only 27min.

2 Likes

Thanks for sharing the good news! Windows is a tricky beast when it comes to deep learning. I wonder how many other issues might be solved with a simple administrator run…

By the way, I am amazed that you are “only” getting that much lift, you must have a very beefy CPU. When I first did a test run on a GTX 1070, it was something like 40x faster than even a 16-core Xeon (albeit a very old one).

1 Like

I have an i7-8700k CPU of 6 cores and the GPU is a NVIDIA GTX 1060 6GB.
Maybe I don’t get a faster exeuction because the GPU is not that much powerful.
There have been times where I have got an error saying “GPU has run out of memory” and I had to close the notebook and reopen it to restart the execution.

it’s really great that you got it working! I tried getting things to work on Windows and ended up just going with Linux and Docker route as the path of least resistance, so kudos!

BTW, I do agree with @crayoneater btw, you should see at least 10x … I mean 3-4X is good but I feel even with a 1060@6GB you should see a bigger differential. I’m guessing if you’re running out of memory, decreasing the batch size may actually let it use the memory more efficiently and increase the processing speed.

Happy learning!

The lack of a speedup might also be impacted by the dataloaders not being able to keep up with the GPU because of the limitation where on Windows only a single dataloader worker is able to be run when using notebooks num_workers=1.

If anyone has any ideas on how to get fastai working on Windows without WSL2 or docker on a 30 series GPU I would be interested in knowing how to do it. I was able to get it running on a 1080ti, but when I try and get it running on my 3090 I get this error if I follow the fast.ai install instructions

or this error when I install pytorch with this command and fastai with the conda install statement.

I’m mainly interested in stress testing the 3090 and being able to monitor temps in Windows. I also have Ubuntu installed on the same machine separately which works fine and is that I normally use, but Ubuntu does not support monitoring the vram temps I’m interested in monitoring while under load.

If it’s just for stress-testing the vram and monitoring, use a miner (e.g. nicehash). Also consider that running the card via WSL2 stresses it all the same.
I have a physical sensor attached to the backplate of my card (used to control the case fans). The sensor reaches the same temp, either training on Linux, or on WSL2, or mining on windows. That’s to say that you can calibrate the power level vs. vram temps on windows while mining (or training with wsl2). These temps will be the same you’ll attain while training on Linux, even if you can’t monitor them directly.

1 Like

How are you using the docker images? When launching the docker-compose up that contains the fastai/codespaces image I see that it does not have pytorch for GPU

I use the containers published by paperspace. The latest one works fine for me. It comes with everything installed, I just need to map my fastbook repo so I can start those notebooks from within jupyter/jupyter-lab . I’ve never tried ‘docker compose’ command.

2 Likes

Thanks a lot for the recommendation @mike.moloch! It worked flawlessly!

1 Like