Thanks to @reshama, here’s a summary of how to use AWS. (I’ve copied it from @reshama’s Github - hope that’s OK!):
AWS fastami GPU Image Setup
fastai.ai Part 1 v2
Notes from Lesson 2 live on 06-Nov-2017
Part I - Setting up AMI
AMI (Amazon Machine Image): a template for how your computer is created
Step 0: Getting Started
Log into AWS Console: http://console.aws.amazon.com/
Select Service: EC2
Launch Instance
Step 1: Choose an Amazon Machine Image (AMI)
- Search Community AMIs [left menu]
- Search:
fastai - Select this image (for region N. Virginia):
fastai-part1v2-p2 - ami-c6ac1cbc
NOTE: this AMI is available in a number of regions. Check your local region first. If it’s not available, check next closest region.
- Oregon: ami-8c4288f4
- Sydney: ami-39ec055b
- Mumbai: ami-c53975aa
- N. Virginia: ami-c6ac1cbc
- Ireland: ami-b93c9ec0
Step 2: Choose an Instance Type
(Note: it is the kind of computer we want to use.)
- Filter by:
GPU Compute - Select:
p2.xlarge(this is the cheapeast, reasonably effective for deep learning type of instance available) - Select:
Review and Launchat bottom
Step 2b: Select keypair
Note: you have already created a keypair in the past. Use one of those. For more specific instructions, see Create a Keypair.
And, voila! We have just created a new computer on AWS that we can log into ![]()
Part II - Logging into our AWS Computer
Syntax for logging in and setting up tunnel for Jupyter Notebook
Note 1: Ensure you are in your .ssh directory on your local computer.
Note 2: You will put your Public IP address where mine is.
Note 3: This part -L8888:localhost:8888 connects Jupyter Notebook from AWS to your computer.
my current path
pwd
/Users/reshamashaikh/.ssh
my syntax for logging in
ssh -i aws_fastai_gpu.pem ubuntu@54.175.101.64 -L8888:localhost:8888
my example
~/.ssh
▶ ssh -i aws_fastai_gpu.pem ubuntu@54.175.101.64 -L8888:localhost:8888
Welcome to Ubuntu 16.04.3 LTS (GNU/Linux 4.4.0-1039-aws x86_64)

 * Documentation:  https://help.ubuntu.com
 * Management:     https://landscape.canonical.com
 * Support:        https://ubuntu.com/advantage

  Get cloud support with Ubuntu Advantage Cloud Guest:
    http://www.ubuntu.com/business/services/cloud

2 packages can be updated.
0 updates are security updates.

*** System restart required ***
(fastai) ubuntu@ip-172-31-10-243:~$
Working on our AWS Computer
List what files are loaded on the AWS computer:
ls
my example
(fastai) ubuntu@ip-172-31-10-243:~$ ls
data  fastai  src
(fastai) ubuntu@ip-172-31-10-243:~$
cd into the fastai repo
cd fastai
my example
(fastai) ubuntu@ip-172-31-10-243:~$ cd fastai
(fastai) ubuntu@ip-172-31-10-243:~/fastai$ ls -alt
total 76
drwxr-xr-x 18 ubuntu ubuntu  4096 Nov  7 16:25 ..
drwxrwxr-x  8 ubuntu ubuntu  4096 Nov  5 00:35 .git
drwxrwxr-x  6 ubuntu ubuntu  4096 Nov  5 00:35 fastai
drwxrwxr-x  6 ubuntu ubuntu  4096 Nov  5 00:29 .
-rw-rw-r--  1 ubuntu ubuntu  1273 Nov  5 00:29 environment.yml
drwxrwxr-x  3 ubuntu ubuntu  4096 Nov  1 21:30 tutorials
-rw-rw-r--  1 ubuntu ubuntu   905 Nov  1 21:30 requirements.txt
drwxrwxr-x  4 ubuntu ubuntu  4096 Nov  1 21:30 courses
-rw-rw-r--  1 ubuntu ubuntu  1173 Nov  1 21:30 .gitignore
-rw-rw-r--  1 ubuntu ubuntu 35141 Nov  1 21:30 LICENSE
-rw-rw-r--  1 ubuntu ubuntu   280 Nov  1 21:30 README.md
(fastai) ubuntu@ip-172-31-10-243:~/fastai$
:heavy_exclamation_mark: Update the fastai repo
git pull
my example
(fastai) ubuntu@ip-172-31-10-243:~/fastai$ git pull
remote: Counting objects: 21, done.
remote: Total 21 (delta 12), reused 12 (delta 12), pack-reused 9
Unpacking objects: 100% (21/21), done.
From https://github.com/fastai/fastai
   9ae40be..d64a103  master     -> origin/master
Updating 9ae40be..d64a103
Fast-forward
 courses/dl1/excel/collab_filter.xlsx   | Bin 0 -> 90259 bytes
 courses/dl1/excel/conv-example.xlsx    | Bin 0 -> 101835 bytes
 courses/dl1/excel/entropy_example.xlsx | Bin 0 -> 10228 bytes
 courses/dl1/excel/graddesc.xlsm        | Bin 0 -> 124265 bytes
 courses/dl1/excel/layers_example.xlsx  | Bin 0 -> 17931 bytes
 courses/dl1/lesson1-rxt50.ipynb        |   4 +++-
 fastai/conv_learner.py                 |   5 +++--
 fastai/dataset.py                      |   2 ++
 fastai/imports.py                      |   1 +
 fastai/model.py                        |   4 +++-
 fastai/plots.py                        |  26 ++++++++++++++++++++++++++
 fastai/structured.py                   |   4 ++--
 fastai/torch_imports.py                |   4 ++++
 13 files changed, 44 insertions(+), 6 deletions(-)
 create mode 100755 courses/dl1/excel/collab_filter.xlsx
 create mode 100644 courses/dl1/excel/conv-example.xlsx
 create mode 100644 courses/dl1/excel/entropy_example.xlsx
 create mode 100644 courses/dl1/excel/graddesc.xlsm
 create mode 100644 courses/dl1/excel/layers_example.xlsx
(fastai) ubuntu@ip-172-31-10-243:~/fastai$
Update the conda libraries (do this once a month.)
conda env update
Optional
- check which version of python is running
python --version
- check which python path is being used
which python
- see what packages are installed
pip list --format=legacy
my example
(fastai) ubuntu@ip-172-31-10-243:~/fastai$ python --version
Python 3.6.3 :: Anaconda, Inc.
(fastai) ubuntu@ip-172-31-10-243:~/fastai$ which python
/home/ubuntu/src/anaconda3/envs/fastai/bin/python
(fastai) ubuntu@ip-172-31-10-243:~/fastai$
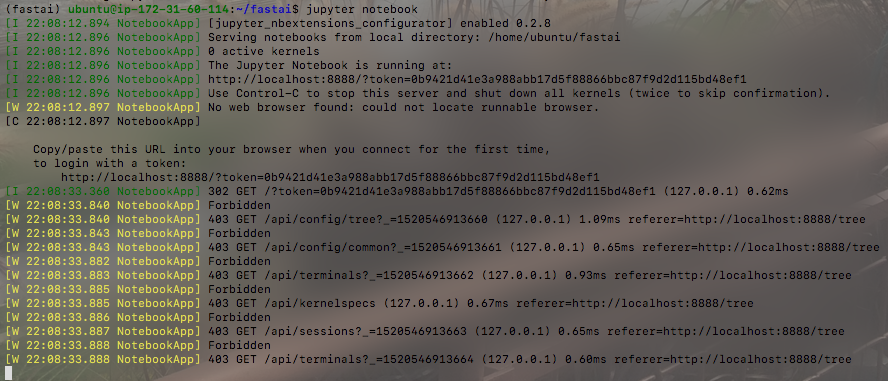
Part III - Jupyter Notebook
Launch Jupyter Notebook
jupyter notebook
my example
(fastai) ubuntu@ip-172-31-10-243:~/fastai$ jupyter notebook
[I 17:00:22.985 NotebookApp] Writing notebook server cookie secret to /run/user/1000/jupyter/notebook_cookie_secret
[I 17:00:30.584 NotebookApp] [jupyter_nbextensions_configurator] enabled 0.2.8
[I 17:00:30.950 NotebookApp] Serving notebooks from local directory: /home/ubuntu/fastai
[I 17:00:30.950 NotebookApp] 0 active kernels
[I 17:00:30.950 NotebookApp] The Jupyter Notebook is running at:
[I 17:00:30.950 NotebookApp] http://localhost:8888/?token=04089b6ccf89e723321097c9089ab52550f408c86f533608
[I 17:00:30.950 NotebookApp] Use Control-C to stop this server and shut down all kernels (twice to skip confirmation).
[W 17:00:30.951 NotebookApp] No web browser found: could not locate runnable browser.
[C 17:00:30.951 NotebookApp]

    Copy/paste this URL into your browser when you connect for the first time,
    to login with a token:
        http://localhost:8888/?token=04089b6ccf89e723321097c9089ab52550f408c86f533608
[I 17:01:49.931 NotebookApp] 302 GET /?token=04089b6ccf89e723321097c9089ab52550f408c86f533608 (127.0.0.1) 0.58ms
Going to “MY URL” for Jupyter Notebook
http://localhost:8888/?token=04089b6ccf89e723321097c9089ab52550f408c86f533608
Note: you will want to edit the above url with YOUR TOKEN.
This notebook is running on AWS GPU machine.
This costs $0.90 per hour (and $3-4 per month for storage) ![]()
![]() Remember to shut the notebook down! (Stop Instance.)
Remember to shut the notebook down! (Stop Instance.) ![]()
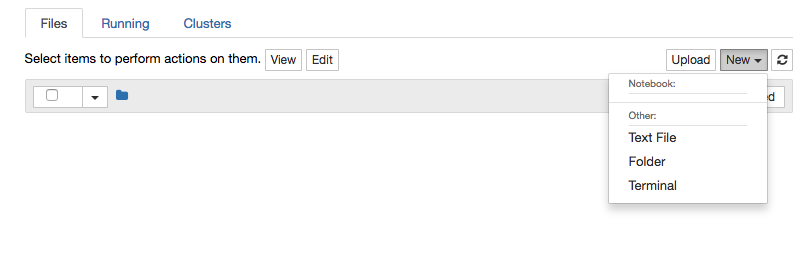
Workflow
I opened the Lesson 1 notebook, made a copy with the name tmp-reshama-lesson1.ipynb and was able to run all the code! ![]()