Hi Everyone,
As suggested by @muellerzr, I will post this half way work of porting Efficient Det to fastai2 (normally I will wait until I have the full version to post or myself just miserably disappeared  ).
).
Please note, this porting is half-way done (training is complete, mAP is complete but still struggling to add it to the fastai2 sytem), and I will keep updating this post (hopefully)
This post will be in the following order
- The Pytorch open library of EffDet I picked
- Current problem that I have
- A very detailed step guide of how I work both libraries
The reason for this order is that more advanced people can just read the first 2 parts and pointing me directions, and the long paragraph is for people like me interesting in go beyond the high level API but don’t have ideas to start.
Here is the link of demo Link
Please note:
if you go over other notebooks in the same repo, it’s not been organized and refactored.
and I only trained the dataset with img_sz 256, no augmentation for 5 epochs. and mAP for one batch is about 0.01 (this is only to test the modules are functioning correctly)
1. Open source library of EffDet
If you google, there are about 5 different repos of Pytorch Efficient Det (please note that efficient Det is a tensorflow implemented paper, the official weights I believe is in tf)
The main reason I picked this repo is because of the following:
I want to say that I follow couple DL heroes in the forum , so I think it has been peer reviewed 
2. Current issues
- The main issue is the model imported, for some reason, I am not able to see the full model, therefore I can’t split the model to layer groups. Therefore, I am unable to freeze the backbone just start training the head (For my experience with efficient net, discrimative learning rate don’t have a much effect on it) [Solved: VScode rendering issue, re-run in Jupyter notebook resolved the issue]
The next step is to split the model at learn.model.class_net, this will make the model two parts
learn.model.backbone / learn.model.class_net
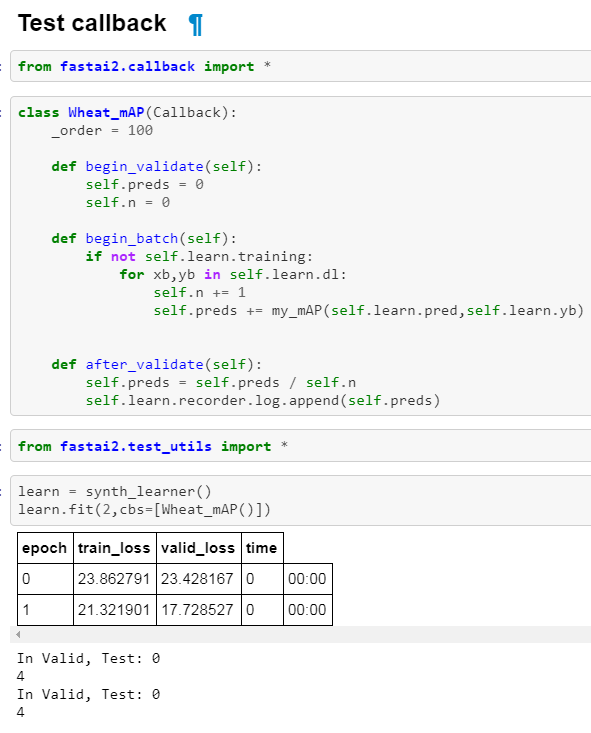
- I have my own customized metric function my_mAP
def my_mAP(preds,targs,img_size=256)
test_mAP = partial(my_mAP,img_size=256)
tst = AccumMetric(test_mAP)
However, preds it’s a list of two lists (class_pred, box_pred), and targs is list of two lists (gt_bbox, gt_lbl)
I will trigger the fastai2 flatten_check(), complaining it doesn’t know how to handle tuple.
I am wondering if a more detailed exampleof how to use this AccumMetrics (especially the call flow) will be highly appreciated.
Or the AccumMetrics wrap is designed to only take single preds and targs, this way, I guess I will have to dig inside callbacks to do it.
(And testing is a nightmare, what is a proper way to raise cancelTrainException? cbs = [cancelTrainException] ? So I don’t have to wait a epoch for train to finish and start debugging the validation loop.
3. Normalization (minor)
I used Imagenetstats to normalize the data, however, for the repo example and kaggle kernel the repo posted didn’t normalize their input data.
Should I assume the backbone is still imagenet pretrained (But I guess it is coco pretrained) or just let the BNs self correct it as we learned from 2019 part2, this will create some exponential jumps in the beginning of training, wasting time but eventually the model will start learning…)
[End of current issue list]
3. A beginner’s guide of porting outside sources to fastai2
Here is the part I learned from fastai, and I am happy to share my understanding and dream one day I can be Sylvan’s level. It might not be the best way, but hopefully it rings a bell so more people will be able to do this monkey patching process.
Use the Efficient Det as an example,
Step1: Assume you have a project, and decided to use some data (you can’t untar_data) and some model (either you found a repo / kaggle kernel / paper) and you want to port it to fastai. What is first step to do?
Remember what Jeremy keep telling you in the class (Data, Model and Loss function).
Therefore, work with Data first. This part is normally done inside fastai, and there are a lot of great tutorial posted on fastai website, I will skip this part for now.
For those of you speak Chinese, I wrote down a brief guide of my understanding of fastai2 DataBlock API, provided an extra kaggle wheat detection as an example. Here is the Link
And this is the entire thing after refactor. As you can see, V2 API is very powerful, I can’t imagine that I can just pass a dict key to form a databunch in V1
def get_data(path,sz=256,bs=64):
    base = Path(path).parent
    df = pd.read_csv(path)
    img2bbox = prep_bbox(df)
    dblocks = DataBlock(
        blocks = (ImageBlock,BBoxBlock,BBoxLblBlock),
        splitter = RandomSplitter(),
        get_x = lambda o: str(base/'train')+'/'+o+'.jpg',
        get_y = [lambda o: img2bbox[o], lambda o: ['wheat' for i in range(len(img2bbox[o]))]],
        item_tfms = Resize(sz),
        batch_tfms=[Normalize.from_stats(*imagenet_stats)],
        n_inp=1
    )
    return dblocks.dataloaders(img2bbox.keys(),bs=bs)
Step 2: Understand your data
b = dls.one_batch()
b[0].shape, b[1].shape, b[2].shape # img, bbox, bboxlbl
In the object detection case, you can see that a batch is a tuple with three things, so the model is supposed to take a image b[0], and output something (depends on the model), and you put b[1],b[2] with the output into your loss function, to spin the wheel.
Now you know, it is time to find a model, because without model, you can’t test your pred and ground truth.
Step 3: Get the model from repo.
Here it will take a lot of time, depends how well is the documentation, the main target you are looking for is the following
-
how to install this repo (read_me of installation, if they don’t have, probably skip this repo.)
-
check example / train.py file, don’t be terrified by the args.parse() things, skip them all and go to bottom of the file, in the end, they have to go to the model, dataset, dataloader, and run. This is your place to start cracking their code
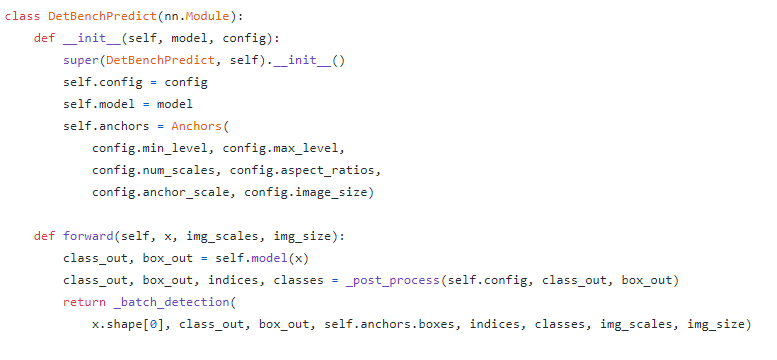
Let’s take a look of the Efficient Det repo. In the train.py, they have a full training loop, but it is still very hard to understand, I went to effdet folder, this is where you need to import model / pre-trained weight …etc
After went over the entire folder, I found that bench.py has everything I need, here is snap shot
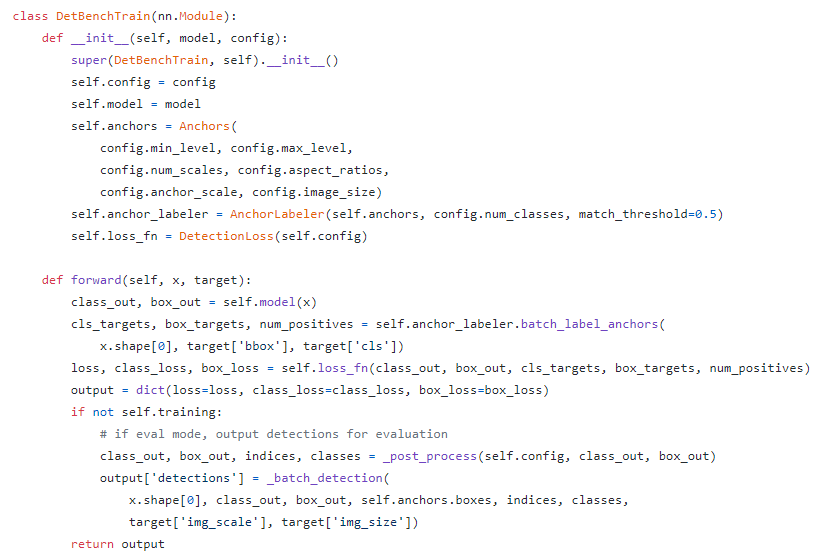
Which means, if I don’t use fastai, I can just call this DetBenchTrain, and start training. (this is not what I want…)
But as you can see, forward function call give you entire code flow,
-
it pass some x into model, and get two things out, class_out, box_out, since we are doing object detection, I will assume this are class output and box output
-
It use a function to map ground truth bbox and cls to anchor, if you know object detection, you know that you need to create anchors on each of the feature map (normally 5, because of the FPN paper). If this looks odd to you, please go watch 2018 part 2 object detection, and make sure you check out fastai Sylvan’s Retina notebook in the nbdev inside fastai
-
it calls a loss function, and the loss function is provided in the init !!!
-
it returns output.
Perfect, this is all we need to know for now, we need to folk / copy / steal this part.
Step4. Import Model
model_config = get_efficientdet_config('tf_efficientdet_d0')
model = EfficientDet(model_config,pretrained_backbone=True)
model_config.num_classes = 1
model_config.image_size = 256
model.class_net = HeadNet(model_config,num_outputs=model_config.num_classes,norm_kwargs=dict(eps=.001,momentum=0.01))
This part is very easy to figure out, spend some time and it is very easy to find, normally you just have to change the head of output class.
[side note:] Fastai head is very good in other models,however, I found it not always work with efficient net. So I will not introduce the concat_pooling and more linear layers here (but hey, searching best arch, hyper tuning is the fun part , and I will do it after I have the arch)
Once you have the model, run simple test
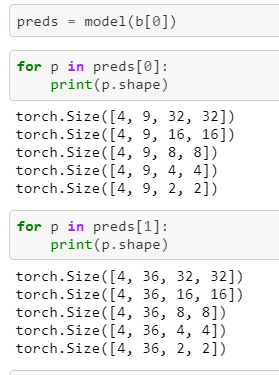
So we know the first part is class_out, the 2nd part is box_out, and we have 5 different feature maps.
the output is batch_size, N, and H, W for feature maps. the box is 4N simply because it needs 4 points to form a box.
Step 5: loss function
anchors = Anchors(
    model_config.min_level,model_config.max_level,
    model_config.num_scales, model_config.aspect_ratios,
    model_config.anchor_scale, model_config.image_size
    )
anchor_labeler = AnchorLabeler(anchors, model_config.num_classes,match_threshold=0.5)
loss_func = DetectionLoss(model_config)
class_out, box_out = model(b[0])
We know the repo provided loss function, but don’t forget our data is packed with fastai data type. And fastai is (-1,1) for bbox coordinates, I think they won’t use this invention in their repo.
After some research, I also found that since they ported tensorflow implementation, and tensor flow used this convention for box, yxyx, normally you have pascal (xyxy), or coco (xywh). Fastai use pascal as well.
Therefore you need to convert the ground truth back, and don’t forget fastai collate the data to form a batch (if you don’t get this one, you can check my previous work SSD with fastai v1
boxes, labels = [],[]
perm = torch.LongTensor([1,0,3,2])

for i in range(b[0].shape[0]):
    box, lbl = un_pad(b[1][i],b[2][i])
    boxes.append(_unscale_pnts(box[:,perm],256)) # to tf style, yxyx
    labels.append(lbl.float())
This simply un_pad bbox and lable before unscale it back from (-1,1) to (0,img_sz) in (yxyx)
The reason un_pad first is to avoid have 0s become img_sz/2 filled in the batch
Now we are safe to call provided loss function
cls_targets, box_targets, num_positivies = anchor_labeler.batch_label_anchors(
    b[0].shape[0], boxes, labels
)
loss, class_loss, box_loss = loss_func(class_out, box_out, cls_targets, box_targets, num_positivies)
For all this functions, simply use your IDE to jump around in the DetBenchTrain to see the function signature and usage (yes, he lacks a bit of explanation)
Step 6: Merge back to fastai2
So you have tested one batch, you have tested loss function, you are ready to move it back to fastai
learn = Learner( dls,model,loss_func=Effdet_Loss,model_dir='/home/heye0507/wheat_detection/model/').to_fp16()
So you have a question, my batch has three things (img, box, lbl), and normally fastai data is (img, lbl). How does fastai handle this things?
I have the same question, and I want to point out the behavior of one_batch() and internal fastai training loop call is inconsistent.
Normally you think, b = learn.one_batch() is what you get inside the training loop, but fastai is smater than that
def _split(self, b):
    i = getattr(self.dls, 'n_inp', 1 if len(b)==1 else len(b)-1)
    self.xb,self.yb = b[:i],b[i:]
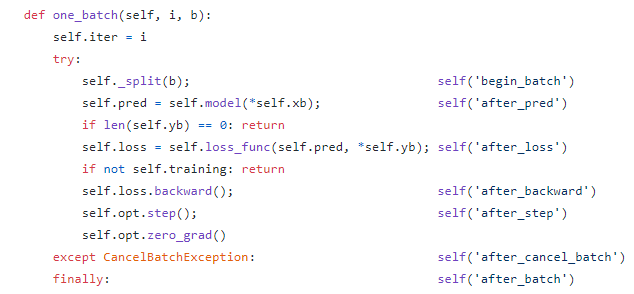
And you can see here, _split use the n_inp to split the data, you don’t have this behavior for one_batch(). Therefore, at run time, fastai knows which part from dataloader is input, and which parts are targs.
Step 7: Debug
If you work like me, use GCP or other cloud service, GPU is turned off when implementing the code, expect couple hours of debugging after you turn GPU on for the cpu / cuda issue. Here I don’t have a best solution, I simply follow call stacks to see if things are out of order.
But if you have tested one batch of dataloader and loss function, then you shouldn’t have other issues
For NaN and 0 loss, this normally due to lr and special designed arch. Also, please understand that for object detection, if you have 5 feature maps, using img_size = 256 is like minimum scale of data to test. Otherwise, you don’t have enough input to feed the network this will also result NaN and 0 loss. But this things is very hard to debug and I am not mastered at all. (Sometimes I pray before I run customized model )
Step 8: Metrics
So now your model trains, your validation loop is working. It is time to think about metrics. You want to define a function that takes a pred, and targ, do something and return a number.
Keep in mind that things are coming as batch, so if you can do broadcasting to speed things up, don’t make loop. Also, sk-learn and some other libraries expect things on CPU, not on GPU, it would be safe to .cpu() your data.
As today (6/18), I still dont have a working mAP inside fastai loop, I will update it once I figure out…
Final Step
Inference, I only run like 5 epochs for testing, therefore the result is not great to show… But I want to leave it here of how you can inter-act with your model.
Remember, model is a model, and we know once we pass model(x) to get pred, we know what the pred represents for. If you are like me, still don’t know how to interact with dispatch system. The quick answer is, don’t use it.
This means, no more show_results, top_losses… etc
But you can figure it out yourself.
In the same place in the bench.py, they provided a DetBenchPredict class to convert everything back to the bbox style you understand.
Use the same idea from Step 3-7, you will figure out that the _batch_detection() outputs the data in the following format
A list of results, length of the list is equal to batch_size
[x_min, y_min, x_max, y_max, confidence, class]
The final
Thank you for your time go through this post, I know this can be formatted better with a medium post, but this project is not finished, as muellerzr encouraged me, something is better than nothing
I will keep updating the results, and hopefully it provides a guide of how to do this cool monkey patching stuff.
Also, please keep in mind I definitely have bugs inside the code, so be extremely caution when using it. Remember that the guy who wrote this post only step in DL field in December, 2018
 I’m following closely the repo as I want to use EfficientDet someday
  . I’m not sure how to handle the

 but I think: