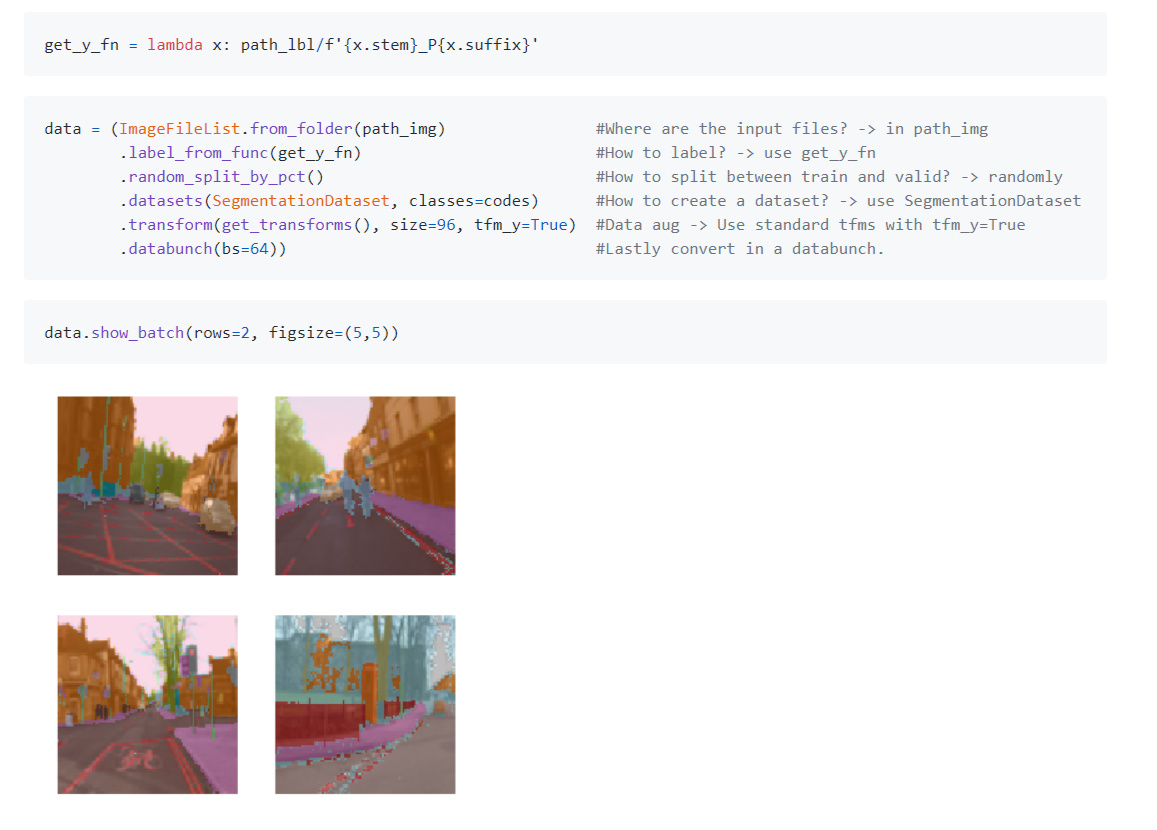
On lesson free, it labels the objects in picture pixel by pixel in the CamVid dataset. But I still do not understand how load the label to put them into the picture?
# Lesson 3
[Video](https://youtu.be/PW2HKkzdkKY) / [Lesson Forum](https://forums.fast.ai/t/lesson-3-official-resources-and-updates/29732)
A quick correction on citation. This chart originally came from Andrew Ng's excellent machine learning course on Coursera. Apologies for the incorrect citation.

[Andrew Ng's machine learning course](https://www.coursera.org/learn/machine-learning) on Coursera is great. In some ways, it's a little dated but a lot of the content is as appropriate as ever and taught in a bottom-up style. So it can be quite nice to combine it with our top down style and meet somewhere in the middle.
Also, if you are interested in machine learning foundations, you should check out our [machine learning course](https://course.fast.ai/ml) as well. It is about twice as long as this deep learning course and takes you much more gradually through some of the foundational stuff around validation sets, model interpretation, how PyTorch tensor works, etc. I think all these courses together, if you really dig deeply into the material, do all of them. I know a lot of people who have and end up saying "oh, I got more out of each one by doing a whole lot". Or you can backwards and forwards to see which one works for you.
We started talking about deploying your web app last week. One thing that's going to make life a lot easier for you is that https://course-v3.fast.ai/ has a production section where right now we have one platform but more will be added showing you how to deploy your web app really easily. When I say easily, for example, here is [how to deploy on Zeit guide](https://course-v3.fast.ai/deployment_zeit.html) created by Navjot.

As you can see, it's just a page. There's almost nothing to and it's free. It's not going to serve 10,000 simultaneous requests but it'll certainly get you started and I found it works really well. It's fast. Deploying a model doesn't have to be slow or complicated anymore. And the nice thing is, you can use this for a Minimum Viable Product (MVP). If you do find it's starting to get a thousand simultaneous requests, then you know that things are working out and you can start to upgrade your instance types or add to a more traditional big engineering approach. If you actually use this starter kit, it will create my teddy bear finder for you. So the idea is, this template is as simple as possible. So you can fill in your own style sheets, your own custom logic, and so forth. This is designed to be a minimal thing, so you can see exactly what's going on. The backend is a simple REST style interface that sends back JSON and the frontend is a super simple little Javascript thing. It should be a good way to get a sense of how to build a web app which talks to a PyTorch model.
show original
muellerzr
February 4, 2020, 10:06pm
2
Each pixel in the numpy array (the mask) represents a class. So IE if we have a 4x4 image, with three classes with the following setup:
0 = ‘background’
2201
2001
0011
0011
This would mean that in our “image”, the top left corner has a cat and the right/bottom right side has a bird. Does this help a bit?
I still do not understand what 2201, 2001, 0011,011 mean.
muellerzr
February 4, 2020, 10:16pm
4
Think of them as the individual pixels in the image. Pixel at 0,3 has a value of 2, which is a bird. They’re “masks”. The png is the file name. In this dataset the y’s (our masks) are named similar to the original file name
So you are saying “0001TP_006690.png” does not tell the position and what item in the picture.
Oh, I see.
But the problem is which file says where the bird should be at?
muellerzr
February 4, 2020, 10:31pm
7
No, it’s given a particular file, it has an associated mask (with a similar file name). This mask is just an array like the example 4x4 we saw, where each coordinate matches up to a particular class or object. Each point in this mask then has one of these overlay pixels. In our example, the 2’s in the top corner means those 3 pixels contain a bird, and the bottom corner and side contain a cat, as bird is when a pixel value is 2, cat of 1, and the “background” or “nothing” as zero. Does this help?
muellerzr
February 4, 2020, 10:34pm
8
A visual example of what these are is like so: the top is the original image, the bottom is it’s associated mask file (which are two different things!)
Here yellow (which we’ll call pixel # 0) is giraffe, pixel 1 is ground, (dark blue), and pixel 2 is brush (light blue)
Thank You, I think I got it. The mask image has a pixel value that is the class name in number