Beginner: Basics of fastai, PyTorch, numpy, etc ✅

Multiple ways to go about this, so you’ll end up getting a lot of different-but-similar advice from different people. So, I’m just going to write down how I personally approach this. (WALL OF TEXT ALERT, sorry ! this is usually easier to demo than to write down about.)

Fastai + Jupyter live inspection method

One thing Jeremy has already demo-ed is the usage of ?, ?? & doc in the Jupyter environment. These provide a pretty good place to start, so a good idea to get comfortable with those. Calling the doc on a python object can actually point you to the source in fastai repositories directly. Try running the following in your jupyter environment. ( after importing from fastai.vision.all import * )

  • ?get_image_files
  • ??get_image_files
  • doc(get_image_files) ← This points you to the exact lines in the fastai repo

Searching in a codebase via editor / command line method

The other method (in my case) is to approach the codebase like I do with any other one. There’s usually two main stages (and appropriate tools for them)

Stage 1. Searching for a keyword / idea

In this phase, I use tools that can quickly find all entries of a text/pattern I’m looking for. I use a tool called rg, but the idea is similar to other tools like ag & grep, or search built-in to the editor you use.

You use this tool to narrow down your search space and find things you might be looking for. If you don’t know the codebase at all, there’ll be some guessing involved. (eg. rg adam, rg Adam, rg optimizer, rg opt and so on…)

Your editor might already have built in support for searching for keywords. So, you can just start with that, no need for external tools really. As long as it’s fast, it’ll work fine. For eg. Search across files in vscode.

NOTE : For the fastai repo, you want your searches to be done not at the top level, but inside the fastai folder. That way you exclude results from other than the pure python files.

Stage 2. Load the file in your editor and start “jumping” to definitions

In this phase I open the corresponding file in my editor, get to the line/col where I was searching the above term. Now I just try to “walk” the codebase.

When there’s a new function/variable that I want to know more about, I try to “jump to” where it was defined. Once I understand it, I “jump back” to where I came from. This has to be supported by your editor. If you’re using vscode, Go To Definition & Go Back is what you’re looking for. I don’t use VSCode a lot yet, so hopefully somebody else can chime in more on that.

Either ways, taking the time to
a) learn how to find the keywords, and
b) learn how to “jump in” and “jump back out” using your editor+language
can be really useful if you plan to have an easier time browsing a codebase.

I hope this was somewhat helpful. :raised_hands:

13 Likes

Actually, I really appreciate you taking the time to answer this in detail (as usual) , so I welcome this (and I’m sure a lot of other beginner types like me would appreciate your answer) :smiley:

I am more comfortable with linux commandline tools so rg/ag would be great to play with. I use grep extensively for my day to day work anyway.

I think I’ll use either a tutorial or a chapter notebook as the starting point and dig through code that way instead of starting with 00_torch_core.ipynb and going down the list because that might just be way over my head.

Thanks!

4 Likes

I’d recommend finishing reading the book before diving too far into the library code, because in the book you’ll recreate many of the key classes in fastai from scratch.

Once you’ve done that the fastai code will make much more sense since you’ll know what each bit is doing.

14 Likes

It’s great @suvash! I add just one technique that I found super useful for experimenting, Installing an editable version of a library with pip install -e then add the auto-reload in notebook with %load_ext autoreload %autoreload 2. With this you are free to add your code in the library, or add break point, …

6 Likes

That’s also a very good idea :100: , esp. if you’re planning to develop on the package. But also, like you mentioned, do print debugging and add breakpoints.

2 Likes

I have a question about untar_data. The documentation comment makes it sound like I can specify a path via fname, but I don’t see anything in the code for it that takes in a path variable. How do I change the destination path? Looking at the code from lesson 1.

1 Like

Yeah, this was discussed briefly in another thread, but I’m not sure what the answer is to this.

1 Like

When working through chapter 4 from the book I got to the part of visualising the 3 using pandas and thought I would try to test the same approach with an image I downloaded directly from the internet. A URL link didn’t directly work so I googled how to do that and followed instructions on stackoverflow:

import requests
from io import BytesIO
cat_url = 'https://toppng.com/uploads/preview/cat-11525956124t37pf0dhfz.png'
response = requests.get(cat_url)
img = Image.open(BytesIO(response.content))

This allowed me to visualise the imported image but the next step failed

cat_t = tensor(img)
df2 = pd.DataFrame(cat_t[4:40, 4:40])

Likely because the tensors have different dimensions and I had wondered slightly off script to check that I know what actually going on.

Screen Shot 2022-05-14 at 12.00.50 pm

And I had no idea what to do next so I thought I’d better search for some help on fastai functions:
Which brought me to your post!!

When running Google Colab and Kaggle with doc(get_image_files) I get the not overly helpful response:

And when trying to pip install nbdev I get the following type of error. Should I be trying to install nbdev on Google Colab or Kaggle? It would be nice to have the link to source directly available so maybe there is a way to have the links displayed?

Sorry for the long post but being able to link to the docs directly from colab would really help if it is possible?

I’ve found one solution to my problem. Use Paperspace and the links work out of the box. So much easier to stay in the flow of fastai rather than googling help and becoming derailed…

Yes this is another reason this is my preferred platform.

You can also just leave a tab open with docs.fast.ai in it, and use the search functionality on that site to find what you’re looking for. One benefit of that is that it’ll show you tutorials as well as the main API docs.

2 Likes

4 posts were merged into an existing topic: Beginner: Setup :white_check_mark:

As the paperspace stuff is already covered in the conversation above, I can try to hint you a bit in the direction of how to reason about fixing the error that you ran into.

If I understand correctly, the code failed at the pandas dataframe creation step (defining df2).

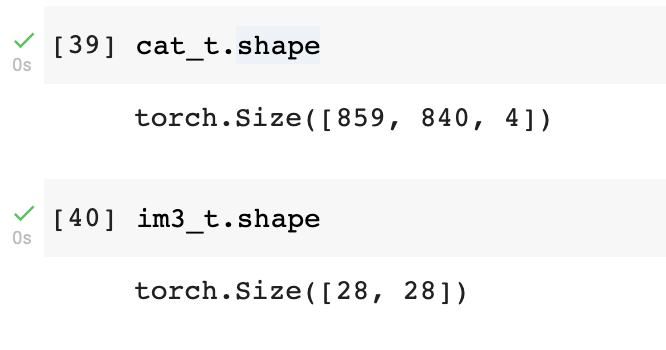
  • First thing to notice is that the cat_t has a shape of [859, 840, 4], as opposed to the mnist example with [28, 28]
  • I’m assuming this is a PNG image of dimension 859px by 840px with 4 channels (Red, Green, Blue, Alpha), hence the total 4 channels.
  • The MNIST example is 28px by 28x px with just 1 channel, that’s why it only has 2 axes instead of 3 as in your image.
  • When you take a slice of the cat_t tensor in cat_t[4:40, 4:40], you should get a tensor of shape [36, 36, 4] back, as you’re only slicing on the 0th & 1st axis.
  • A pandas dataframe holds tabular data, in other words it’s a 2 dimensional matrix/table like data, which means in our case that it can only be created out of a rank-2 tensor (no. of axes = 2, length of shape = 2)
  • The cat_t[4:40, 4:40] is a rank 3 tensor. To verify this, try cat_t[4:40, 4:40].ndim or len(cat_t[4:40, 4:40].shape)
  • What we can do is to filter out using only 1 channel from this image, so the slice can be fed into the pandas dataframe.
  • I’d suggest picking any on channel when building the slice, after which you can check the rank (has to be a rank 2 tensor) and feed to the pandas df creation. (eg cat_t[4:40, 4:40, 0].ndim )

Let me know how it goes. I’ll not post the exact code, but the solution is in the text above. I hope this points you in the direction of resolving the error that you ran into. :raised_hands:

4 Likes

Thank you Suvash! You have a new admirer :smiling_face_with_three_hearts:

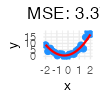
I went from from this image:
simulated_data

To this:

And along the way learnt how to use Paperspace, simulate date, filter out one channel in an image of the simulated data, check ranks of tensors and upload image files to a notebook. Now I would like to control the output size but feel satisfied with my few learnings this last week.

3 Likes

Yay ! :raised_hands:

edit: solved by completely shutting down instance and re running all cells

Hello everyone,
My goal is to clone the fast.ai repo into an AWS instance (conda_python3). I have the instance set up and the repo cloned.

In order to have some things defined I had to add:

conda install -c fastchan fastai
import fastai
pip install fastai --upgrade
pip install nbdev

Something else I tried that failed was:

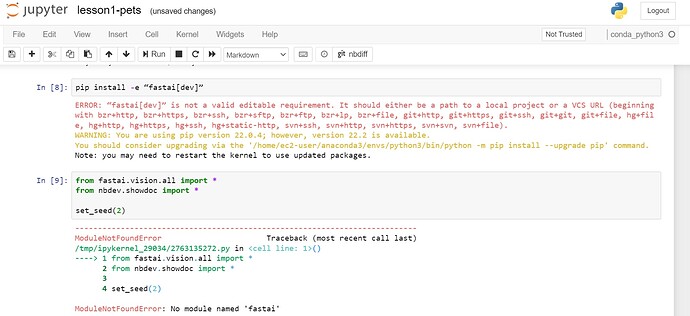
pip install -e "fastai[dev]"

But received:

ERROR: fastai[dev] is not a valid editable requirement. It should either be a path to a local project or a VCS URL (beginning with bzr+http, bzr+https, bzr+ssh, bzr+sftp, bzr+ftp, bzr+lp, bzr+file, git+http, git+https, git+ssh, git+git, git+file, hg+file, hg+http, hg+https, hg+ssh, hg+static-http, svn+ssh, svn+http, svn+https, svn+svn, svn+file).
Note: you may need to restart the kernel to use updated packages.

I had to remove “.all” from

from fastai.vision.all import *
from nbdev.showdoc import *

set_seed(2)

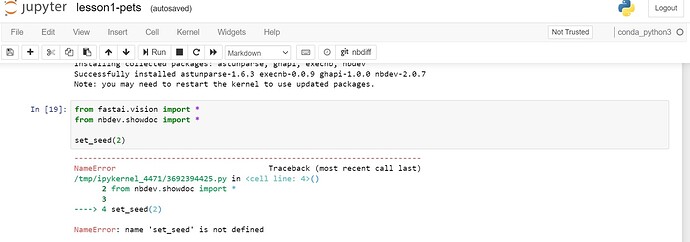
However, when I try to run the cells I receive:

NameError: name 'set_seed' is not defined

Any advice is greatly appreciated. I also tried restarting the kernel

pip install -e “fastai[dev]”

— The above installation command to be used when doing a git clone of fastai repository and then doing a pip install like so:

git clone GitHub - fastai/fastai: The fastai deep learning library
pip install -e “fastai[dev]”

Regarding this problem, ‘I had to remove “.all”’. I suspect your installation is an older version of fastai. Please check the installed version by running,

pip show fastai

It should be 2.7.7. If it is not then please run

pip install --upgrade fastai

2 Likes

Thank you! I tried:

!git clone https://github.com/fastai/fastai
!pip install -e “fastai[dev]”

Which successfully cloned a folder. But whenever I try to use

pip install -e “fastai[dev]”

I received:

I was able to move forward without this but I would like to learn best practices and I am worried it will cause a headache later.

1 Like

You’re missing the ! at the start of that command.

Is there a structured ‘SUPER beginner guide’ for dummies like me?

I’m at lesson 2, but already drown in complexity

  1. can’t set up pytorch to use GPU on my local machine - using pip/conda - killed many hours for this
  2. can’t verify mobile at kaggle (support doesn’t respond), so can’t follow the book there
  3. paperspace, despite providing a GPU, runs twice slower than CPU on my local machine
  4. using google collab. But what is fastBOOK? I thought the lib is fastAI?? Why does fastbook tries to access my gdrive? and then later fastSETUP??? fastCHAN???
  5. why do I need to register at Azure to search for images? Switched to _ddg - now the function call never finishes (42minutes and counting)
  6. what’s the difference between PILImage and Image.open()?
  7. what is nbdev?
  8. then it got weirder - and much more complex - HuggingFace, which evolved into WSL, boilerplate app.py without any understanding, fastsetup/mamba/fastchan/nbdev, and of course the detour into html and JavaScript

besides all that, I’m totally overwhelmed by Jupiter extensions, lots of libraries installation - which I have no idea about, lots of new functions from the library that haven’t got into context yet
RED BUTTON

sorry for venting, I’m just overwhelmed and super frustrated

Hi @michael-pru - I hear your frustration and it can be overwhelming at times. I highly recommend you go to the Live coding sessions starting from number 1. It starts off with the basics and the idea was that it would be a step-by-step guide for absolute fastai beginners like you and me (3 months ago). It does diverge from this original intent and goes off on a few deep tangents but should help you get started.

Don’t do both Google Colab and Paperspace. Pick one and I recommend Paperspace because the Live Coding sessions use this.

I really hope the live coding sessions restart at some time in the future because I made the most progress in the shortest space of time by following along. Word of warning. These sessions aren’t a structured course and highly dependent on the questions from people who attended.

Also the setup and recommended first steps changed deep into the sessions because things were still being optimised. If you want to jump to Session 17 to setup up more automatically this session will help you do that. Going from Session 1, however, you’ll set up Paperspace from scratch which is also really helpful. I recommend the going from Session 1 and learning the easy way later but you can choose your path.

6 Likes