An inquiry (guide, sort-of) into Matplotlib's figures, subplots, axes and GridSpec objects

Hello everyone!
I’ve created a notebook that goes into sufficient depth to explain how Matplotlib’s Figure, Axes, Subplots and GridSpec objects work.
The objective here is for the reader to walk out with a much simpler, more powerful and clearer understanding of how the basic building blocks of this library work.
I felt the need for this when I realized how frustrating it is to use Matplotlib for most people given the not so intuitive API that it provides.

Link: https://gist.github.com/akashpalrecha/4652e98c9b2f3f1961637be001dc0239
(this is geared towards people who already know how to make basic plots using Matplotlib)

Creating this notebook taught me a lot about the library and I’ve definitely one-upped my data visualization skills after this. I hope this is similarly helpful to others.

This is the first time that I have written any sort of guide on the internet. I would very much appreciate any feedback that I can get from others!

12 Likes

Good effort!
mrfabulous1 :smiley::smiley:

1 Like

UPDATE : Matplotlib’s twitter handle asked me to submit a blog on the same topic for their official blog : Matplotblog. So I went ahead made some significant improvements to the original notebook and submitted it to Matplotblog’s Github repo.
They accepted it and it’s now published on their official website!

Here it is : An Inquiry into Matplotlib’s Figures
(There’s a small glitch in the blog where one of the images isn’t displayed correctly. I’ve submitted a PR to fix it and hopefully, it will be merged soon)

I’d like to have a lot (a lot) of criticism on my blog from anyone who has the time since this is the first time I’ve written for an audience other than myself. This was originally meant to be a notebook for my own personal use. And since I like to keep notes/guides mostly in the form of readable code, less text, and to-the-point (if at all necessary) explanations, all of that is (probably) reflected in the blog too. I am not sure of how well received this style is by other readers on the internet.

This was my first technical blog on the internet and I’m very grateful to the FastAI community for all the help it has given me! Of all the education that I have ever received, this has by far been my best experience!

There are three people I would like to especially thank:
@radek for the heads up on writing the blog!
@rachel for all the inspiration and guidance on why one should write a blog!
@jeremy for giving me an education that enables me to do this, and so much more!

(I hope to keep writing blogs of the form : “An Inquiry into XYZ”. I think this is a great way to both deeply understand a single topic and help others do the same.)

7 Likes

Congrats on getting onto the official matplotlib site @akashpalrecha - really well deserved!

I’m looking forward to more posts along this theme. There’s lots more stuff you could probably write about matplotlib, since it’s a nice library that’s really misunderstood.

1 Like

Thanks @jeremy
Although Matplotlib is a big, big library to write about, I was thinking for my next post to be about PyTorch’s nn.Module covering a lot of its underused methods (and some other nifty tricks I’ve discovered over time!).

I’m not really good at data visualisation so I don’t know how much more I’d be able to write about Matplotlib (although I’ll make it a practice to write a blog (or at least a gist) about anything I’m learning)

1 Like

That sounds interesting. What kind of things did you have in mind?

BTW one trick is that fastai v2’s Module doesn’t require calling super().__init__()! :slight_smile:

I don’t have an exact plan as of now. (Also I’m home for holidays and my family does not appreciate me spending time on my laptop while I’m here so it’s hard to really get started on anything)

Although I do have at least one very specific thing in mind. And I think it’s pretty cool.

So, I wanted to test out a modification to BatchNorm layers after doing Part-2 of the course. I was looking for a function that can somehow scale all it’s input to between -1 and 1 without any parameters. Naturally, I turned to activation functions such as Sigmoid, exp(-x^2), Tanh, etc. After some experimentation in the 07_batchnorm notebook itself, what finally seemed to work reliably was applying Tanh followed by the usual scaling and shifting with mults and adds in BatchNorm (Essentially, I replaced the normalization part of a BatchNorm layer with a Tanh). The final results looked pretty (very) close to the usual BatchNorm at least for the network in that Notebook

97.35% vs 97.66% accuracy for 5 epochs each.

Since this looked encouraging, I wanted to try this modification for all the usual networks (Resnets, Inception, etc.) and see if this generalizes with datasets that are more serious than MNIST.
But I didn’t want to have to write new model definitions for all these architectures as I figured that I’ll be needing to write a whole lot more definitions this way and that will slow me down.
So I went ahead and just tried setting the bn* modules in the factory PyTorch resnet modules to a Tanh layer.
THIS DID NOT WORK.
It seemed to break some of the skip-connection logic. I realized that the same issue will probably crop up in other networks too.
After a bit of fiddling around, I found this bit of code to work:

def recursive_getattr(obj:nn.Module, name:str):
    """ getattr for nested attributes with `.` in their names """
    sequence = name.split('.')
    if len(sequence) == 0 or name == '': return obj
    for attr in sequence: obj = getattr(obj, attr)
    return obj

def recursive_setattr(obj:nn.Module, name:str, new_attr):
    """ setattr for nested attributes with `.` in their names """
    sequence = name.split('.')
    obj = recursive_getattr(obj, '.'.join(sequence[:-1]))
    setattr(obj, sequence[-1], new_attr)

def modify_network(m:nn.Module, replace_func:Callable, condition:Callable=None)->nn.Module:
    """ modifies `m` by replacing each module that satisfies `condition` 
        with replace_func(module) """
    if condition is None:
        # If `replace_func` has a condition in-built, it should return
        # the passed module as it is. This is to prevent a recursion issue.
        condition = (lambda x: not x == replace_func(x))
    
    modules = list(m.named_modules())
    if len(modules) == 1:
        return replace_func(m)
    for name, module in modules:
        if condition(module):
            recursive_setattr(m, name, replace_func(module))
    return m

After this I can do what I originally intended with very little code:

def bn_to_tanh(m):
    if isinstance(m, nn.BatchNorm2d):
        nf = m.num_features
        m = TanHNorm(nf) # A module I defined elsewhere
    return m

m = models.resnet18(pretrained=False)
modify_network(m, bn_to_tanh)

This gives me back a working resnet18 with all the BatchNorm layers replaced with a suitable tanh layer. I have yet to test it with other kinds of architectures.

In essence, this allows me to take models created by anyone with whatever logic they might have used in their script, and then just modify them as needed with very little code. This can be handy when trying out new activation functions, particular modifications to cnn layers or just in general adding/modifying arbitrary parts of existing networks with little effort. (Can this be added to Fastai?)

It does work with FastAI’s (V1) simple_cnn function:

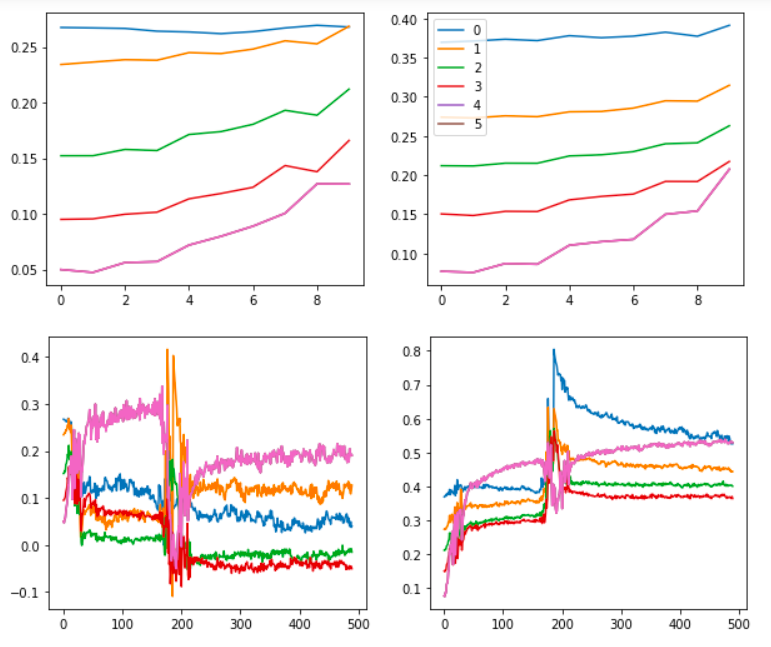
Also, the graphs for the tanh experiment look like this:


As opposed to the usual BatchNorm:

It’s not as smooth, but I think this is worth exploring further. The core advantage of using this approach is that there are no variance or mean parameters or calculations (since that’s generally what causes a lot of problems with batch sizes and generalization). By getting rid of those parameters, we may get rid of those problems too. (I’m still learning though. Please, please correct me if this sounds naive or wrong)

I want to start running experiments with resnets on Imagewoof and Imagenette using this approach as soon as possible but right now I’m all caught up in preparing to go back to college. Hopefully, I’ll have something tangible to show for soon enough.

As far as writing the blog is concerned, I was hoping to discover new things as I go along ripping apart some of the core functions in nn.Module just like I did with matplotlib. A significant part of that was covered in Part-2 of the course itself, so that might help here too.
(I’m thinking of exploring other libraries as well - Jax: Numpy with Autograd, XLA and GPUs, streamlit: easily creating data science GUI tools/apps)

Sounds like an interesting research direction.

AFAICT your code might be a little more complex than needed. I think you should be able to just use children() recursively, rather than splitting on .. Also, you may even be able to use nn.Module.apply - although I’m not sure if that’ll work in this case.

I had previously tried achieving this with the functions you’re mentioning, but the issue is that they return new references to the Model’s inner modules and modifying them doesn’t change anything about the original references inside the Model. I have to have the original references to modify the model and getattr seems to be the way to go here.
Also, modules in nn.Sequential modules are named 0 through N and I cannot access them through the usual obj1.obj2.obj3 notation in python because the names are integers. getattr is a good way to get these kinds of modules.

Side note: getattr doesn’t work by default with names of the form : obj1.obj2.obj3...objN. You have to use a loop to get to the end by accessing each object in succession.

Also @jeremy, any particular advice / things-I-should-know as I try out this research idea? I’ve never done this before so I want to avoid making beginner mistakes as far as possible :sweat_smile:.

Oh that’s interesting. Thanks for explaining!

I showed my approach to researching these kinds of ideas in part2, e.g. when looking at RunningBatchNorm and GeneralRelu. Not sure I have anything to add to that…

Try Imagenette/woof/wang to make sure you see actual improvements on a real dataset.

I tried quickly running a resnet34 with all Batchnorm layers replaced by tanh layers on Imagenette and the results so far haven’t been very encouraging.
Although there is one very weird observation: the model doesn’t get any better with a constant learning rate. But with a one-cycle schedule, the model stays at 10% accuracy for the complete cycle except near the last few epochs where it almost always makes a big jump in accuracy (jumps to anywhere between 30% to 70%). This happens consistently. It always starts training near the end of a cycle.

I tried prolonging the latter half of the cycle to see if that helps, but even in that case the model only started getting better in the last 2 out of 10 epochs.

I think it might work better with the usual kinds of cnn models (the kind that simple_cnn produces) but I have yet to test that out. I’ll try that tonight.

I’ve used nbdev for this so you can see the full notebook as it stands currently with the results here. It’s a very quick and rough notebook to validate things before I give a proper structure to the project. For this reason the notebook isn’t very well structured. But the results should be easy to follow for anyone. Here’s the notebook : https://akashpalrecha.me/tanhNorm/resnet34_experiment

I did some more training and tanh seems to work similar to Batchnorm quite reliably for simple cnns : https://akashpalrecha.me/tanhNorm/simple_cnn_experiment

Just read through it, thank you for writing. I learned a lot and it was written as if you have been blogging for a long time now :slight_smile:

1 Like