You are right! Fixed now ![]()
3 Likes
Error Conversion to tensors error from numpy arrays / Notebook 01_matmul
Anyone had below error(s) in 01_matmul?
Then, use torch.from_numpy
x_train,y_train,x_valid,y_valid = map(torch.from_numpy, (x_train_nmp,y_train_nmp,x_valid_nmp,y_valid_nmp))
or better just run conda update pytorch
that did the trick for me 
From docs it seems Windows is not supported fully. However from lessons 8 video it seems Jeremy is using Windows with fastai successfuly. Is there a ‘official ‘ guide on how to setup fastai on Windows?
I’m not sure if that is still the case, during the earlier versions of the course, Jeremy would ssh into his instance/machine and then “tunnel” the nb to his laptop.
In the lesson, we are taking mean across all the points, across all the features to get a single mean value. But usually, don’t we calculate mean for each feature separately across all the points so that we have separate mean values for each feature?
For understanding how matrix multiplication works on the GPU, you could dig into some CUDA tutorials. But the main idea is that you break large matrices into small blocks (for example, 96 by 96 numbers), and then they are all multiplied in parallel on the GPU, because these intermediate multiplications do not depend on each other. After that is done, results are combined to produce the output matrix.
I found this CUDA workshop somewhat relevant, it explains low level data manipulations and parallelization abstractions overview (in C++).
I can also recommend two blog posts (part 1 and part 2 by Tim Dettmers that go into details of how GPUs are used to speed up deep learning.
3 Likes
I’m not sure if its being “tunnelled”.
When you ssh into an instance and add a param as follows:
ssh abc@xyz -L 8888:localhost:8888
or
ssh abc@xyz -L 8888:localhost:8889
That forwards whatever is happening on your server to your port.
I’m not aware of any good blogs/tutorials covering it, it’s termed as “ssh tunneling” if you’d like to read further. ![]()
2 Likes
I think I was using similar setup connecting to GCP instances. Just forgot about it lol  thanks I was hoping there is a official windows support lol
2 Likes
You’re right, but MNIST images are grayscale, so there’s only a single feature/channel. For ImageNet dataset we would normalize each channel (RGB) separately.
3 Likes
I guess it is called “port forwarding”. With this you can run your local jupyter notebook on port 8888 and forward the port 8888 from your server to your port 8889 so you can have the local and the server jupyter notebook running at the same time.
1 Like
Okay, yeah makes sense.
If this would have been a tabular data, we would have then calculated mean and stddev for each of the 784 dimensions separately, right?
can anyone please explain me following code in 02_fullyconnected notebook?
test_near_zero(w1.std()-1/math.sqrt(m))
I was thinking that we wanted w1.std to be as close to “1” but not understanding why we wanted it to near (1/math.sqrt(m)).
1 Like
just so i understand this. to detect overfitting we monitor accuracy or validation error?
in the response above, Jeremy states that we want to track accuracy, then in the lesson 8 video, Jeremy says it’s the validation error we want to track:
so overfit means what? it means that your training loss is lower than your validation loss. no. no it doesn’t mean that. remember it doesn’t mean that. a well fit model will almost always have training loss lower than the validation loss. remember that overfit means you have actually personally seen your validation error getting worse okay. until you see that happening you’re not overfitting.
or maybe this is just definition thing, we have:
validation loss
training loss
validation error
accuracy
error_rate (introduced in pets notebook from part 1)
so i understand that validation loss is not the same as validation error
and that validation error (or error rate) = 1 - accuracy
and that to detect overfitting we track accuracy or validation error (error rate).
correct me if i am wrong here. thanks ![]()
Going through the recording of the lecture 8 I annotated lesson notebooks with YouTube video links. Added annotations link position in the notebook to the corresponding location of the video where Jeremy discusses the few next cells in the notebook. I found it useful for myself, and I think it might be useful for others. I would like to share it, but I am not sure how to do that. What would be the right way to contribute the annotated .ipynb files?
1 Like
That’s great. Would you mind sharing these via your GitHub repo?
I wanted to force myself to not “cheat” by looking at Jeremy’s code while re-creating what we did in lesson 8, so I made a notebook with more or less only the instructions. Not sure if it will be helpful to anyone else, but I posted it here
7 Likes
Yes, with a table consisting of 784 columns of continuous variables. You get it by default using fastai.tabular.transform.Normalize.
inject it here maybe: https://forums.fast.ai/t/collaborative-lesson-notes/40387/30
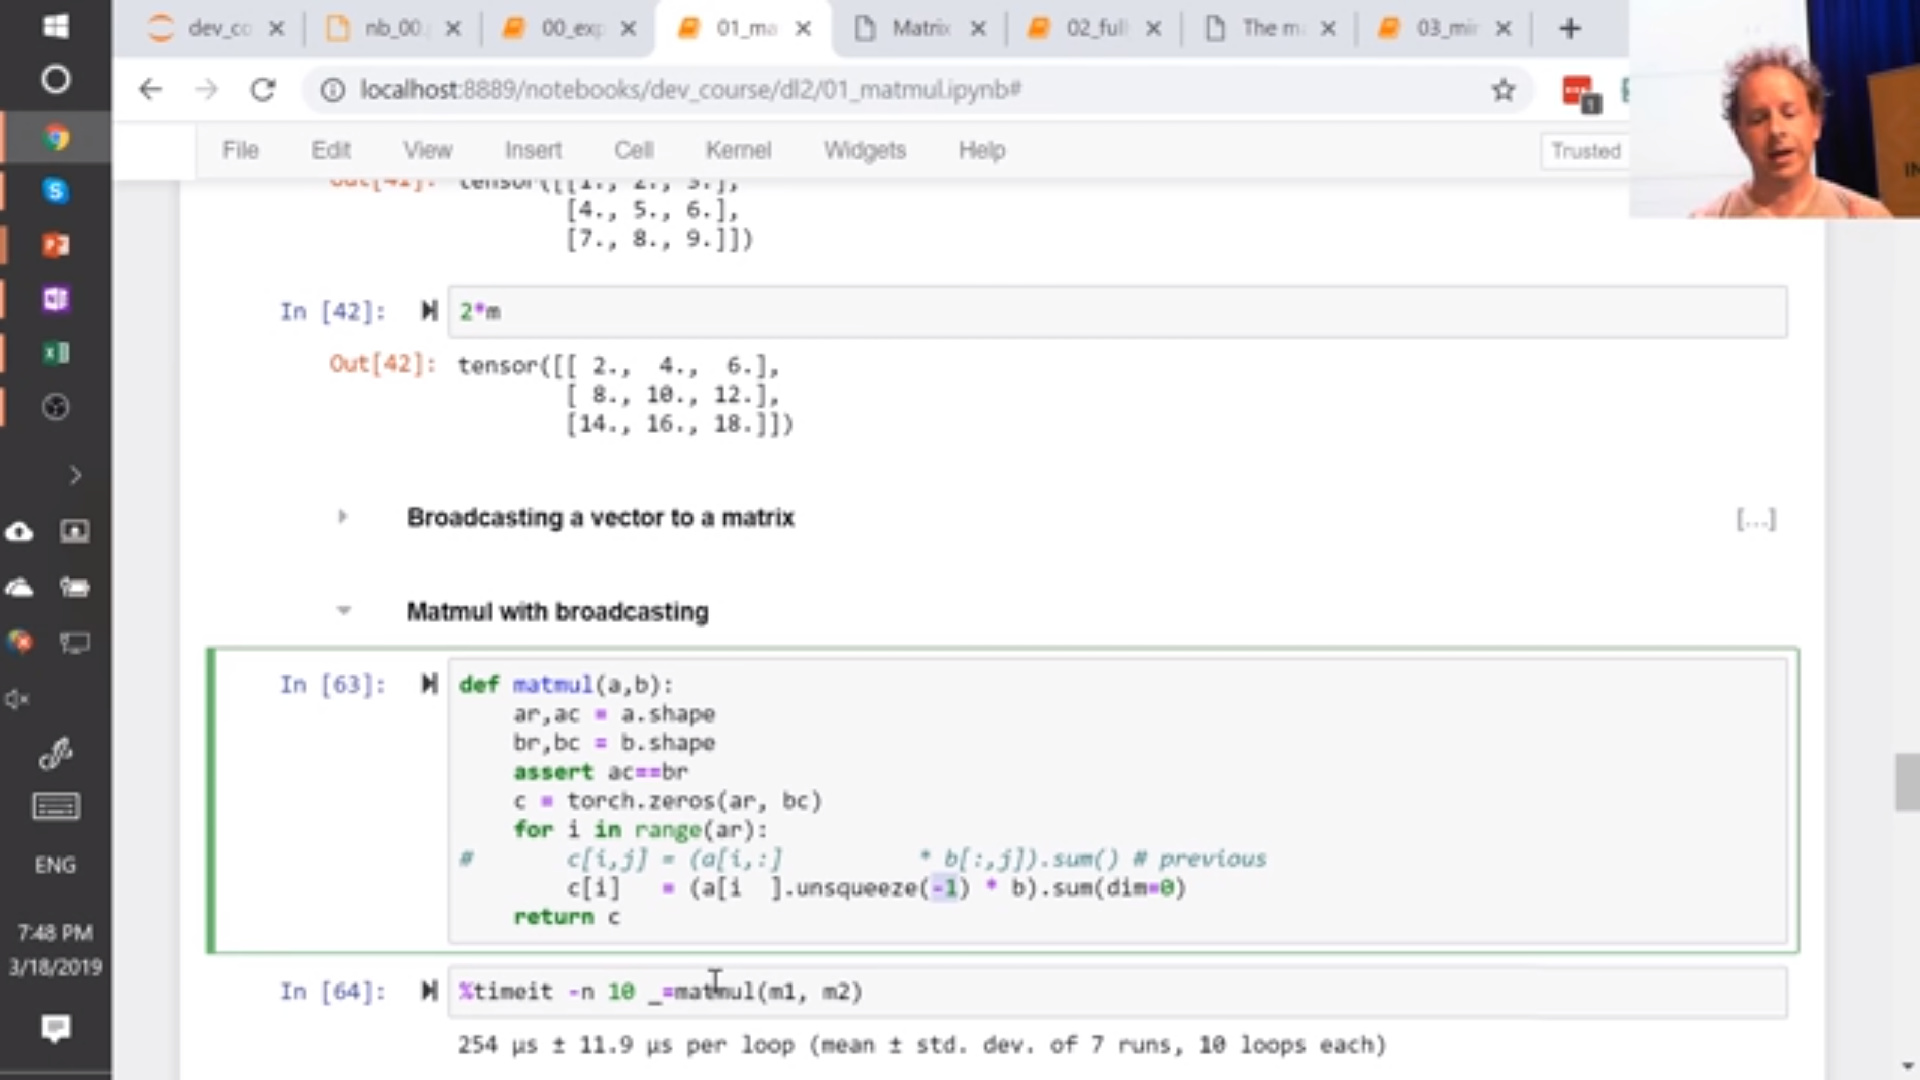
@jeremy, I think there is another buglet to fix in the video.
In broadcasting matmult (video 1:04:25) you suggest that these 2 are the same:
    for i in range(ar):
        c[i] = (a[i].unsqueeze(-1)*b).sum(dim=0)
        c[i] = (a[i,None]*b).sum(dim=0)
but the second one gives an error.
RuntimeError: The size of tensor a (3) must match the size of tensor b (2) at non-singleton dimension 1
The only way I can make it work is via a temp assignment:
    for i in range(ar):
        t = a[i]
        c[i] = (t[:,None]*b).sum(dim=0)
All your unsqueeze using None examples were using : but as soon as you replace : with an actual index like 0, those things no longer work. Here is an example:
m1 = torch.arange(6.0).view(2,3)
m1[0]
m1[0].unsqueeze(-1)
m1[0, None]
tensor([0., 1., 2.])
tensor([[0.],
        [1.],
        [2.]])
tensor([[0., 1., 2.]])
Thanks.
3 Likes