Lesson 1 discussion

Ah, the key was putting the files in another directory lower. They are now in /test/test, and the following output occurs:

Found 6 images belonging to 1 classes.

And I got it predicting!! Now just to get that paired back to the filename, and I can submit!!

I figured out that batch.filenames does actually give a list of the filenames in the order of the batching, so I ended up using that. YAAAAAY Thanks for the course Jeremy this is very awesome!!!

I am starting with lesson 1 and the Vgg16.py cloned from main git repository is leading to frustrating errors. Iā€™ve searched for and implemented most of the instructions I could find from the forums &/ googling.

(OS : Ubuntu 16.04, GPU: 1080Ti)

Confirmed working GPU backend on Theano (0.9.0). Test code from Theano docs works & confirms gpu usage.
I have also set the .theanorc file appropriately.

Downgraded Keras from 2 to 1.1.0
Edited keras.json also as per the instructions Iā€™ve collated.

Yet, vgg16.py is throwing atypical errors, with a full dump of something like os.env

['nvcc', '-shared', '-O3', '-Xlinker', '-rpath,/usr/local/cuda/lib64', '-arch=sm_61', '-m64', '-Xcompiler', '-fno-math-errno,-Wno-unused-label,-Wno-unused-variable,-Wno-write-strings,-DCUDA_NDARRAY_CUH=c72d035fdf91890f3b36710688069b2e,-DNPY_NO_DEPRECATED_API=NPY_1_7_API_VERSION,-fPIC,-fvisibility=hidden', '-Xlinker', '-rpath,/home/ra/.theano/compiledir_Linux-4.8--generic-x86_64-with-debian-stretch-sid-x86_64-2.7.13-64/cuda_ndarray', '-I/home/ravi/.theano/compiledir_Linux-4.8--generic-x86_64-with-debian-stretch-sid-x86_64-2.7.13-64/cuda_ndarray', '-I/usr/local/cuda/include', '-I/opt/anaconda/lib/python2.7/site-packages/theano/sandbox/cuda', '-I/opt/anaconda/lib/python2.7/site-packages/numpy/core/include', '-I/opt/anaconda/include/python2.7', '-I/opt/anaconda/lib/python2.7/site-packages/theano/gof', '-L/home/ra/.theano/compiledir_Linux-4.8--generic-x86_64-with-debian-stretch-sid-x86_64-2.7.13-64/cuda_ndarray', '-L/opt/anaconda/lib', '-o', '/home/ra/.theano/compiledir_Linux-4.8--generic-x86_64-with-debian-stretch-sid-x86_64-2.7.13-64/tmpRLFd51/ea4e203b6529466794536f8a1bfa77ae.so', 'mod.cu', '-lcudart', '-lcublas', '-lcuda_ndarray', '-lcudnn', '-lpython2.7']

Followed by a printout of some full C code.

Then, the Traceback points to exception in line 213 of vgg16.py
ā€“> 213
validation_data=val_batches,nb_val_samples=val_batches.nb_sample)

And the Traceback ending with following Exception message:

Exception: ('The following error happened while compiling the node', GpuDnnConv{algo='small', inplace=True}(GpuContiguous.0, GpuContiguous.0, GpuAllocEmpty.0, GpuDnnConvDesc{border_mode='valid', subsample=(1, 1), conv_mode='conv', precision='float32'}.0, Constant{1.0}, Constant{0.0}), '\n', 'nvcc return status', 2, 'for cmd', 'nvcc -shared -O3 -Xlinker -rpath,/usr/local/cuda/lib64 -arch=sm_61 -m64 -Xcompiler -fno-math-errno,-Wno-unused-label,-Wno-unused-variable,-Wno-write-strings,-DCUDA_NDARRAY_CUH=c72d035fdf91890f3b36710688069b2e,-DNPY_NO_DEPRECATED_API=NPY_1_7_API_VERSION,-fPIC,-fvisibility=hidden -Xlinker -rpath,/home/ra/.theano/compiledir_Linux-4.8--generic-x86_64-with-debian-stretch-sid-x86_64-2.7.13-64/cuda_ndarray -I/home/ravi/.theano/compiledir_Linux-4.8--generic-x86_64-with-debian-stretch-sid-x86_64-2.7.13-64/cuda_ndarray -I/usr/local/cuda/include -I/opt/anaconda/lib/python2.7/site-packages/theano/sandbox/cuda -I/opt/anaconda/lib/python2.7/site-packages/numpy/core/include -I/opt/anaconda/include/python2.7 -I/opt/anaconda/lib/python2.7/site-packages/theano/gof -L/home/ravi/.theano/compiledir_Linux-4.8--generic-x86_64-with-debian-stretch-sid-x86_64-2.7.13-64/cuda_ndarray -L/opt/anaconda/lib -o /home/ravi/.theano/compiledir_Linux-4.8--generic-x86_64-with-debian-stretch-sid-x86_64-2.7.13-64/tmpRLFd51/ea4e203b6529466794536f8a1bfa77ae.so mod.cu -lcudart -lcublas -lcuda_ndarray -lcudnn -lpython2.7', "[GpuDnnConv{algo='small', inplace=True}(<CudaNdarrayType(float32, 4D)>, <CudaNdarrayType(float32, 4D)>, <CudaNdarrayType(float32, 4D)>, <CDataType{cudnnConvolutionDescriptor_t}>, Constant{1.0}, Constant{0.0})]")

This is frustrating as the enthusiasm to proceed with the lesson & learn real ML is curbed by all the troubleshooting that needs to be done. Please help me out to get started really.

You can use 4kdownloader to download from youtube for the lecture videos

It would be great to have a solution that does not violate youtubeā€™s terms of service.

I ran into the same problem. I was trying to write code on my own.

from keras.models import Sequential
from keras.layers import Convolution2D, MaxPooling2D, ZeroPadding2D
from keras.layers import Activation, Dense, Dropout, Flatten, Lambda
import numpy as np

activation = 'relu'
model = Sequential()
model.add(Lambda(vgg_preprocess, input_shape=(3,224,224), output_shape=(3,224,224)))
model.add(ZeroPadding2D((1, 1, )))
model.add(Convolution2D(64, 3, 3,activation=activation, ))
model.add(ZeroPadding2D((1, 1, )))
model.add(Convolution2D(64, 3, 3,activation=activation, ))
model.add(MaxPooling2D((2, 2), strides=(2, 2)))
model.add(Flatten())

This ZeroPadding2D is imported from keras.layers. In the code given on the git, it is imported from keras.layers.convolutional. Both accept the different number of params.

I changed ZeroPadding2D((1, 1, ) to ZeroPadding2D((1, 1, 1, 1) and it worked.

To debug just comment the lines before flatten and see which causes the error.
Compare your model.summary() with summary supplied in git.

Why do Tensorflow back , acc has been only 91

%, and Theano back can reach 97%? What is the reason for this?

Browsing Images in a Batch
Hi Jeremy, It might be useful to add a small function to the utils.py file that interactively browses through images in a batch.

batches = vgg.get_batches(path+'train', batch_size=batch_size)
imgs,labels = next(batches)

Browse images

from ipywidgets import interact

def browse_images(imgs, labels=None):
    n = len(imgs)
    def view_image(i):
        label = 'None'
        plt.figure(figsize=(12,6))
        plt.imshow(imgs[i].transpose((1,2,0)).astype(np.uint8)) 
        if labels is not None:
            label = np.argmax(labels[i])
        plt.title('Image: %s Label: %s' % (i, label))
        plt.show()
    interact(view_image, i=(0,n-1))

Iā€™m having an issue running the Lesson 1 Notebook and would be forever grateful if anyone can offer some help!

I was able to run the notebook successfully after completing the AWS setup and running it through my AWS server. However, Iā€™ve re-downloaded all the files onto my own Macbook (instead of the AWS server) and get the following error when running lesson 1:

Can anyone offer some assistance on this? Also if there is more information needed on the context of my setup let me know (Iā€™m sure there is), but Iā€™m currently using python via anaconda.

Have you tried this from your SSH bash shell:
conda install keras

I had this same issue today and finally got it resolved. I am using Keras 2 and downloaded the Keras 2 version of the course which has a link published on the forums. But the real key to solving this issue from your post is to ensure that your keras.json file is correct:
{
ā€œepsilonā€: 1e-07,
ā€œfloatxā€: ā€œfloat32ā€,
ā€œimage_data_formatā€: ā€œchannels_firstā€,
ā€œbackendā€: ā€œtheanoā€,
ā€œimage_dim_orderingā€: ā€œthā€
}

This helped a ton! Thank you

do you have the line plot(show) ? after all the plotting processing is done?

2 very beginner questions -

  1. if this represents my lowest loss, and highest accuracy, is it reasonable to assume that this epoch produced the ā€œbestā€ model? or could this be overfitted and only testing will tell.
    Epoch 8/10
    6200/6200 [==============================] - 17205s - loss: 0.2573 - acc: 0.9814

  2. is there a way to save the weights after each epoch? i assume reloading those weights would reset the model to that epoch?

thanks very much

finetune comes from cars and engines - and it usually means to adapt the car/engine better to your needs - most of the time more power - by taking the adjustable bits in the engine and tuning them ā€œfinelyā€ - as opposed to the ā€œroughā€ tune from the factory

that being said, I think it is completely intuitive the way it is used.

There is one typo at http://wiki.fast.ai/index.php/Lesson_1, homework, Item 9: ā€œdonā€™t forget the utils.py, vgg26.py files etcā€ -> it should be vgg16.pyā€¦

Hi guys. Iā€™m beginning to follow Part 1. Till now, I succeeded in setting up a local linux box with gpu, cloned the course repository, and started to gnaw at lesson 1.

Two small questions:

  1. Although we use anaconda, the setup script uses pip to install packages, and not conda. Why?

  2. I noticed that utils.py does contain a world of code. Will it be explained in due time, or we keep using that stuff as a tool? I understand that this is a top-down course, but Iā€™d like to understand what happens behind the scenes.

Thanks!

Hey all,

Coming back to this after a long hiatus. I keep getting a ā€˜dead kernelā€™ warning when I try to create a Vgg16() object

vgg = Vgg16()

Iā€™ve downloaded the weights and thrown them in a ā€œmodelsā€ folder and then directed the vgg16.py file to them, in case that was the reason the kernel was dying. That didnā€™t fix it. Anyone else run into this/ know how to fix it?

Thanks,
Elizabeth

Update: itā€™s the h5 file thatā€™s causing it to crashā€¦ not sure why. has anyone else had success recently in a p2 instance?

Update 2: changing from gpu to cpu in the .theanorc file fixed itā€¦ but this seems less than ideal if we want to use the gpu. re: https://github.com/tensorflow/tensorflow/issues/916

Hi everyone,

just a newbie question. vgg16 already has weights from Imagenet build in. So when we are training it with cats and dogs images, what are we doing to these pre-trained weights?

Thank you.

Cantā€™ get 97% accuracy (using Windows and Tensorflow backend)

Does everyone easily get to 97% accuracy on lesson 1 and 2? I get around 90% at most.

I tried a few learning rates going as low as 3E-5. While loss and precision progress as we normally expect when doing backprop, it always stabilizes around

Loss: 0.2302 - acc: 0.9100 - val_loss: 0.1540 - val_acc: 0.9340

And I went up to 150 Epochsā€¦

I have to admit I am running this on a Windows PC with Python 3.6 and Tensorlfow as the backend. My hunch is that I have my channels wrong or something like that.

I did modify the source code according to quite a few posts about it lying around in the forums.

So I did include stuff like:
K.set_image_dim_ordering('th')
in the code for vgg16.py

and I also have
%matplotlib inline
from keras import backend
backend.set_image_dim_ordering(ā€˜thā€™)
As my first cell in the notebook.

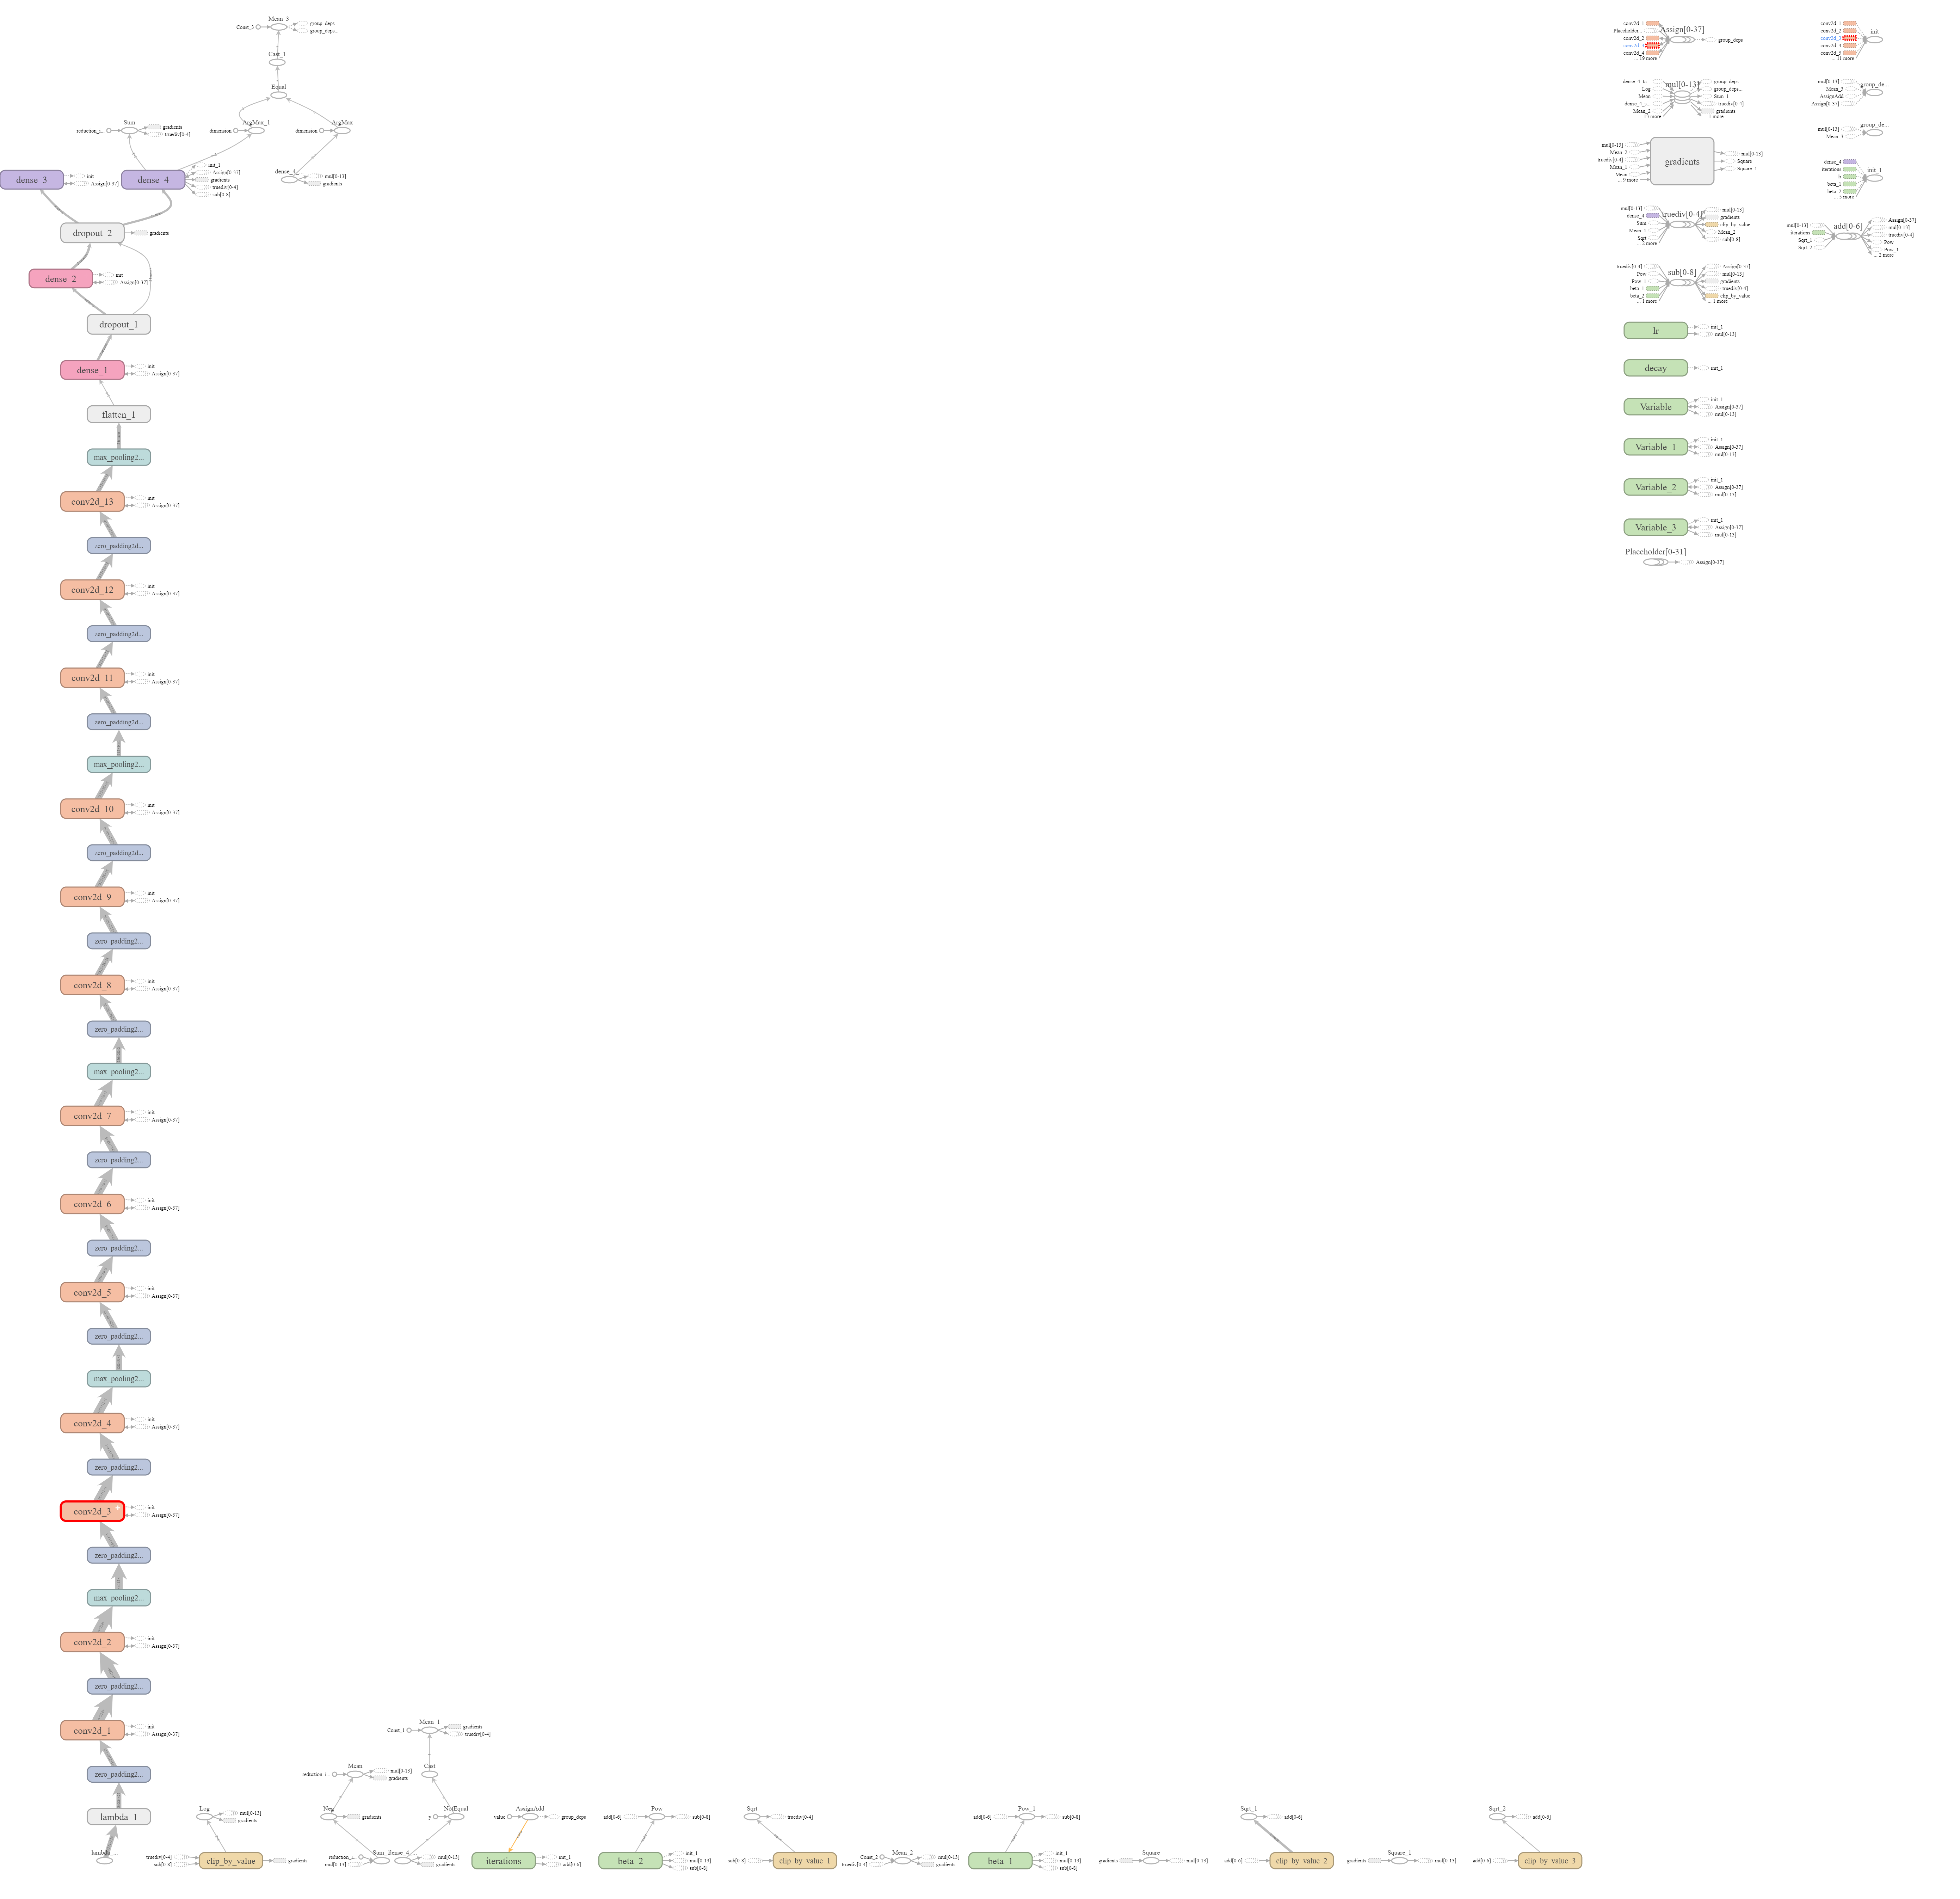
Included is the graphI see in Tensorboard. The top layers donā€™t look like what I would expect: The dense_3 node, which I deduct is the layer we pop to fine tune, is dangling up there sending itā€™s output to no one. dense_4 is outputting a 2 label tensor so that bit looks OK. But maybe that is Keras doing normal extra internal stuff on what I define.

Did I miss anything?

Here is my code below. Any hints on what else I should check?

 from __future__ import division, print_function

import os, json
from IPython.display import display
from math import ceil
from glob import glob
import numpy as np
from scipy import misc, ndimage
from scipy.ndimage.interpolation import zoom

from keras import backend as K
from keras.layers.normalization import BatchNormalization
from keras.callbacks import TensorBoard
from keras.utils.data_utils import get_file
from keras.models import Sequential
from keras.layers.core import Flatten, Dense, Dropout, Lambda
from keras.layers.convolutional import Conv2D, MaxPooling2D, ZeroPadding2D  # Conv2D: Keras2
from keras.layers.pooling import GlobalAveragePooling2D
from keras.optimizers import SGD, RMSprop, Adam
from keras.preprocessing import image

# In case we are going to use the TensorFlow backend we need to explicitly set the Theano image ordering


K.set_image_dim_ordering('th')


vgg_mean = np.array([123.68, 116.779, 103.939], dtype=np.float32).reshape((3,1,1))
def vgg_preprocess(x):
    """
        Subtracts the mean RGB value, and transposes RGB to BGR.
        The mean RGB was computed on the image set used to train the VGG model.
        Args: 
            x: Image array (height x width x channels)
        Returns:
            Image array (height x width x transposed_channels)
    """
    x = x - vgg_mean
    return x[:, ::-1] # reverse axis rgb->bgr


class Vgg16():
    """
        The VGG 16 Imagenet model
    """


    def __init__(self):
        self.FILE_PATH = 'http://files.fast.ai/models/'
        self.create()
        self.get_classes()


    def get_classes(self):
        """
            Downloads the Imagenet classes index file and loads it to self.classes.
            The file is downloaded only if it not already in the cache.
        """
        fname = 'imagenet_class_index.json'
        fpath = get_file(fname, self.FILE_PATH+fname, cache_subdir='models')
        with open(fpath) as f:
            class_dict = json.load(f)
        self.classes = [class_dict[str(i)][1] for i in range(len(class_dict))]

    def predict(self, imgs, details=False):
        """
            Predict the labels of a set of images using the VGG16 model.
            Args:
                imgs (ndarray)    : An array of N images (size: N x width x height x channels).
                details : ??

            Returns:
                preds (np.array) : Highest confidence value of the predictions for each image.
                idxs (np.ndarray): Class index of the predictions with the max confidence.
                classes (list)   : Class labels of the predictions with the max confidence.
        """
        # predict probability of each class for each image
        all_preds = self.model.predict(imgs)
        # for each image get the index of the class with max probability
        idxs = np.argmax(all_preds, axis=1)
        # get the values of the highest probability for each image
        preds = [all_preds[i, idxs[i]] for i in range(len(idxs))]
        # get the label of the class with the highest probability for each image
        classes = [self.classes[idx] for idx in idxs]
        return np.array(preds), idxs, classes


    def ConvBlock(self, layers, filters):
        """
            Adds a specified number of ZeroPadding and Covolution layers
            to the model, and a MaxPooling layer at the very end.
            Args:
                layers (int):   The number of zero padded convolution layers
                                to be added to the model.
                filters (int):  The number of convolution filters to be 
                                created for each layer.
        """
        model = self.model
        for i in range(layers):
            model.add(ZeroPadding2D((1, 1)))
            #model.add(Convolution2D(filters, (3, 3), activation='relu'))
            model.add(Conv2D(filters, kernel_size=(3, 3), activation='relu'))  # Keras2
        model.add(MaxPooling2D((2, 2), strides=(2, 2)))


    def FCBlock(self):
        """
            Adds a fully connected layer of 4096 neurons to the model with a
            Dropout of 0.5
            Args:   None
            Returns:   None
        """
        model = self.model
        model.add(Dense(4096, activation='relu'))
        model.add(Dropout(0.5))


    def create(self):
        """
            Creates the VGG16 network achitecture and loads the pretrained weights.
            Args:   None
            Returns:   None
        """
        model = self.model = Sequential()
        model.add(Lambda(vgg_preprocess, input_shape=(3,224,224), output_shape=(3,224,224)))

        self.ConvBlock(2, 64)
        self.ConvBlock(2, 128)
        self.ConvBlock(3, 256)
        self.ConvBlock(3, 512)
        self.ConvBlock(3, 512)

        model.add(Flatten())
        self.FCBlock()
        self.FCBlock()
        model.add(Dense(1000, activation='softmax'))

        fname = 'vgg16.h5'
        model.load_weights(get_file(fname, self.FILE_PATH+fname, cache_subdir='models'))


    def get_batches(self, path, gen=image.ImageDataGenerator(), shuffle=True, batch_size=8, class_mode='categorical'):
        """
            Takes the path to a directory, and generates batches of augmented/normalized data. Yields batches indefinitely, in an infinite loop.
            See Keras documentation: https://keras.io/preprocessing/image/
        """
        return gen.flow_from_directory(path, target_size=(224,224),
                class_mode=class_mode, shuffle=shuffle, batch_size=batch_size)


    def ft(self, num):
        """
            Replace the last layer of the model with a Dense (fully connected) layer of num neurons.
            Will also lock the weights of all layers except the new layer so that we only learn
            weights for the last layer in subsequent training.
            Args:
                num (int) : Number of neurons in the Dense layer
            Returns:
                None
        """
        model = self.model
        model.pop()
        for layer in model.layers: layer.trainable=False
        model.add(Dense(num, activation='softmax'))
        self.compile()

    def finetune(self, batches):
        """
            Modifies the original VGG16 network architecture and updates self.classes for new training data.

            Args:
                batches : A keras.preprocessing.image.ImageDataGenerator object.
                          See definition for get_batches().
        """
        self.ft(batches.num_class)
        classes = list(iter(batches.class_indices)) # get a list of all the class labels

        # batches.class_indices is a dict with the class name as key and an index as value
        # eg. {'cats': 0, 'dogs': 1}

        # sort the class labels by index according to batches.class_indices and update model.classes
        for c in batches.class_indices:
            classes[batches.class_indices[c]] = c
        self.classes = classes


    def compile(self, lr=0.00003):
        """
            Configures the model for training.
            See Keras documentation: https://keras.io/models/model/
        """
        self.model.compile(optimizer=Adam(lr=lr),
                loss='categorical_crossentropy', metrics=['accuracy'])


    def fit_data(self, trn, labels,  val, val_labels,  nb_epoch=1, batch_size=64):
        """
            Trains the model for a fixed number of epochs (iterations on a dataset).
            See Keras documentation: https://keras.io/models/model/
        """
        self.model.fit(trn, labels, epochs=nb_epoch,
                validation_data=(val, val_labels), batch_size=batch_size)


    def fit(self, batches, val_batches, nb_epoch=1):
        """
            Fits the model on data yielded batch-by-batch by a Python generator.
            See Keras documentation: https://keras.io/models/model/
        """
        display("Yes2")
        tbCallBack = TensorBoard(log_dir='./Graph', histogram_freq=1, batch_size=batches.batch_size, write_graph=True, write_grads=True,write_images=True)
        self.model.fit_generator(batches, steps_per_epoch=ceil(batches.samples/batches.batch_size), epochs=nb_epoch,
                validation_data=val_batches, validation_steps=ceil(val_batches.samples/val_batches.batch_size),
                callbacks=[tbCallBack])


    def test(self, path, batch_size=8):
        """
            Predicts the classes using the trained model on data yielded batch-by-batch.
            Args:
                path (string):  Path to the target directory. It should contain one subdirectory
                                per class.
                batch_size (int): The number of images to be considered in each batch.

            Returns:
                test_batches, numpy array(s) of predictions for the test_batches.

        """
        test_batches = self.get_batches(path, shuffle=False, batch_size=batch_size, class_mode=None)
        return test_batches, self.model.predict_generator(test_batches,
                ceil(test_batches.samples/test_batches.batch_size))
1 Like

Itā€™s well explained in the lesson 1 notebook. In a nutshell, when you call finetune() you alter the model thus:

  1. Remove the last layer of vgg16 which outputs the 1000 labels of the classification with a softmax
  2. Make all remaining layers untrainable (the weights are frozen, no backprop is done on them)
  3. Add a new layer with softmax which outputs the CAT or DOG prediction.