Issues with deployment on google app engine example

First of all thank you for replying!
So are you saying that I should go to source code and change this line:
“_solve_func = getattr(torch, ‘solve’, torch.gesv)”

Manually? I think I would face the same issues andres is facing.
See his answer below mine.

I tried / trying another path, but while, faced another error, maybe you can help.
So I went to my VM JupyterHub.
Checked ! pip install list.
And transformed my requirments.txt file to mimic what ! pip install returned.
So I know I have a perfect match of what I am deploying vs what I trained on.

So I ended up with the following requirements doc:"

‘’’
numpy==1.16.2
torchvision==0.3.0
https://download.pytorch.org/whl/cpu/torch-1.1.0-cp37-cp37m-linux_x86_64.whl
fastai==1.0.55
starlette==0.11.4
uvicorn==0.3.32
python-multipart
aiofiles==0.4.0
aiohttp==3.5.4

‘’’

And here is my current docker file

‘’’
FROM python:3.6-slim-stretch

RUN apt update

RUN apt install -y python3-dev gcc

ADD requirements.txt requirements.txt

RUN pip install -r requirements.txt

COPY app app/

RUN python app/server.py

EXPOSE 8080

CMD [“python”, “app/server.py”, “serve”]

#CMD [“gunicorn”, “-b”, “:8080”, “–chdir”, “app/”, “main:app”]

#RUN python app/server.py
#gcloud app update --no-split-health-check

‘’’

However, when I tried to launch I got the following error:

‘’’
Step 5/9 : RUN pip install -r requirements.txt
—> Running in 0132b685c40c
ERROR: torch-1.1.0-cp37-cp37m-linux_x86_64.whl is not a supported wheel on this platform.
WARNING: You are using pip version 19.2.1, however version 19.2.2 is available.
You should consider upgrading via the ‘pip install --upgrade pip’ command.
The command ‘/bin/sh -c pip install -r requirements.txt’ returned a non-zero code: 1
ERROR
ERROR: build step 0 “gcr.io/cloud-builders/docker” failed: exit status 1

‘’’

That was due to =
https://download.pytorch.org/whl/cpu/torch-1.1.0-cp37-cp37m-linux_x86_64.whl

trying to install version for Python 3.7 (CP37) vs Docker file specifying Python 3.6

So I changed it to:
https://download.pytorch.org/whl/cpu/torch-1.1.0-cp36-cp36m-linux_x86_64.whl

And now facing this error.

from torchvision import _C
ImportError: libcudart.so.9.0: cannot open shared object file: No such file or directory
The command ‘/bin/sh -c python app/server.py’ returned a non-zero code: 1
ERROR
ERROR: build step 0 “gcr.io/cloud-builders/docker” failed: exit status 1

Looked into it, and it has to do with CUDA versioning…
Looks like this will never end.
I am giving up for now.

PS.
The app did deploy on render…
So an easier way out.

Here is my GIT if it helps anyone here:
The timeout error for me is solved by increasing the requested disk space in the app.yaml file, like this:

resources:
    disk_size_gb: 12

12 GB seems to be enough for me.

could you solve the problem

@joaquinmaya could you solve the problem

Hi All ,

I’ve down graded pillow to <7.0.0 and moved to docker file install step.

here is docker file

FROM python:3.6-slim-stretch
MAINTAINER Emre Cavunt <emre.cavunt@gmail.com>
RUN apt-get update
RUN apt-get install --yes software-properties-common
RUN apt-add-repository contrib
RUN apt-get update

RUN apt-get install --yes \
    python \
    python-dev \
    python-pip \
    build-essential \
    git \
    bash \
    strace \
  && pip install virtualenv \
  && pip install 'pillow<7.0.0' \
  && rm -rf /var/cache/apk/* \
  && apt-get clean

ADD requirements.txt requirements.txt
RUN pip --no-cache-dir install -r requirements.txt

COPY app app/

RUN python app/server.py

EXPOSE 5000

CMD ["python", "app/server.py", "serve"]

You can check the our github repo

https://github.com/emrecavunt/detect-dental-problem

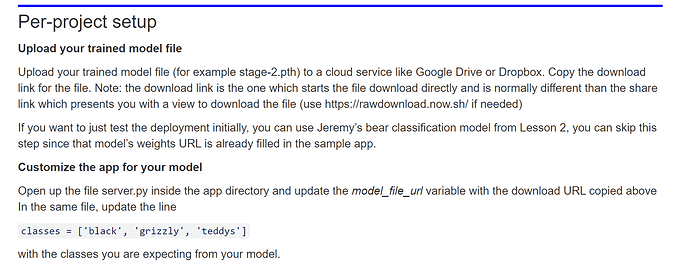
Hello, i’m a bit of a beginner and don’t understand this part of the tutorial. He mentions to open up server.py on instructions and change url and classes. I am using Windows and using Ubuntu app as terminal. I follow all the previous instruction, but then i am having trouble opening and thus modifying the file from the terminal. I’m not sure if there is also a GUI to do it more easily. But, i’m stuck here. Some help with beginner details exactly on that part would be appreciated

Yes, you can open server.py script in notepad or any other text editor on windows. Then you can edit whatever you need to edit.

I finally got it deployed but it never passes the readiness checks. Only main changes are on the app.yaml which can be seen below. Any suggestions on how to fix?

runtime: custom
env: flex
service: first-class
readiness_check:
  app_start_timeout_sec: 1800
resources:
 disk_size_gb: 15

The service works if I use the suggested download URL in the tutorial, but not with my own parameters.

I’m using Google Drive and I’m creating a request from here:

Because my file is over 100MB, I’ve attached an API key to my request. I am not receiving an ‘Unpickling error’ about my response returning with ‘<’.

Here’s what my Google Drive link looks like:

All results occurred in AppEngine. I can’t run the service locally to test because I receive an error that Starlette cannot be found, which I attribute to a lack of a download even though I’ve downloaded the dependencies multiple times.

In order to test this locally, I’ve been starting a docker process and running docker build .

Is there a better way to run the service locally given that the suggested command doesn’t work for me? python app/server.py serve

I’m on a Mac

Hi nswekosk hope your having a jolly day!

See this link Deployment Platform: Render ✅ There are many posts of the issues people have deploying their models. I use exactly the same code to deploy locally on my mac, via docker on my mac in a virtual directory on my mac or on an online host.

Pay particular notice to posts about pip list in relation to requirements.txt, your torch version and server.py config.

I nearly always start with this repository starter code https://course.fast.ai/deployment_render.html and build on it when I have it working.

Lastly this Running, Deploying Fastai successes: Links, Tutorials, Stories is a thread started recently which shows various ways people have deployed their models.

Hope this helps

mrfabulous1 :smiley: :smiley:

1 Like

Thanks!

The link to deploying on ‘Render’ gave a helpful example of the right command to run the Dockerfile locally. I’ll give that a shot