The latest version of Pytorch - 0.3.1, doesn’t offer support for GPU with CUDA capability less or than equal to 5.0 and this is the only version available for Windows from my understanding.
If anyone is open for dual boot with Ubuntu, then can follow this setup script with following additional steps.
After cloning the git, edit environment.yml in the fastai folder from pytorch >= 0.2.0 to pytorch <= 0.3.0
Instead of conda env update, use conda env create - not sure whether this is absolutely necessary but just to be safe I did this.
I was able to follow lesson1 without any trouble in my laptop. Good luck!
"# >>>> ERROR REPORT <<<<
…
yaml.constructor.ConstructorError: could not determine a constructor for the tag ‘tag:yaml.org,2002:python/unicode’
in “C:\Users\antip\AppData\Local\ContinuumIO\binstar\config.yaml”, line 1, column 1
"
This thread suggests it’s a problem with the yaml creation?
dl1/lesson7-cifar10.ipynb is throwing me an error in fastai\dataset.py line 48 for fname in os.listdir(os.path.join(full_path, label)):
NotADirectoryError: [WinError 267] The directory name is invalid: ‘data/cifar10/train\0_frog.png’
not sure what the listdir() is trying to do after join adds the filename to the path?
(I have done a git pull, maybe there’s some work going on here?)
I deleted the os.listdir call and this step ran, then errored on the next step x,y=next(iter(data.trn_dl))
again errrored in dataset.py this time line 199
OSError: No such file or directory: data/cifar10/train\16187_horse.png\t
I don’t think so. For that reason I put it in the Windows thread, (but I was too tired to think properly, then I edited my post, but didn’t communicate well enough)… NotADirectoryError: [WinError 267] The directory name is invalid: 'data\\cifar10\\train\\0_frog.png'
now clearly thats not a directory, but it doesn’t look like a windows problem. I now presume fastai is expecting a directory structure like train\cats*.img and train\dogs*.img (here planes and frogs etc)
‘data\cifar10\train\frog\0.png’
but thats different to what I got by downloading the suggested cifar.tgz . I haven’t written something to move the files around yet, which will demonstrate if thats right, but I figured other people would have had this same download (recently?)
fast.ai does expects all images in different folders according to the classes or mapped by a CSV? Or out the directory name in f string in python within quotes
Pardon me haven’t used DL side of fast.ai for past 2-3 weeks…(so I may be wrong)
confirmed. when I moved the 50 000 train and 10 000 test files into nested subdirectories, dataloader worked. I don’t know why this is ‘new’
Excuse if the below code is awful python. I don’t like looping individual files. (note I haven’t put in code to delete the original files)
#note plane would work for airplane, car wouldnt for automobile
classes = ('airplane', 'automobile', 'bird', 'cat', 'deer', 'dog', 'frog', 'horse', 'ship', 'truck')
cd ./data/cifar10/train
#cd ./data/cifar10/test

for c in classes:
    %mkdir $c

import fnmatch
allpng=fnmatch.filter(os.listdir(), '*.png')
for c in classes:
    c_list = fnmatch.filter(allpng, '*'+c+'*')
    for fn in c_list:
        shutil.copy( fn, c)
sounds like creating a csv for this download would be the way to go then…
Same, I’m revisiting DL after finishing the ML stuff. I remember Jeremy saying he spends more time fitting datasets to what fastai wants, rather than writing more fastai dataloaders. I just found this odd, using the recommended download from within lesson 7
The information in @ecdrid’s reply above is incorrect. Please don’t use that approach to setting up Windows, but use the approach in the top post in this current thread instead.
We are using the pre-release version of Pytorch for Windows. It runs under Windows directly, not under the Linux subsystem.
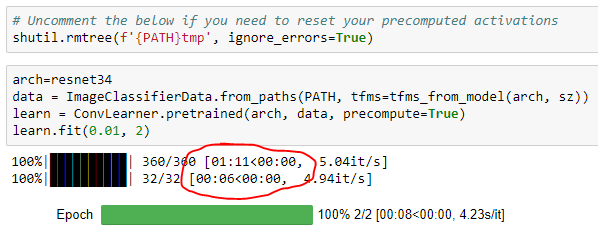
I have GTX 1080ti on my windows box. I followed these instructions and I see that my Jupyter notebook runs slow. Is this common for Jupyter Notebook to run slow?
In fact, the learning is also slower.
Here’s a comparison (running first model from lesson1.ipynb)
Ubuntu Unix Box
RAM 32 GB
GPU GTX 970
Drive SSD
Example: Our first model (dogs vs cats) with no temporary files
Windows Box:
RAM 64GB
GPU GTX 1080ti
Drive SSD
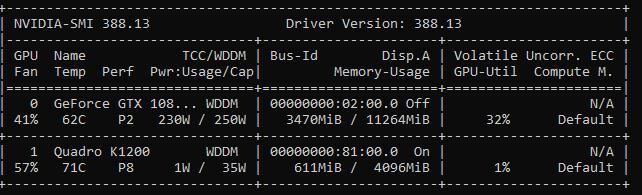
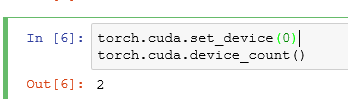
I have two GPUs
Therefore, I set device as follows:
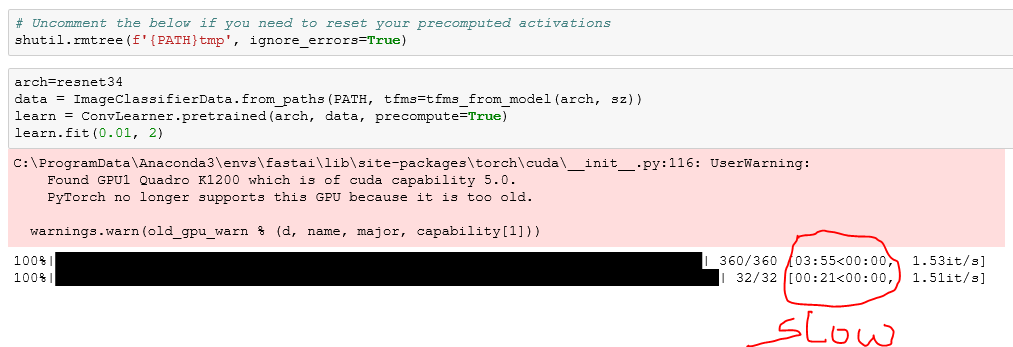
When I run the same piece of code as above, it not only runs slowly but gives warning for the other GPU (device 1).
Just wanted to share my experience with the install for anyone who has issues. I’m a huge novice to the command line and programming so these tips are targeted at that audience.
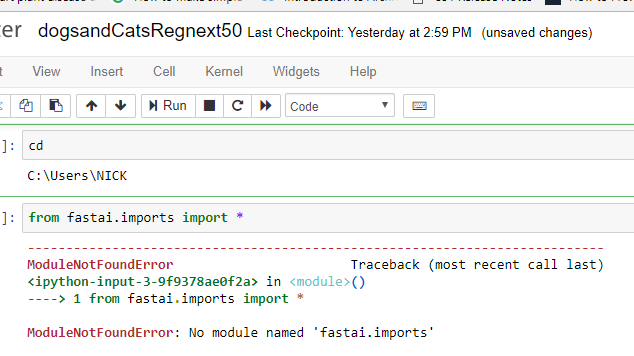
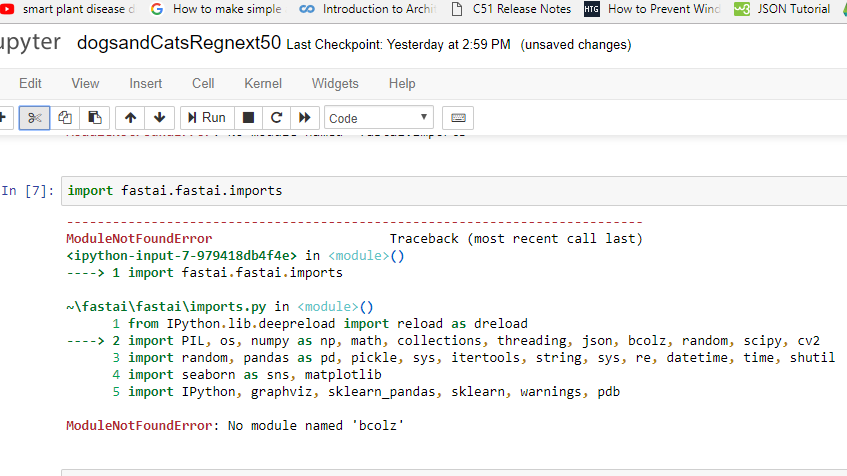
I followed Jeremy’s instructions but received a module not found error when inside of the lesson 1 running this: from fastai.imports import *
I believe I had two issues. The first was I had previously installed Anaconda but I had it installed for all users rather than just me like Jeremy had specified. I uninstalled my anaconda and reinstalled for just me.
My second issue was creating a symlink in the command line for step 8 of the install. (which was the first time I’ve ever done that so needed a bit more verbose instructions). What isn’t clear for noobs but I’m sure is totally obvious to people with command line experience is once you load the anaconda command line prompt in administrator mode, it loads you into an entirely different directory than the home directory you were working in for steps 1-7. Therefore you need to navigate to the home directory you were in for the previous steps using the change directory function “cd”. For me, I needed to navigate back to: C:\Users\Will\fastai\courses\dl1 but you’ll need to replace "Will’ with your home directory name. Once at this directory, which you can check by typing ‘pwd’ you can finish the install by following the instructions in step 8.
One final thing to note is that the instructions work as long as you are in the dl1 course. If you try to run a notebook from the ml1 course, you’ll need to change your directory within the jupyter notebook to courses/dl1 instead of courses/ml1. I’m sure there is a better way to do this but this is what got it to work for me.
Anyway, I’m sure this is obvious to most but hopefully helpful to the coding newbs in the group.
I am new to the course so my question might be silly. Is it impossible to implement fastai on CPU with AMD Radeon or it just very slow to work?
Also when I tried with the same I am getting an error for line: from fastai.imports import *
I thought there was a problem with directory path so tried
@jeremy - I am sorry to tag you in this post but I have not been able to find a solution to this yet.
Have you observed that CUDA 9 is slower tha CUDA 8? My windows box (GPU 1080i) is slower than my Ubuntu box (GTX 970) in that it takes twice as long to run the same code.