Oh, OK, thank Jeremy.
I installed anaconda on a different drive as I am running out of space on my c: drive.
Can I force my D:\Anaconda3 directory to be my home directory?
Oh, OK, thank Jeremy.
I installed anaconda on a different drive as I am running out of space on my c: drive.
Can I force my D:\Anaconda3 directory to be my home directory?
When you install it gives you that option - it’s mentioned in the instructions in this post.
Hello and thanks again @jeremy for this 2018 course! I am from last year instalment as a remote student and have a perfectly working win 10 + GTX 1070 laptop, caveat being all packages are 6-8 months old (it was very hard to get them all up and running ehehe). So my humble question to you and fellow students is: how do I update my Anaconda & all the Python packages in the smoothest manner in order to work with the new 2018 course without destroying my environment? All the best, Gius.
Hi @jeremy
I had already installed Anaconda and for this user only, and specified the D:\Anaconda3 as my home directory. But when I interrogate this setting in Python this is the result (and yes I really didn’t change the default user name):
from pathlib import Path
str(Path.home())
'C:\\Users\\User'
Under that directory are all of the “dot” directories like ,anaconda,.conda, .ipython, .python, .jupyter, .keras etc.
But under Anaconda3 are directories like Lib, libs, pkgs, etc.
If I type sys.path then it does indeed show all of the Anaconda directories first, though I don’t know why some specific directories and .egg files are included.
['',
 'D:\\Anaconda3\\python36.zip',
 'D:\\Anaconda3\\DLLs',
 'D:\\Anaconda3\\lib',
 'D:\\Anaconda3',
 'D:\\Anaconda3\\lib\\site-packages',
 'D:\\Anaconda3\\lib\\site-packages\\Babel-2.5.0-py3.6.egg',
 'D:\\Anaconda3\\lib\\site-packages\\Mako-1.0.7-py3.6.egg',
 'D:\\Anaconda3\\lib\\site-packages\\pattern-2.6-py3.6.egg',
 'D:\\Anaconda3\\lib\\site-packages\\cherrypy-13.1.0-py3.6.egg',
 'D:\\Anaconda3\\lib\\site-packages\\python_docx-0.8.6-py3.6.egg',
 'D:\\Anaconda3\\lib\\site-packages\\pdfminer.six-20170720-py3.6.egg',
 'D:\\Anaconda3\\lib\\site-packages\\feedparser-5.2.1-py3.6.egg',
 'D:\\Anaconda3\\lib\\site-packages\\mysqlclient-1.3.12-py3.6-win-amd64.egg',
 'D:\\Anaconda3\\lib\\site-packages\\backports.csv-1.0.5-py3.6.egg',
 'D:\\Anaconda3\\lib\\site-packages\\future-0.16.0-py3.6.egg',
 'D:\\Anaconda3\\lib\\site-packages\\pypiwin32-220-py3.6-win-amd64.egg',
 'D:\\Anaconda3\\lib\\site-packages\\portend-2.2-py3.6.egg',
 'D:\\Anaconda3\\lib\\site-packages\\cheroot-6.0.0-py3.6.egg',
 'D:\\Anaconda3\\lib\\site-packages\\pycryptodome-3.4.7-py3.6-win-amd64.egg',
 'D:\\Anaconda3\\lib\\site-packages\\tempora-1.10-py3.6.egg',
 'D:\\Anaconda3\\lib\\site-packages\\more_itertools-4.0.1-py3.6.egg',
 'D:\\Anaconda3\\lib\\site-packages\\win32',
 'D:\\Anaconda3\\lib\\site-packages\\win32\\lib',
 'D:\\Anaconda3\\lib\\site-packages\\Pythonwin',
 'D:\\Anaconda3\\lib\\site-packages\\IPython\\extensions',
 'C:\\Users\\User\\.ipython']
I suspect that when trying to compile the english dictionary support that spacy is making an assumption about the location of files in relation to the running python.
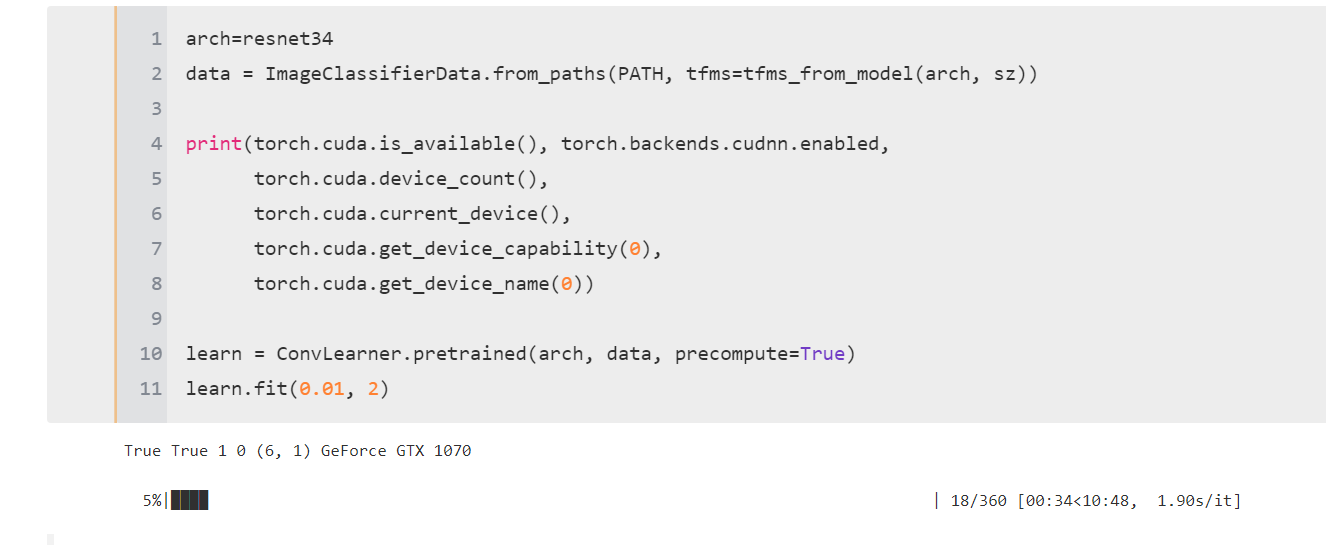
I cannot really believe it. I queried the GPU just before running the model, and it responds it’s all ok. Still, it has something like a 10 minutes ETA, while it takes less than 15 seconds when the GPU is properly initialized.
Any idea about what’s happening?
I’ve created an “Anaconda Prompt (fastai)” shortcut. Might be something to create when installing fastai (or the option)?
note this works after activating fastai. otherwise I got a spacy not found kindof message
Please help diagnose my “torch.cuda.is_available()” -? false.
cudnn is true
I tried a reboot. no change.
I looked into source - no clues there, calls torch._C._cuda_isDriverSufficient() which is false, but its builtin - no code
looking at some of the suggestions here - path in my anaconda fastai cmd has ~6 anaconda fastai directories first
C:\Users\Brad\Anaconda2\pkgs has cuda90-1.0-h4c72538_0
my anaconda fastai cmd does not show any CUDA enviroment variables (via “set”)
the only other thing I can think of is I did most of the installs last night, but put a NVIDIA GPU in the PC today. conda env update has run
@balnazzar maybe not just you 
thanks for any suggestions / ideas
if this happens to you… try a 2nd reboot. I searched fruitlessly for ages for something to try - nothing. turned the computer off. try again.
“torch.cuda.is_available()” -? true.
It happens. In my case, reboots didn’t help, a fresh installation of (systemwide) cuda 9 solved the issue.
I think it wasn’t cuda 9 in itself. Rather, it straightened my env vars or kind of.
I had gone through a pretty tedious/painful installation last year as well (following this very helpful guide: https://github.com/philferriere/dlwin), so I had the exact same fear. However, I found that following the instructions exactly as written here worked like a charm. Good luck!
yep. it was a pretty good feeling when it all works, so I’d encourage people not to be afraid of this on Windows now. Thanks again fastai team!
I created a little batch to popup a window showing the nvidia stats which is useful to confirm power loads, fan and temperature etc - especially if a new pc / gpu
Got this working on Windows 7, with some fixes required.
defaults channel had to be disabled, otherwise ipykernel cannot be installed properly due to an error related to defaults::ipykernel-4.8.0-py36_0 (https://github.com/ContinuumIO/anaconda-issues/issues/8087)
conda update conda
conda update ipykernel
conda env update # after commenting out defaults in environment.yml
install the VC2017/VC2015 redistributables or runtimes
One machine repeatedly crashes at the opencv commands. This only went away after applying all available Windows 7 updates (including .net framework 4.6.1), and re-installing opencv-python. Exact cause is still unknown.
Additional modifications that I’ve discovered through trial and error that made my installation work:
After step 6, run the following in your fastai directory:
pip install -U .
If you’re getting errors:
conda remove -n fastai --all
conda clean --all
git pullpip install -U .And if that doesn’t work, see #2.
Thanks @DivingStill , followed your same path last year, happy to hear you are up and working now. My new install went pretty well too, one only problem with the git from the anaconda environment for PDPbox so had to pip install a few packages manually to complete the fastai library setup. That said, I am now running the lesson1 notebooks to check my system and still fighting with the batch size for rxt50 and vgg while learn-fitting after unfreezing (my 8GB GTX 1070 is not enough on a Win 10, 16GB RAM, i7-6700HQ laptop). It seems the most is done, though. Thanks again for your reply and best of luck with your course! Gius
If anyone else uses their Windows setup on the ML course, I suspect graphviz will fail for you. Make sure to install it with
>conda install python-graphviz
Pip and conda without the python bit, causes a problem (Jupyter doesn’t find it on the path, but don’t just add it to the path, because other stuff then crashes). If it can be confirmed by others that this IS needed, maybe @jeremy would include it above?
Just don’t forget to include graphviz.exe in your system path also…(I had to do so Win10 64 bit)
And nothing has crashed till today…(hope so that it shouldn’t)
Note, my method does not require it on the path the maintainer says adding to path is not the way to go. Glad it hasn’t caused you problems. Details at: http://github.com/ContinuumIO/anaconda-issues/issues/1666#issuecomment-301895525
I was running the conda env update command and I received the following error on a Windows 10 machine
Solving environment: failed

ResolvePackageNotFound:
  - pytorch[version='>=0.2.0']
  - ptyprocess
  - libgcc
  - glib
  - fontconfig
  - readline
  - libgfortran
  - jbig
  - libffi
  - torchvision[version='>=0.1.9']
I followed the instructions and ran into the same issue with deleting the link, which failed for me even in an admin prompt. I deleted the old link using File Explorer, then created the Windows version in the command prompt:
(fastai) C:\Local\fastai\fastai\courses\dl1>mklink /d fastai …\fastai
symbolic link created for fastai <<===>> …\fastai
When I start to go through courses\dl1\lesson1.ipynb, I get this error from the second cell:
ModuleNotFoundError: No module named ‘fastai.imports’
NOTE: Although I typed the mklink command exactly as required, it is displaying incorrectly in this post with three periods and a single backslash.
you may find it easier, being windows and all, to use Link Shell Extension. I downloaded it and it is quite nice. you can read about symlinks and where to download it from here: