How to contribute to the fast.ai docs?

Thank you for the answer, @sgugger!

Really great, @jeremy! Thank you very much for the guide. I will work on this!

1 Like

What is the best way to contribute to the fast.ai library? When I was reading the fast.ai developer docs, I found the whole process a little overwhelming. I am wondering if anyone has any best practices other than using hub as Jeremy described above.

That being said I was working on lesson one v3 and I was thinking a small semantic change in the description of plot_top_losses could make it easier for novices to understand plot if the description was more closely aligned with the output.

Current description:

“Show images in top_losses along with their loss, label, and prediction.”

Proposed description:

“Show images in top_losses along with their prediction, actual, loss, and probability of actual class.”

In general, what type of PR’s does the industry find most beneficial? Would you recommend this type of semantics push request? Since they could come across critical, opposed to helpful.

You can make a direct pull request to correct small typos, grammatical errors (a lot of people that work on the library don’t have English as a native language) or change the docs one-liners to be clearer.
If we disagree with the change, we’ll let you know, but we never take those kinds of PR as critical (can’t speak for other projects but I don’t see why they would).

2 Likes

Could you let us know which parts you found overwhelming? I’d love to see if I can make it more accessible.

In general, the answer to your question is - just do your best, tell us here any time you get stuck, and we’ll try to help you. We appreciate all PRs, since they show that someone cares enough about our work to want to help improve it. If we reject a PR, we’ll let you know why - and hopefully that’s a useful process for everyone too! :slight_smile:

Unfortunately I can’t tell you the specific parts of the developer docs that caused my confusion. I think my problem is I don’t have any real world experience with all the nuances of git, and version controls. Frankly I had no idea how much there was so much to it, I think it just caught me off guard. I thought it was just push, pull, and clone. Reading the dev docs is kind of like reading a different language, my brain just shut down.:exploding_head:. I will learn it all soon, but I will have to put in some time to learn it. Maybe then I can give you a better answer.

One of the reasons I love the fast.ai way, is it forces me to learn so much more than just the fast.ai library. I have learned about bash, terminal, linux, notebooks, curl, AWS, computer hardware, vim, tmux, debugger, pytorch, and so much more.

Thank you so much for the time you have put into fast.ai and the deep learning community. You have made it possible for me to follow my dream to make the world a better place. Without your efforts and teaching style, I would still be in a master’s program that wouldn’t have given me a fraction the knowledge I have today. It is your leadership that gives me the energy to wake up at 4am everyday and learn.

Cheers! :beers:

2 Likes

I have been working on the docs and I am in this step to run tools/sgen_notebooks.py, but the file is not there. Has this file been replaced by build-docs?

I think the issue is actually our dev docs. Currently we don’t have many simple walk-thrus, but instead have very complete details, with lots of jargon etc. Mainly the dev docs have been written with our own team in mind so far, not beginners.

So please don’t be put off. Instead, pick one small thing you’d like to do. Tell us what it is. We’ll tell you how to do it - or at least set you on the right direction.

Remember: trying to understand every detail of anything when you start is always going to be intimidating - and is rarely if ever necessary! :slight_smile:

1 Like

I believe it’s been moved to tools/update-nbs . There’s a comment at the top with info.

1 Like

When running tools/update-nbs docs_src/vision.learner.ipynb:

I couldn’t find a solution for this. Besides, when I try to install jekyll using bundle install jekyll, the following message is shown:

ERROR: "bundle install" was called with arguments ["jekyll"] Usage: "bundle install [OPTIONS]"

Thanks!

We’ll take a look. One thing that might help - try doing the “developer install” mentioned in the fastai readme.

I am happy to say that I submitted my first PR this morning, and it was accepted/merged this morning! I was so excited!
:beers:

3 Likes

Wonderful. Could you tell us a bit about the process you used, and what you learned, to help other folks interested in making their first contribution?

I used the GitHub desktop, github.com, and visual studio code(any text editor should work).

  1. GitHub
    Make sure you are logged in to your GitHub account. (sign up or sign in )

  2. GitHub Desktop
    Download(windows or macOS) or open GitHub Desktop

  3. Tutorials
    If you are new to GitHub, a good place to start is GitHub’s “Hello World” tutorial it cover some of the features/terms you are going to need to know(What is GitHub?, Create a Repository(Repo, Create a Branch, Make a Commit, Open a Pull Request(PR), Merge Pull Request). Some other options are hubspot’s git-and-github-tutorial-for-beginners, or github-flow

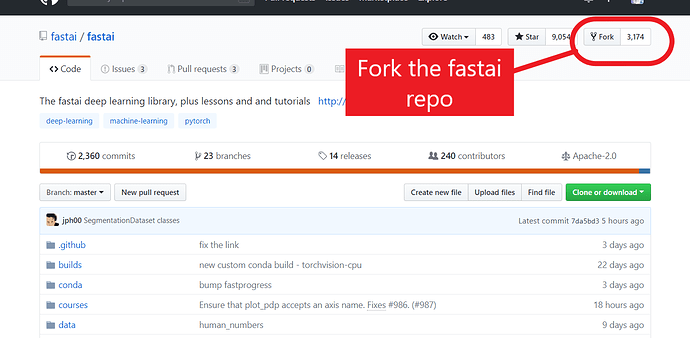
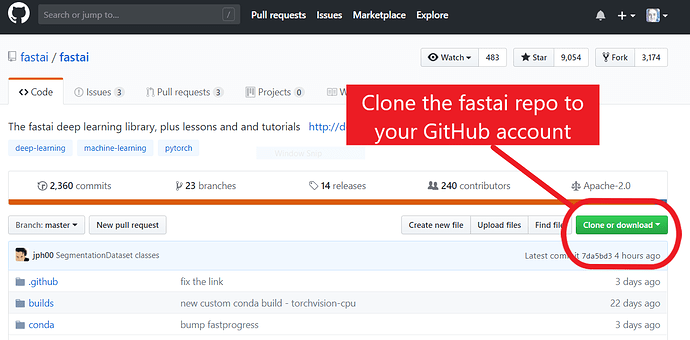
  4. Clone & Fork
    I chose to Clone as well as fork the fastai GitHub repo. The reason I chose to do this is I could use the official GitHub repo for reading/class-work, and use the forked one to make my proposed change(s) to the library.

  5. Clone It


    To me cloning a repo is like borrowing a library book, it is possible to make changes/commits(write in it) when it is in your possession, but changes you make could cause problems/errors(conflicts) since you don’t have permission to make changes/updates. The changes you make will only be on your local copy, and if you try to return-it/update-it, it might cause issues. Since most library and companies have a code review process, you can’t create a pull request(PR) from a cloned copy. You need to do that from a Forked copy.

  6. Fork It


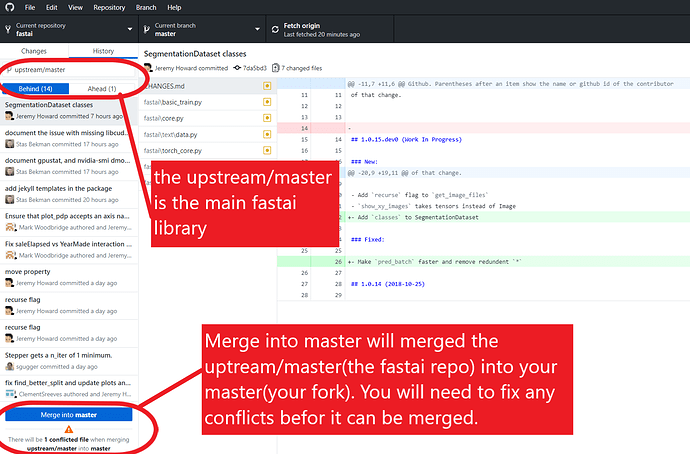
    As time goes by, chages will be made to the fastai library, and you will need to update your forked copy with the new updates by syncing the fork. If you very recently forked the repo you won’t have to worry about this, but if it has been more than a couple days you will most likely want to update it before making your changes. See the fastai-docs “start-with-a-synced-fork-checkout” and syncing-“subsequent-times”, personally I think it is easier for the beginner to just use GitHub-desktop to get updates/sync-fork.

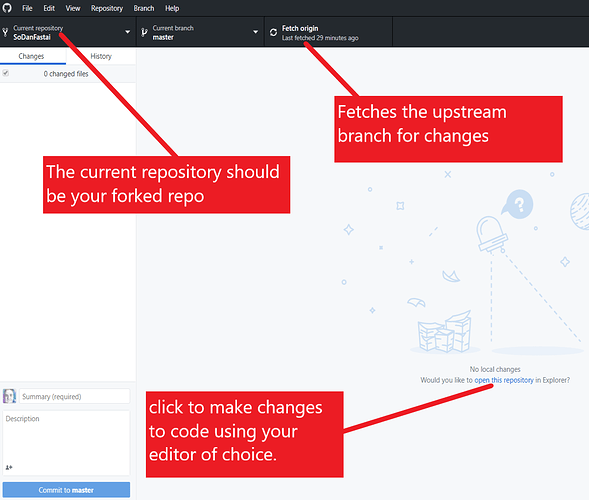
Tip - You probably want a unique name for your fork because if you use fastai, it can be confusing because fastai/fastai and YourGitHubUserName/fastai will both show as fastai in the current repository section

  1. Open GitHub-desktop


    Every repo has a “master” “branch”, this is your main version. The “repository”(repo) could be the source, or it could be a “fork” of that source. The source(repo forked from) is considered to be"upstream", its main version would be considered “upstream/master”.

  2. Checking for updates/changes/syncing-fork


  3. Branches
    Branches are a very important part of the git/github process. Generally speaking, you want to create a new branch for each new feature.

Fastai dev docs:
“It’s very important that you always work inside a branch . If you make any commits into the master branch, you will not be able to make more than one PR at the same time, and you will not be able to synchronize your forked master branch with the original without doing a reset. If you made a mistake and committed to the master branch, it’s not the end of the world, it’s just that you made your life more complicated. This guide will explain how to deal with this situation.”

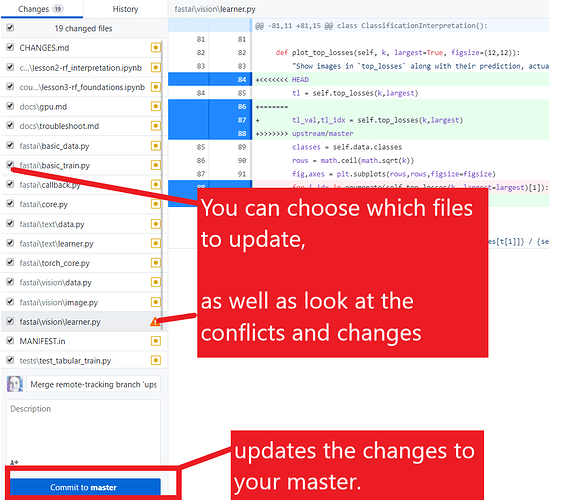
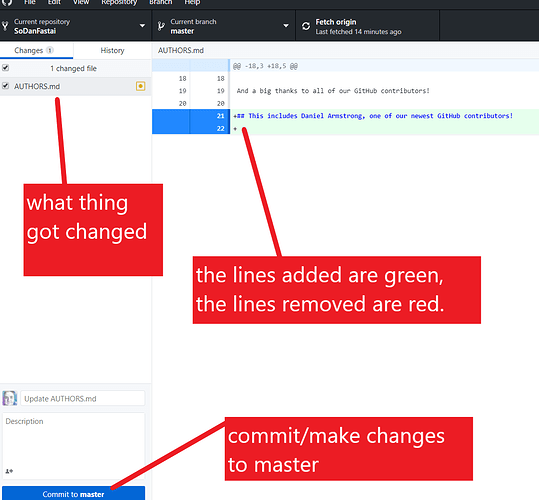
  1. Make your changes in the text editor of your choice
    Github-desktop tracks the local folder that your repo is in, and if you make any changes to the files or folder in that folder, GitHub-desktop keeps track of all the changes, so when you log back into GitHub-desktop, it knows what needs to be committed/updated.

    Once you commit to master, It will now be updated/committed on github.com as well. You can then submit a Pull Request on gitHub.com, in GitHub-Desktop, or in the terminal.

Keep in mind if you are updating the Jupiter-notebooks(docs) you will need to perform additional steps.

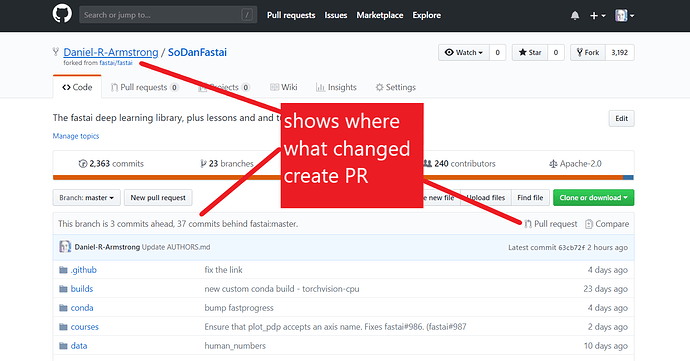
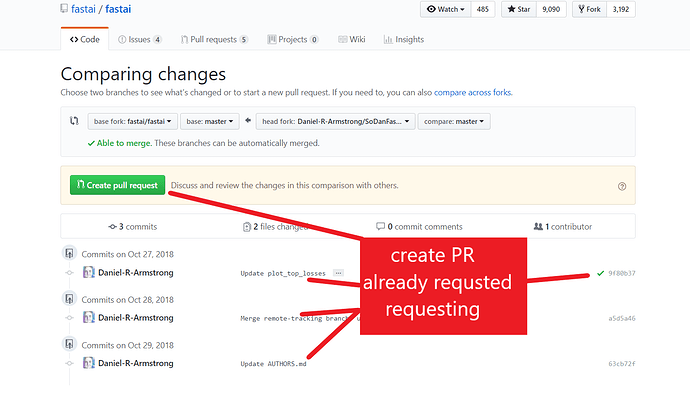
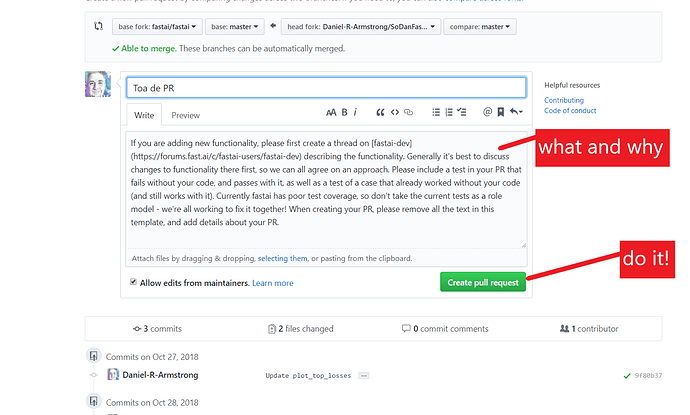
  1. Pull Request via GitHub.com
    Log-in to github.com, go into your forked repo.

    Compare changes

    Add in description and documentation

More information is available in the fastai developer documentation

Now Git to It!
12 Likes

Great tutorial! Would you mind making a proper markdown file out of it, and we could add it to the tutorials on course-v3 if Jeremy is okay with it?

1 Like

I would love to! :slight_smile:

@Daniel.R.Armstrong - if you do this, you can send a PR here : https://github.com/fastai/fastai/tree/master/docs

You should create a new subfolder inside the “images” folder, eg “images/pr_tutorial”. You can copy your images there (if you don’t have a local copy, you can grab them from the URLs in your post, by editing it). Then paste your post markdown into a file - e.g. “pr_tutorial.md”. You can use a markdown gui tool on your computer to check it all looks OK.

2 Likes

I would be happy to do that!

1 Like

I am trying to create a notebook that will help new coders like me get more comfortable with cli/bash/git/etc. I think that one of the biggest reasons the new coders don’t use the command line and prefer GUI like Github desktop, Jupiter, etc is that I/we feel that we cant mess as much up. To me using the command line to make a PR is terrifying. That is why I am thinking that it would be very helpful for new users to have a notebook(s) that do all the steps that you would do in a cli, but in the comfort of a notebook. (the notebook(s) would be creating a pull request to a library that they create, not the fast.ai library, this way the notebook could take them through the git process while teaching them cli, git, bash, all from the comfort of notebooks). In my quest for this, I have learned a ton, but it seems like I have found “100 way not to make a PR request from a notebook.”

Issues

1. github want you to paste ssh code

I am thinking it would be better to use ssh vs https, but I ran into a dead end when I try to use notebook/bash to assign the ssh key to GitHub, I was able to get the notebook to print and copy the SSH key but not pass it to GitHub, it seems like GitHub forces you to just copy and paste your ssh code manually, I didn’t want the students to have to leave the notebook. I also tried to figure out how to use OAuth and the GitHub API but ran into issues. I tried using
!curl -u “Daniel-R-Armstrong” --data ‘{“title”:“test-key”,“key”:“ssh-rsa AAA…”}’ https://api.github.com/user/keys"

2. Dealing with different systems & aliases

I also tried to use hub, but I am not sure how to set up a notebook that would allow for the different ways that this has to be installed, mac/windows/Linux/binary. In my googling, it seems like the %%bash magic also doesn’t always work as expected, but this might have been solved https://stackoverflow.com/questions/43103750/use-bash-profile-aliases-in-jupyter-notebook

3. Assignments using subprocess

I see that the PR process has been improved with the new “fastai-make-pr-branch” and other tools. but I have been having issues with getting notebooks to run these different bash scripts. I am thinking that a solution is using the popen from the subprocess library but I am stuck on assigning variables. I am thinking that the helper function, fastai-make-pr-branch has four arguments I need to pass in, (auth="$1" user_name="$2" repo_name="$3" new_branch_name="$4") but I can’t figure out how to assigns from the searching I have done. @stas do you have any tips? thoughts on using subprocess.popen with “fastai-make-pr-branch

Thoughts?

Does anyone think that this projects would be beneficial?

Does anyone have any tips?

3 Likes

This sounds like an interesting project!

Since that only has to be done once per person, perhaps it’s OK to just have them copy/paste here?

Yeah installing hub isn’t always as easy as it should be. You can always simply copy a release binary from their github repo. Or you could write git stuff directly in python:

https://gitpython.readthedocs.io/en/stable/

There’s probably a lot of good reasons to rewrite this in python - including that we could then avoid having to deal with subprocesses.

1 Like

what jeremy said.

until then if you can invoke it from python through a sub-process, you should be able to run it directly from bash.

2 Likes

Thank you so much i was planning to contribute and did not know where to start …know i know how to start things

1 Like