Mostly convenience, and we empirically found it worked. As for where we put the split between the first and the second group, it’s empirical trials too.
No, there is no link. A Learner in vision usually has three layer groups that are lower part of the body, upper part of the body and head. The 4 layers you see in the resnet correspond to the the 4 different parts, each ending with the image size being divided by 2.
Thank you so much for your explanation! it is very helpful!
When you say ‘empirically found it worked’, do you indicate that although in lesson notebooks we only see two ways of freezing the model: normal mode (freeze up to the head, the last layer group), unfreeze mode (freeze no layers), there is actually a third way of freezing the model for training in your actual practice worth trying, that is middle mode (freeze up to the middle group, if there are three layer groups)?
The two different groups are intended for discriminative LRs (give a lower one to the first group), but you could certainly try unfreezing one group after the next.
@ashaw, here is another small doc gen improvement request.
We get quite a few PRs with users modifying the autogenerated html, since they don’t realize they are autogenerated.
In the fastai_docs when we autogenerate .py code we inject this header at the top of the file:
#################################################
### THIS FILE WAS AUTOGENERATED! DO NOT EDIT! ###
#################################################
# file to edit: dev_nb/01_matmul.ipynb
So I was thinking perhaps it’d work to inject something similar in our html files? e.g. for docs/basic_train.html:
<!--


#################################################
### THIS FILE WAS AUTOGENERATED! DO NOT EDIT! ###
#################################################
# file to edit: docs_src/basic_train.ipynb
# instructions: https://docs.fast.ai/gen_doc_main.html


-->
I added the ample vertical whitespace so that hopefully it’ll stand out from the dense HTML once the user opens it in their editor. I’m not sure whether it can appear at the very top, or after the jekyll headers.
In order to do so, the module dependencies are carefully managed (see next section), with each exporting a carefully chosen set of symbols when using import * . In general, for interactive computing, you’ll want to import from both fastai , and from one of the applications , such as:
from fastai.vision import *
it seems to suggest we should do import for interactive computing in the following way
from fastai import *
from fastai.vision import *
However, if you experiment as I did it here on kaggle, you will notice that from fastai import * add nothing to from fastai.vision import *.
Therefore, I attempt to say that from fastai import * is unnecessary.
Am I missing something here? if so, please correct me. Thanks
Here is my proposed change to the doc. Please have a look.
In order to do so, the module dependencies are carefully managed (see next section), with each exporting a carefully chosen set of symbols when using import * . In general, for interactive computing, to play around the core module and training loop you can do
from fastai.basics import *
If you want experiment with one of the applications such as vision, then you can do
On this page Welcome to fastai – fastai, all the data links point to vision.data, but according to the context, they should point to links of basic_data. Do I understand the context correctly? Could anyone double check them for me? thanks!
Then, there are three modules directly on top of torch_core:
data, which contains the class that will take a Dataset or pytorch DataLoader to wrap it in a DeviceDataLoader (a class that sits on top of a DataLoader and is in charge of putting the data on the right device as well as applying transforms such as normalization) and regroup then in a DataBunch.
This takes care of the basics, then we regroup a model with some data in a Learner object to take care of training. More specifically:
callback (depends on data) defines the basis of callbacks and the CallbackHandler. Those are functions that will be called every step of the way of the training loop and can allow us to customize what is happening there;
From data we can split on one of the four main applications , which each has their own module: vision, textcollab, or tabular. Each of those submodules is built in the same way with:
The first learn is now train, and in the second, the submodule is {application}.learner, that’s correct.
Thanks so much for proofreading and making this consistent with the current stage of the library!!!
I am trying to work with the tabular module but found the documentation a bit incomplete (for beginners)… Now I am going to try and look for improvements! I think it is a great way to learn and help other beginners. (Although I am a bit afraid of making mistakes)
@sgugger Thank you for all the work done on the fastai library and documentation. However, I personnaly think that there is much more than just examples that are missing. I have been struggeling for quite some time to understand arguments in several basic functions and I would gladly help to enrich the doc once I get a better understanding of it.
The most essential part that I find missing is a clear description of each parameters and not just its type and default value. Without this information I am for example left hanging when just trying to specify a validation folder working on the first lesson with another dataset that has a definite train and test set that are seperated into 2 folders and are both labeled on their filenames.
The takeaway of my message is really, not only examples, but also parameters description.
I ran into the same issue! It is hard to get a clear description of the functions when you want to use your own dataset or work on kaggle competitions.
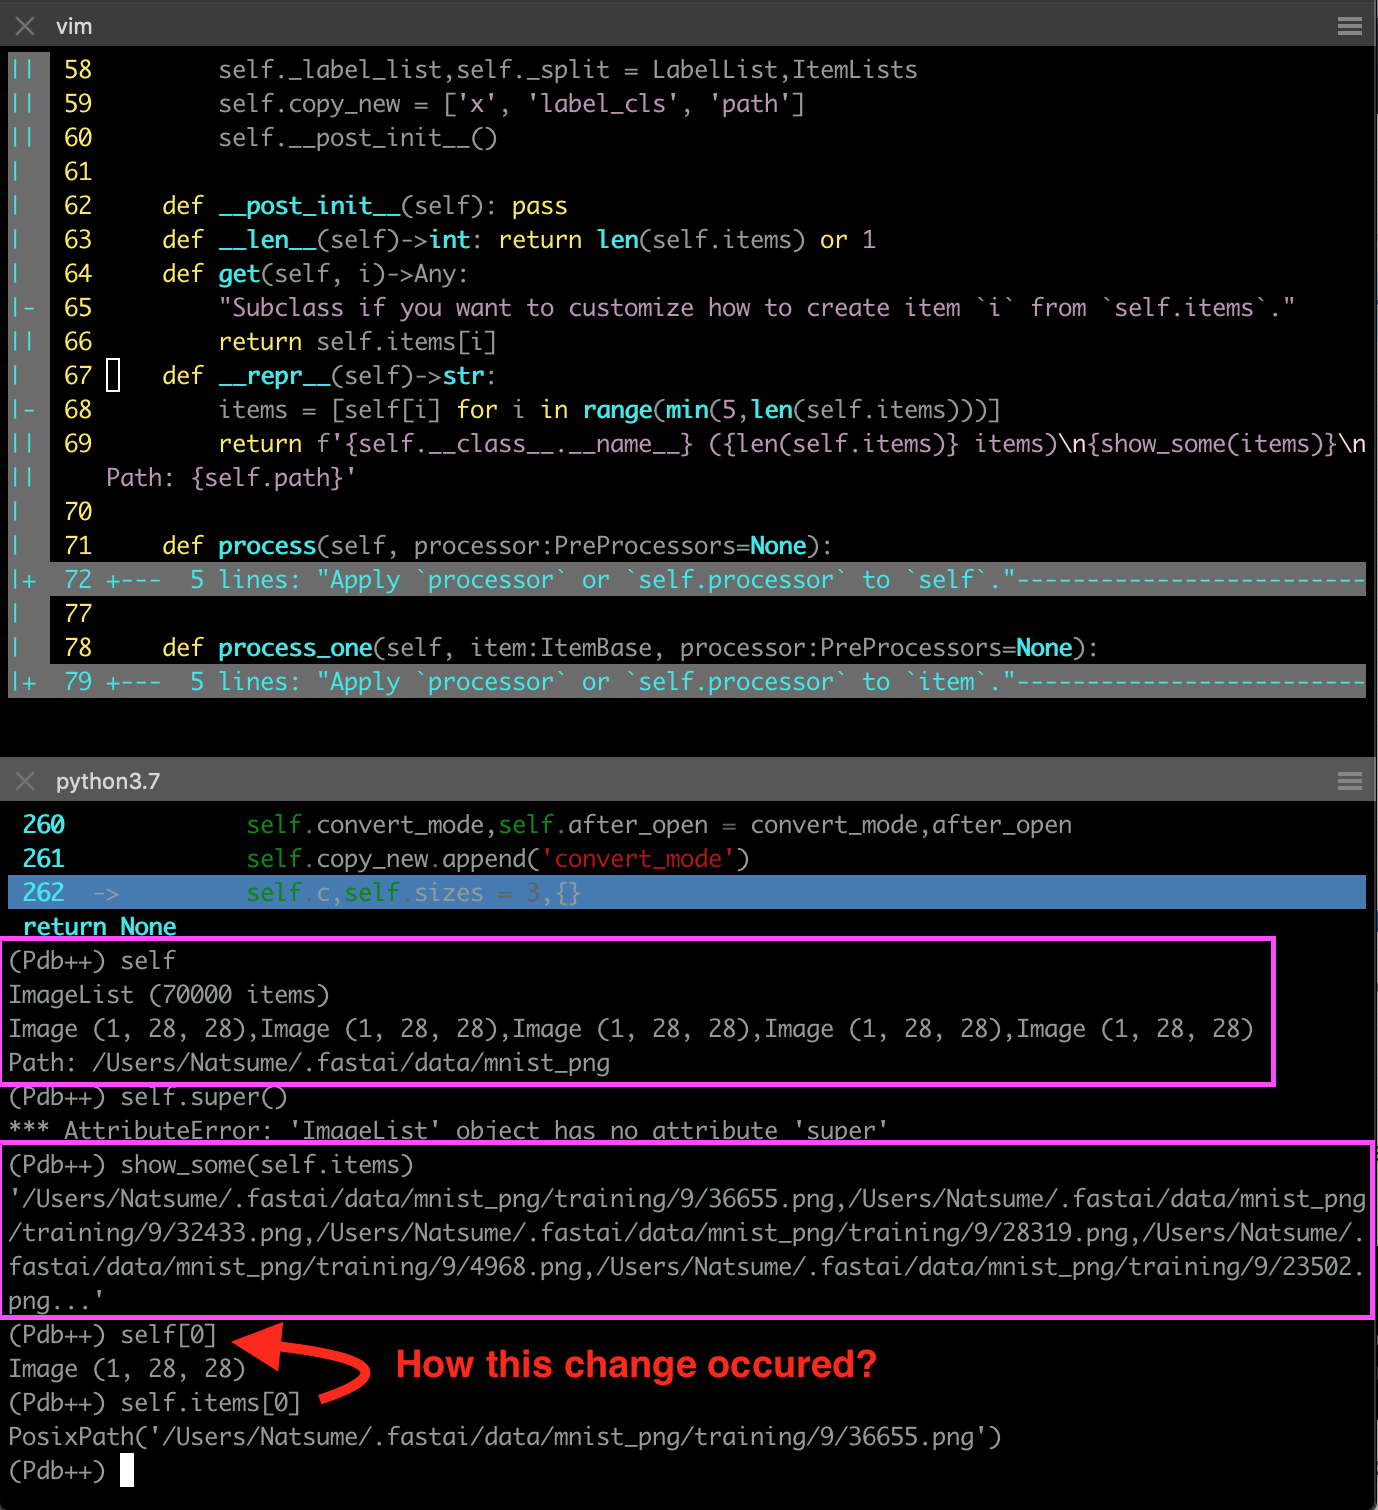
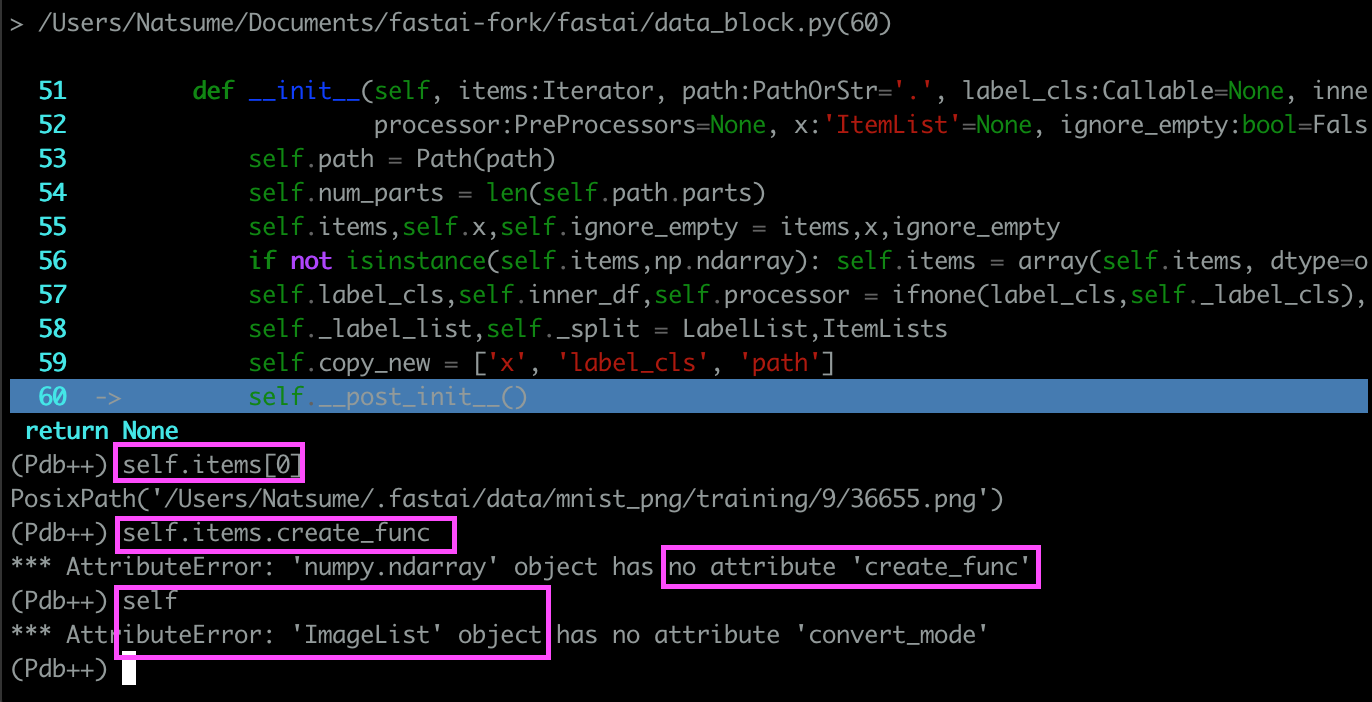
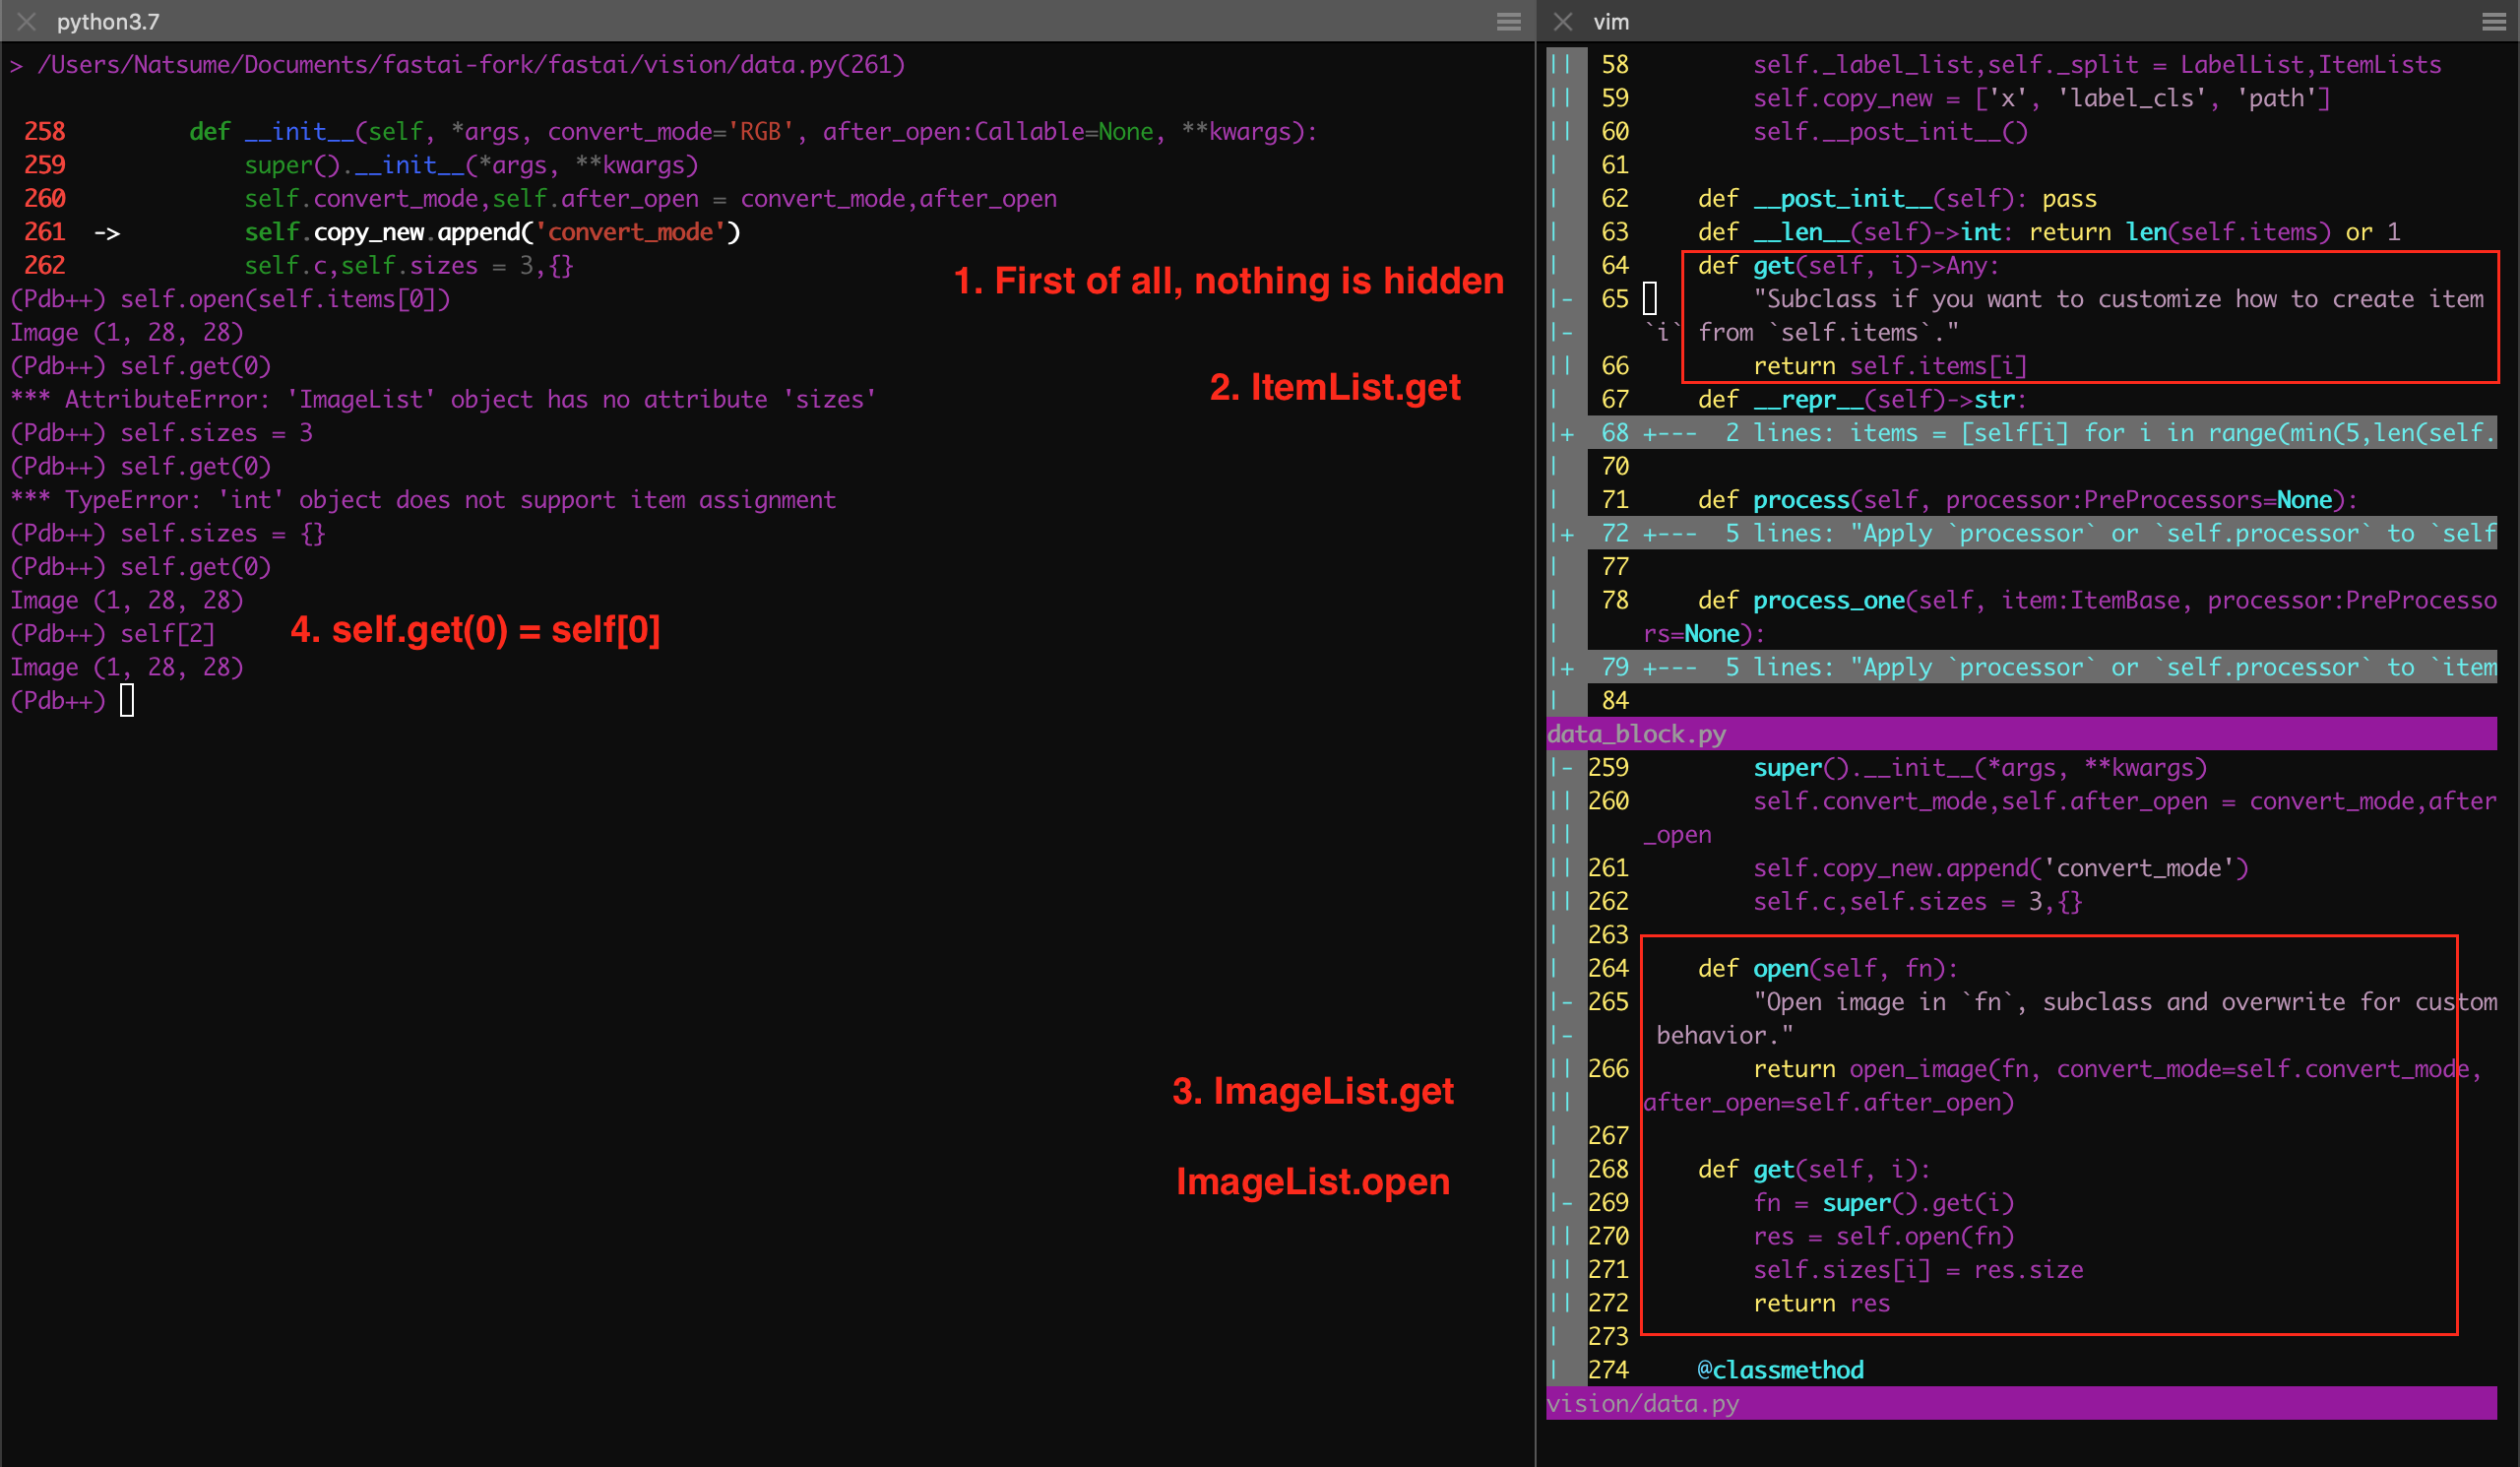
Having trouble to verify " items. create_func will default to open_image " in ImageList
I have tried to read source code of ItemList, ImageList, and their from_folder to figure out how ImageList.from_folder work.
I can use pdb to walk through the flow of codes, but I can’t find the exact step for turning image file path object into Image object, see below for comparison