@atul If you connect to the instance before the swap is complete, and then after the swap, ssh will give that error. This will fix it:
@slavivanov - At this juncture - I honestly dont know if my setup at AWS is OK or not to run ec2_spotter.
The ami instance I created with Jeremey’s setup_p2.sh script is terminated (by the ec2_spotter’s config_from_instance.sh) . I also killed/terminated the spot instances that start_spot.sh had started, bcos of SSH problem. (Yes, I can remove that offending entry from the .ssh_hosts…)
…But I’m wondering if I should re-do the whole thing. If I were to re-do, where would one start? From Step 1.3?
I’m assuming I can reuse the security group/subnet I had created earlier.
@atul Sorry this is taking so long, it gets easier down the line 
You should have a good looking my.conf so you can just try sh fast_ai/start_spot.sh and see what happens. If it doesnt work, start with part 1.3 and then jump to 3.1
Hey! Did you see the message “dpkg was interrupted, you must manually run ‘sudo dpkg --configure -a’ to correct the problem.”? You could try doing what is says, that’s how I fixed it. I think the problem was that dpkg was still configuring some packages while I terminated a spot instance, with that corrupted package info transferring onto the new spot instance. If you start a new spot, let it run for a couple of minutes, just ro make sure.
Hi,
Just came across your post and looking forward to trying it. I have been developing something for the same purpose using docker containers on a non-boot volume. I created a separate post for this:
How did you find working with AWS? I found it rather painful!
2 Likes
@slazien - Thx for your note.
Sorry, I didn’t understand.
Did you run Jeremy’s install_gpu.sh script to update all the packages for Nvidia?
Or did you run something else?
Thx
No, I didn’t run that or anything else. Just sudo dpkg --configure -a and it worked.
Just noticed the wiki page and the blog post, great job and thanks again!
As a side note, I suspect the spot price bidding in my region went from the boring $0.2 to $0.6-0.9 because so many people are using your script suddenly  No complain though, I think it’s great that anyone can take advantage of this technologies. For me, I just switch the instance type to g2.2xlarge whenever I need to for smaller jobs. I really like the flexibility in your approach. So thank you again!
1 Like
Hey @slazien - I’m still running into the same issue - could you detail a little bit more how you solved it? I went through the spot instance setup, and everything seems to work, except when I boot into the spot instance, I get the same error from nvidia-smi.
Hi:
Setting up aws on Cygwin, I keep getting this error:
$ aws
C:\Users\bella\Anaconda2\python.exe: can’t open file ‘/cygdrive/c/Users/bella/Anaconda2/Scripts/aws’: [Errno 2] No such file or directory
I couldn’t find the threads to resolve this issue. What shall I do?
Thanks,
Rhonda
Hi,@guydav
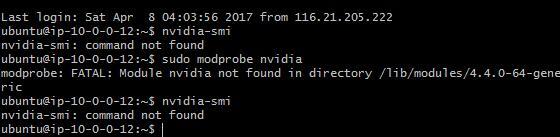
I got the same problem as yours, yesterday I spend 5hours in this problem but it didn’t work. I googled many solutions, such as purge all Nvidia packages, and sudo apt install nvidia-375,even I reinstall CUDA! Everytime I type nvidia-smi, it comes up nvidia-smi has failed to communicate to the driver.
I even try to recreate the vpc and create new spot instance and new volume , I noticed that the first time I start the instance, everything is just fine. But when I terminate the instance, and start another spot instance, nvidia-smi will dead no matter how many times I reinstall driver, CUDA and reboot.
Can anyone help us ?@slavivanov @jeremy
Here’s how to install CUDA and drivers from scratch:
sudo -s
sudo apt-get purge nvidia*
sudo apt-get autoremove
cd ~/downloads/
wget https://developer.nvidia.com/compute/cuda/8.0/Prod2/local_installers/cuda_8.0.61_375.26_linux-run
killall -9 jupyter-notebook
sh cuda_8.0.61_375.26_linux-run
exit
nvidia-smi
2 Likes
Thank you jeremy, I’ll try that. And I will let you guys know the result later.
sorry @jeremy , I did the exactly the same with you, but it said command not found
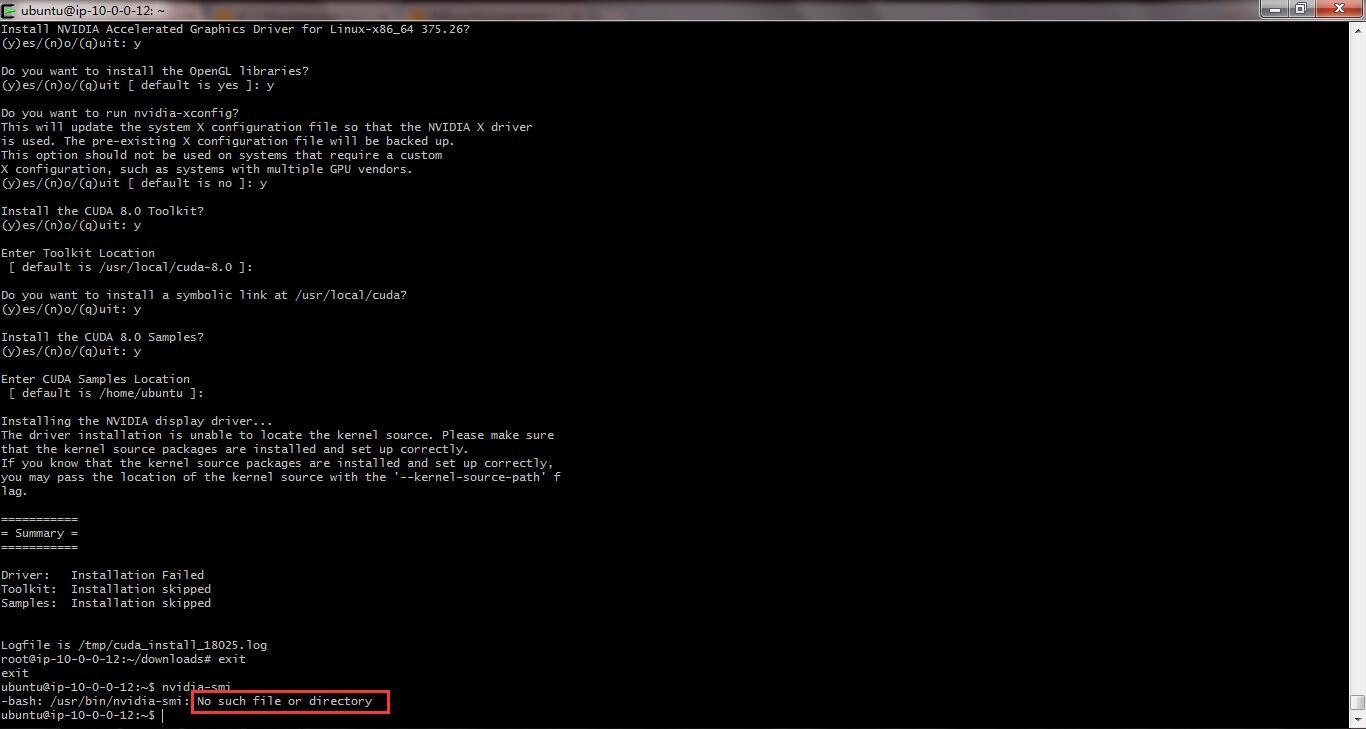
After I reboot the instance, it’s still ‘conmand not found’
edit:
here’s some clue:
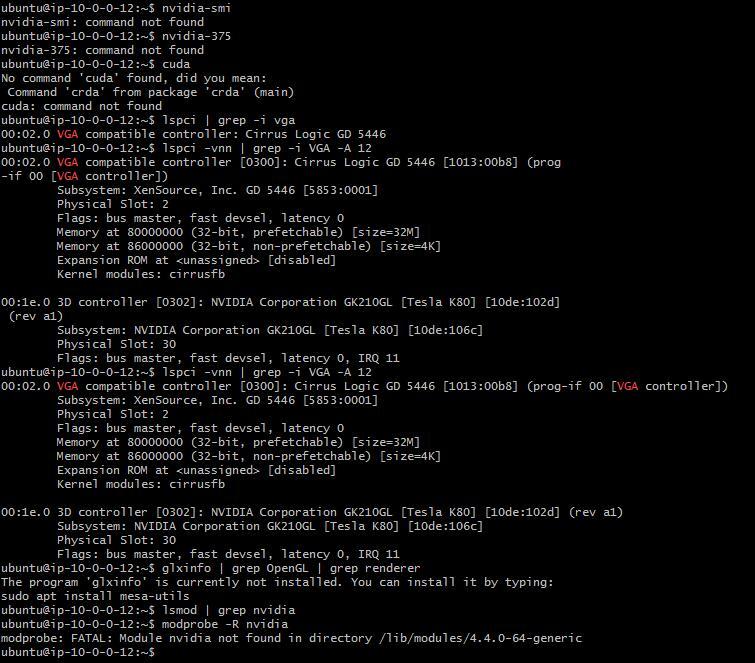

You’ll need to follow nvidia’s installation docs to add the appropriate stuff to your PATH etc.
Thanks for a such great work, @slavivanov
On last weekend I’ve finally managed to get spot instance running with persistent storage.
It was a long way, with obstacles as nvidia-smi command showing errors. So, maybe my experience could help somebody.
Note: If you are looking for exact solution, just jump to the part “How I managed to get rid of nvidia-smi problem” and skip failure experience.
For all steps described below I was using guides from the article: https://medium.com/slavv/learning-machine-learning-on-the-cheap-persistent-aws-spot-instances-668e7294b6d8
First of all I’ve tried to create an instance from the Step 1: https://medium.com/slavv/learning-machine-learning-on-the-cheap-persistent-aws-spot-instances-668e7294b6d8
As you can assume, I already had some instances, keys and VPC generated by fast-ai scripts
So, I need to clean the environment for seamless experience. Yes, lost some data, but it wasn’t something, what I’m able to recover easily.
If you want to follow the same step, there is a really helpful guide in the wiki: http://wiki.fast.ai/index.php/Starting_Over_with_AWS
Note: Don’t forget to clean not only AWS environment, but also to delete local “aws-key-fast-ai.pem id_rsa” key. Otherwise create_vpc.sh script will fail with an keypair problem error.
After cleaning environment and creating VPC, start_spot_no_swap.sh script works as a charm. Instance is created just by calling one command.
Note: Play with bid_price value here. By default, it is 50 cents, you can make lower or higher, based on demand in your area.
Flushed with success, I got Step 2 - having persistent data storage. I’ve skipped approach with mounting disk and got directly to automated root volume mount and hit the bumpy road.
I’ve tried to follow instructions from section 3.1 - cloning config from the instance. Script worked fine, old instance was terminated and new one was created.
I was able to login, but unfortunately when I tried call nvidia-smi, it showed me the same error as @slazien and @justinho had.
I tried to call ‘sudo dpkg --configure -a’, but result was the same.
I’ve tried different approaches and here are my series of unfortunate events:
- I assumed that I called config_from_instance.sh too earlier and package installation was still running on old instance. So I’ve created new one, ran top command and waited until all process are finished. Cloning from such instance resulted with the same error.
- I assumed that maybe something is wrong with drive mount, so I’ve tried to follow steps from section 3.2 with detaching and renaming the drive. Cloning from such instance resulted with the same error.
- I assumed that something is wrong with configuration generated from running instance, so I’ve tried to change AMI to ami-a58d0dc5, as it was said in the article.
- Running such instance resulted with the same error.
- I’m not going even to mention different tries to install/reinstall nvidia stuff. It never helped
Sorry for such a long list of failures, but I had to share this pain with somebody.
¯\_(ツ)_/¯
How I managed to get rid of nvidia-smi problem
So, after all these failures I was really ready to give up, but decided to try one more time with AMI provided by fast-ai
Here are my steps, which led to finally working instance:
- Clean your environment
- Run script to create VPC
- Run script to create Spot instance.
- Let all installation scripts finish. By my measurements it can take from 10 to 15 mins (until last dpkg appearance in top command)
- Do your stuff on the instance: clone git, download cats and dogs and so on.
- Stop instance and rename the drive, as described here: https://medium.com/slavv/learning-machine-learning-on-the-cheap-persistent-aws-spot-instances-668e7294b6d8#9f6d
- Clone configuration file to my.conf, as described here: https://medium.com/slavv/learning-machine-learning-on-the-cheap-persistent-aws-spot-instances-668e7294b6d8#9f6d
- Change values to appropriate ones. Pay attention that in article doesn’t say anything about changing key name ec2spotter_key_name, but it is required. It should be: ec2spotter_key_name=aws-key-fast-ai
- And now a trick which worked for me: put for ec2spotter_preboot_image_id, AMI provided by fast-ai, for example I’m using ec2spotter_preboot_image_id=ami-bc508adc
- As this AMI is large one, you’ll need to change default volume size in the ec2spotter-launch script. By default, it is 8 GB, we need to put 128
Change it here:
"BlockDeviceMappings": [
  {
    "DeviceName": "/dev/sda1",
    "Ebs": {
      "DeleteOnTermination": true,
      "VolumeType": "gp2",
      "VolumeSize": 128
    }
  }
After all these changes, I’m able to start instance using start_spot.sh script and have GPU accessible by theano, having all changes saved … at least it worked out few times 
Hope, all this information will help somebody to save few bucks.
5 Likes
@gaiar I found my problem maybe is the cuda dir is not correct, in the original dir is ‘/usr/local/cuda’, but the cuda is already update to cuda-8.0, so I change the cuda dir as ‘/usr/local/cuda-8.0’, everything works fine !
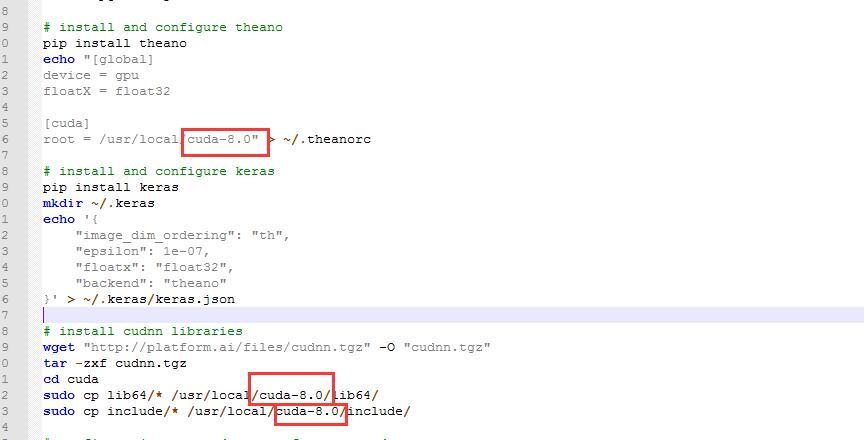
Wow @gaiar, thank you so much for sharing! Clearly it was a bumpy road. I’ll add a note in the article (and credit it!) about your solution.