Jeremy and I thought it would be a good idea to document a bit more what we are currently doing, both for those who are reading the development notebooks as they come and want to understand what is going on and for the future documentation of the library, to explain why we made certain choices during its design. So tonight, I’ll talk a bit about what we decided with Jeremy about the new transforms pipeline and how we’ll do data augmentation in fastai_v1.
What does a transform do?
Typically, a data augmentation operation will randomly modify an image input. This operation can apply to pixels (when we modify the contrast or brightness for instance) or to coordinates (when we do a rotation, a zoom or a resize). The operations that apply to pixels can easily be coded in numpy/pytorch, directly on an array/tensor but the ones that modify the coordinates are a bit more tricky.
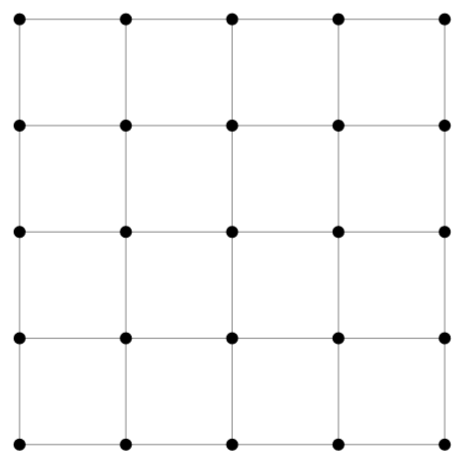
They usually come in three steps: first we create a grid of coordinates for our picture: this is an array of size h * w * 2 (h for height, w for width in the rest of this post) that contains in position i,j two floats representing the position of the pixel (i,j) in the picture. They could simply be the integers i and j, but since most transformations are centered with the center of the picture, they’re usually rescaled to go from -1 to 1, (-1,-1) being the top left corner of the picture, (1,1) the bottom right corner (and (0,0) the center), and this can be seen as a regular grid of size h * w. Here is a grid what our grid would look like for a 5px by 5px image.
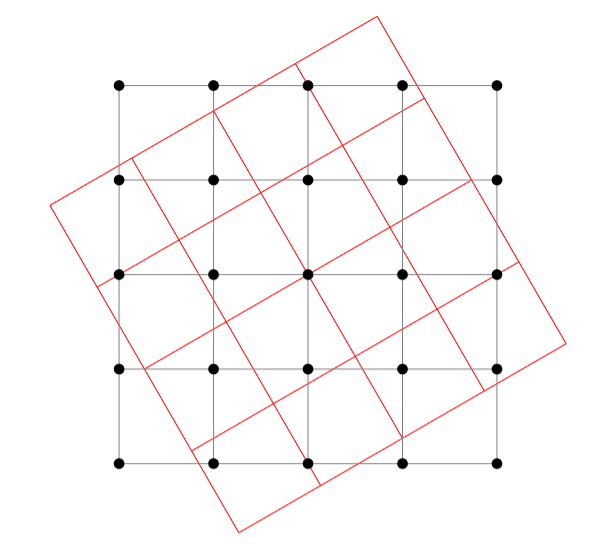
Then, we apply the transformation to modify this grid of coordinates. For instance, if we want to apply an affine transformation (like a rotation) we will transform each of those vectors x of size 2 by Ax + b at every position in the grid. This will give us the new coordinates, as seen here in the case of our previous grid.
There are two problems that arise after the transformation: the first one is that the pixel values won’t fall exactly on the grid, and the other is that we can get values that get out of the grid (one of the coordinates is greater than 1 or lower than -1).
Which takes us to the last step, an interpolation. If we forget the rescale for a minute and go back to coordinates being integers, the result of our transformation gives us float coordinates, and we need to decide, for each (i,j), which pixel value in the original picture we need to take. The most basic interpolation called nearest neighbor would just round the floats and take the nearest integers. If we think in terms of the grid of coordinates (going from -1 to 1), the result of our transformation gives a point that isn’t in the grid, and we replace it by its nearest neighbor in the grid.
To be smarter, we can perform a bilinear interpolation.This takes an average of the values of the pixels corresponding to the four points in the grid surrounding the result of our transformation, with weights depending on how close we are to each of those points. This comes at a computational cost though, so this is where we have to be careful.
As for the values that go out of the picture, we treat them by padding it either:
- by adding zeros on the side (so the pixel that fall out will be black)
- by replacing them by the value at the border
- by mirroring the content of the picture on the other side (reflect padding).
Be smart and efficient
Usually, data augmentation libraries have separated the different operations. So for a resize, we’ll go through the three steps above, then if we do a random rotation, we’ll go again to do those steps, then for a zoom etc… The idea we have, to design the new fastai library, is to do all the transformations on the coordinates at the same time, so that we only do those three steps once, especially the last one (the interpolation) that is the most heavy in computation.
The first thing is that we can regroup all affine transforms in just one (since an affine transform composed by an affine transform is another affine transform). We’re not the first to think of this, and there are already libraries (like torchsample) that implement this. We pushed the thing one step further though to integrate the resize, the crop and any non-affine transformation of the coordinates in the process. Let’s dig in!
In step 1, when we create the grid, we use the new size we want for our image, so new_h,new_w (and not h,w). This takes care of the resize operation (usually a resize to 1.1 or 1.25 * the size we will take at the end by cropping) with no cost.
In step 2, we do only one affine transformation, by multiplying all the affine matrices of the transforms we want to do beforehand (those are 3*3 matrices, so it’s super fast), then we apply to the coords any non-affine transformation we might want (jitter, elastic distorsion…) before…
Step 2.5: we crop (either center or randomly) the coordinates we want to keep. Crop is easy to do whenever we want, but by doing it just before the interpolation, we don’t compute pixel values that won’t be used at the end, gaining again a bit of efficiency
Then Step 3: the final interpolation. Afterward, we can apply on the picture all the tranforms that operate pixel-wise (as said before brightness, contrast…) and we’re done with data augmentation.
But does it work?
More tests are needed, and we asked the pytorch team to optimize/add some different options to the functions we need (essentially affine_grid, that combines step 1 and 2, and grid_sample that does step 3 for those who want to dig in the code) but we can already see the difference: loading all the batches of the training set of dogs and cats with standard data augmentation in torchvision takes 48s on a p3 (optimized with libjpeg-turbo and pillow_simd) when our way takes 37.6s to 43.8s (depending on the padding we use, and we hope that will get down with further optimization on the pytorch side).
Also, adding a new transformation almost doesn’t hurt performance (since the costly steps are done only once) when with classic data aug implementations, it will result in a longer training time.
Even in terms of final result, doing only one interpolation gives a better result: if we stack several transforms and do an interpolation on each one, we approximate the true value of our coordinates in some way, which tends to blur a bit the image. By regrouping all the transformations together and only doing this step at the end, we can get something nicer.
Look at how the same rotation then zoom done separately (so with two interpolations)

is blurrier than regrouping the transforms and doing just one interpolation
This where we stand for now, and hopefully, you should clearly see the three steps I mentioned above when you read the final version of the transforms code. Don’t hesitate to add any resource that might be helpful or ask questions about point that are unclear as this post will be refactored somehow to go in the documentation of fastai_v1.
 I use my local machine, I have Samsung SSD, should be 500Mb read/write approx.
 Didn’t have time to work on the imagenet idea (and neither the resources - single GPU might be too little for this) but maybe if some of this new work could be applicable and it would not require too much work… Not asking anyone to put any work into it but on the offchance a slightly more cleaned up training on imagenet could be produced as a by product of the development effort… I think this would be really useful and really neat
  Hoping to get involved if I manage timewise and for now will continue to root for you from the sidelines!!!