Hello,
I have a model and I want to check where is he looking on all of the datasets samples (training, validation and test).
I started from lesson 7 but I can’t figure out how can I display the name of the frame using this type of iteration
x,y = next(iter(data.val_dl))
x,y = x[None,1], y[None,1]
dx = data.test_ds.denorm(x)[0]
Also in order to loop through all data, I should create 2 for loops since x contains 64 images, (which is the batch size bs=64), so for now x just contains the first batch of images.
The final purpose is that I want to check the failing samples from the test dataset - for which I have the frame_names. You may wonder why I don’t read directly the images from the disk. Well, because when I iterate with the code above, the results are really nice attention maps as following (please ignore the title above the plots, they are not accurate):
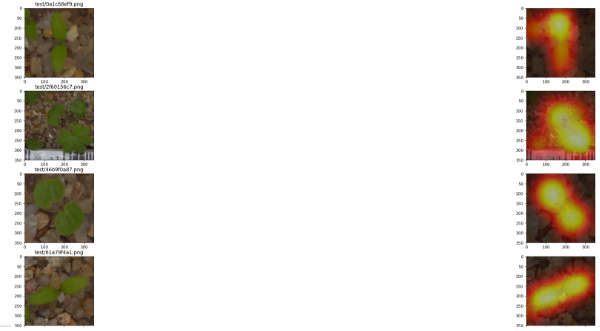
(Sorry for the bed resolution, I have no clue how to display those subplots better I tried this but it’s totally ignored fig=plt.figure(figsize=(150, 150), dpi= 120, facecolor='w', edgecolor='k'))
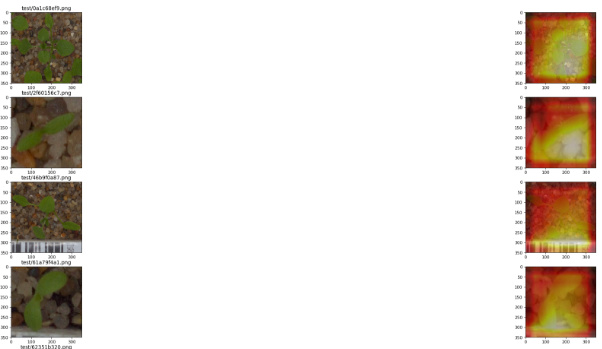
And when I read an image directly from the disk, the attention maps are much worse, so I may do something wrong?
This is why I need your help guys to be able to iterate through the datasets (data.val_ds, data.test_ds or data.train_ds) to get the images and their names.
This is how I read the image
img_path = f'{PATH}/test/{ims[i]}'
x, dx = image_loader(img_path, expand_dim=True)
with
def image_loader(path, expand_dim=False):
    img = Image.open(path)
#     plt.imshow(img)
    img = img.resize((sz, sz))
    dx = np.array(img)
    img = np.array(img, dtype=np.float32)
    img = np.einsum('ijk->kij', img)
    if expand_dim:
        img = img[None]
#     # convert to torch
    img = torch.from_numpy(img)
    return img, dx
followed by
sf = SaveFeatures(m[-4])
py = m(Variable(x.cuda()))
sf.remove()

py = np.exp(to_np(py)[0])

feat = np.maximum(0, sf.features[0])

f2=np.dot(np.rollaxis(feat,0,3), py)
f2-=f2.min()
f2/=f2.max()
# f2;
ax = plt.subplot(11, 2, (i+1)*2-1)
plt.imshow(dx)
ax.set_title(not_accurate_imgs)
plt.subplot(11, 2, (i+1)*2)
plt.imshow(dx)
plt.imshow(scipy.misc.imresize(f2, dx.shape), alpha=0.5, cmap='hot');
where
class SaveFeatures():
    features=None
    def __init__(self, m): self.hook = m.register_forward_hook(self.hook_fn)
    def hook_fn(self, module, input, output): self.features = to_np(output)
    def remove(self): self.hook.remove()
I will try to make a git repository as well, for easier followup.
Thank you in advance! 
[Edit:] Here it is my first git repository https://github.com/alessaww/fastai_ws You can check the differences here
@aditya @radek Any ideea why I have two different activations maps for the same image? Many thanks!