Finally, you can use the same computer to run Windows 10, while coding within a linux environment AND utilizing CUDA operations for deep learning. I myself prefer Win10 as my daily driver. But when it comes time to code, I am usually remoting to a cloud environment, or setting up a virtual machine, or running a separate computer without a monitor (headless) because it has beefier hardware. As of yesterday (6/17/20), NVIDIA has detailed steps to enable GPU processing within the Windows Subsystem for Linux (WSL) version 2. This could very well be the “dream” setup if have the hardware to run a GPU, and a bit of patience to get things installed. With Version4 of fastai course soon to be released, maybe now is the time to get your local machine configured in this fashion.
Caution:
With this being brand new, it is not for everyone. It can take several hours to get configured from a clean installation of Win10 into an fully operational environment. You need to install “beta” versions of software, some of which have expiration dates. If you don’t turn off updates, your system may change and things break. You need to install special drivers for the video cards. You need to register to even get access to the downloads. Some of these downloads may even be restricted for export, I do not know. But if this is something you want to tackle, read on.
Installation steps:
A detailed article on CUDA and WSL2 can be found here:
The more general steps that need to be taken can be found here:
https://docs.nvidia.com/cuda/wsl-user-guide/index.html
Here is what I did the first and/or second time trying to get this installed:
Setup Windows – Base Version
- Download Win10 ISO from Microsoft. https://www.microsoft.com/en-us/software-download/windows10 I wanted the ISO file to setup another computer, which was my Ubuntu machine. The file is 3.85GB
- I used Rufus to “burn” the image to my USB drive. I normally use balenaEtcher but they recommended Rufus.
- Then I installed Win10 onto the other machine, overwriting my Ubuntu install. The install loads a non-Preview version of windows, version 19041.264. WSL2 w/GPU needs 20145 or higher.
- Join the Microsoft Windows Insider Program, within the windows update screen. Join the “Fast” Track and check for updates. You may have to do several installs and reboots until you install the 20H2 Feature Update. This took my Win10 version to 20150.1000. You can check you windows version by typing “
winver” in the run command area.
Setup Windows – NVIDIA driver
Do not proceed until you have updated your windows version to 20145 or higher. Also, this is not the same general availability driver. It is special, and must be done from the link shown.
- Download the appropriate video driver for your system from https://developer.nvidia.com/cuda/wsl . This will require you to register with the NVIDIA development program. The file is 554MB in size. You are downloading for windows, and NOT linux. In fact, they say DO NOT install a video driver once you get into your linux distribution.
- Install the video driver. I just used the Express option and left everything default. After a reboot or two, we can setup wsl2.
Setup Windows – WSL2
These steps follow https://docs.microsoft.com/en-us/windows/wsl/install-win10
- Open a PowerShell window as an Administrator
- Run
dism.exe /online /enable-feature /featurename:Microsoft-Windows-Subsystem-Linux /all /norestart - Run
dism.exe /online /enable-feature /featurename:VirtualMachinePlatform /all /norestart - Reboot the machine
- Open a PowerShell window as an Administrator
- Run
wsl --set-default-version 2 - Run
wsl cat /proc/version. You will probably see that the kernel version is 4.19.104 or so. We need kernel 4.19.121+.
Setup Windows – WSL2
- Go back to Windows Update, and look under “Advanced Options”.
- Make sure the “Receive updates for other…” is set to “On”
- Check for updates.
- After a few checks, the Windows Subsystem for Linux Update 4.19.121 should appear.
- Install
- Reboot.
Setup Windows – Linux Disto
- Open the Microsoft Store
- Search for your preferred Linux distro. First time out, I chose Ubuntu 20.04, but ended up with problems. I’m not saying it won’t work, but the second time through I chose Ubuntu 18.04.
- Get
- Install
- Launch
- Set credentials
Setup Ubuntu within WSL
- Open Powershell
- Run wsl and this should start Ubuntu.
You now have a choice as to how you want to run your CUDA applications. Are you going to run docker and containers? Or are you going to run the CUDA apps natively? That is where Steps 4,5,6 of the nvidia walkthu tries to help. Let’s start with docker.
Setup Ubuntu – Docker
- Within Ubuntu, run curl https://get.docker.com | sh . Now when you do this, it will tell you that it detects WSL and that you should run Docker Desktop for Windows. Well, I tried that, but never got it to work. I don’t know if it was docker’s fault, ubuntu 20.04’s fault or what, but it did not go. If you are adventurous and can get it to work, please let me know as I would prefer to use it.
- Run a few more commands…
a.distribution=$(. /etc/os-release;echo $ID$VERSION_ID)
b.curl -s -L https://nvidia.github.io/nvidia-docker/gpgkey | sudo apt-key add –
c.curl -s -L https://nvidia.github.io/nvidia-docker/$distribution/nvidia-docker.list | sudo tee /etc/apt/sources.list.d/nvidia-docker.list
d.curl -s -L https://nvidia.github.io/libnvidia-container/experimental/$distribution/libnvidia-container-experimental.list | sudo tee /etc/apt/sources.list.d/libnvidia-container-experimental.list
e.sudo apt-get update
f.sudo apt-get install -y nvidia-docker2 - In a new terminal….
a.sudo service docker stop
b.sudo service docker start - Verify the docker service and GPU compute by running one of their examples.
a.docker run --gpus all nvcr.io/nvidia/k8s/cuda-sample:nbody nbody -gpu -benchmark
b.docker run -it --gpus all -p 8888:8888 tensorflow/tensorflow:latest-gpu-py3-jupyter
This should give you confidence that the general pieces are installed to use docker and cuda, but….
Setup Ubuntu – CUDA
…you may not have access to a CUDA container, or don’t want to use docker. In that case, it appears that you need to install cuda at the Ubuntu level. When I tired first time out, I could not get fastai to use the GPU even though it was working fine in docker. When running Ubuntu natively, we don’t have to install CUDA, as pytorch brings over what it needs. But this is no ordinary install. There needs to be communication to the video driver and that can only happen with installing CUDA (I assume).
- Navigate to https://developer.nvidia.com/cuda-downloads
- Select Linux
- X86_64
- Ubuntu
- 18.04
- Deb local and follow the steps. I would list out the steps but am unsure if that is allowed as CUDA is also part of the NVIDIA developer program.
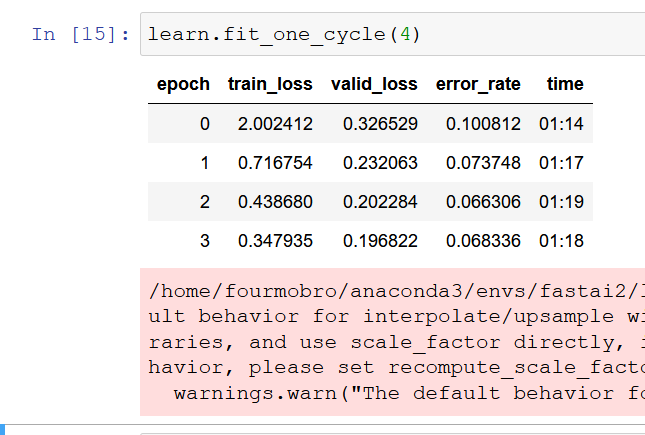
It should be noted that even with CUDA installed, running nvidia-smi within Ubuntu will not yield any results. It says it cannot communicate with the driver. However, during training, the command can be run within PowerShell to get an instant look at the memory usage, but the “watch” command will not work.
Setup Ubuntu – fastai2
- You can now follow the Ubuntu setup from https://forums.fast.ai/t/platform-local-server-ubuntu/65851/26
- Follow step 2, 6, 7, 9* and some of the other posts to get your installation working.
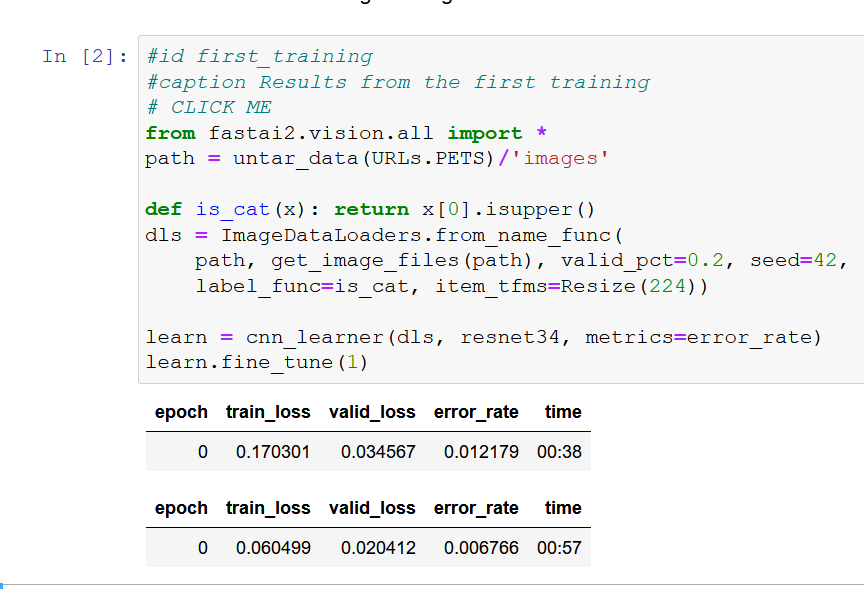
- You can verify if GPU is being used by running torch.cuda.is_available() and hope that it returns True.
Setup Windows – Optional Steps
- I would turn off/pause updates once this is working properly to prevent something breaking
- Now would be a good time to install vscode if that is your preferred editor
- I also like using Windows Terminal from the Microsoft Store. It gives a tabbed interface which can have WSL in one tab and PS in another or command prompt in another, etc