Now it is giving the error PATH dogs/cats not found
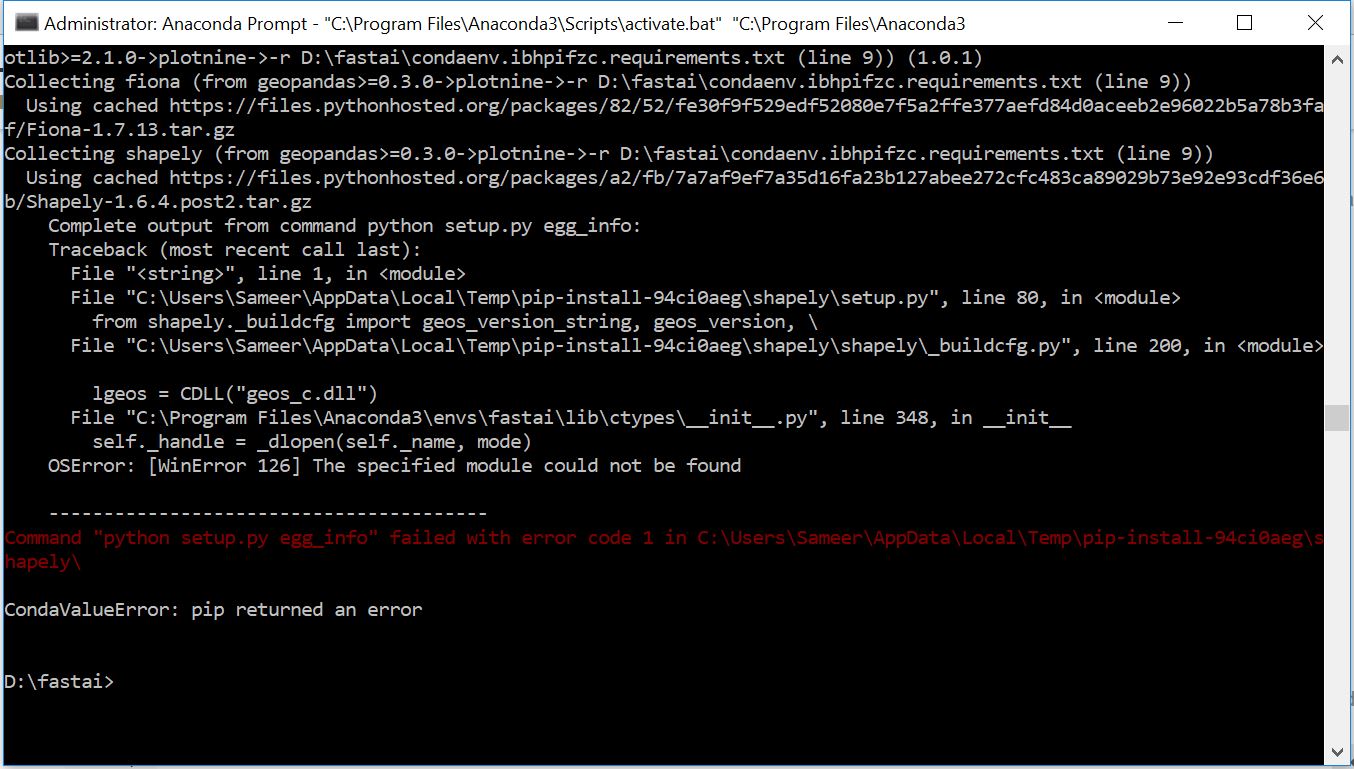
@pverma, I also tried to install Fiona first, which was successful, but running conda env update still returns the same error message related to Fiona.
I too was stuck on a fiona related problem in Windows 10 install of fastai. I tried a lot of things and finally it worked. I’m listing some of the steps here. At first I tried the installation from this post with conda env update, which kept failing on the fiona step. I downloaded GDAL and followed these instructions earlier: https://github.com/Toblerity/Fiona/blob/master/README.rst#windows
including GDAL but it still didn’t work. Then I removed the fastai environment
conda env remove -n fastai
and followed old instructions for Windows 10 on How to set up Windows 10 for fast.ai
Here are the series of commands that seemingly randomly led to it working. (Sorry I wish I had more succinct advice)
conda create -n fastai python=3.6 numpy cython statsmodels opencv
activate fastai
conda install -c peterjc123 pytorch cuda90
pip install fastai (error received fiona related)
python -m pip install --upgrade pip
pip install fastai (error received fiona related)
conda install -c conda-forge geopandas
conda remove geopandas fiona
pip install geopandas fiona (error received fiona related)
pip install Fiona-1.7.13-cp36-cp36m-win_amd64.whl
(downloaded from https://www.lfd.uci.edu/~gohlke/pythonlibs/#fiona)
pip install geopandas fiona
pip install fastai
python -m ipykernel install --user --name fastai --display-name “fastAI custom”
jupyter notebook
3 Likes
Have you tried building Fiona from source rather than just installing the binary? Its pretty likely the issue is caused by conda not knowing to point the Fiona install script towards the GDAL include and lib. It looks like toddprater had success just by setting the environment variables before updating the environment.
Hi Josh, should I just type these two “set environment” under the Annoconda command prompt, or set these environment variables using Windows environment setting tool? Thanks.
I just set the environment variables in the shell before I ran the conda env update command. I don’t think you’d want to set those globally. Actually, just this morning I went back to see if I could make it work from scratch and found that I must have installed fiona (from conda-forge) before updating the environment:
conda install -c conda-forge fiona
Or, you could just add the line under dependencies in the environment.yml file:
- conda-forge::fiona>=1.7.13
And then just a single conda env update should work.
3 Likes
It works, thank you very much!!
How did you installed GDAL?
I tried to install GDAL core, but at the path-to-gdal I don’t have “include” and “lib” library.
I have: “charp”, “gdal-data”, “gdalplugins”, “licence”, “projlib”
@talz: I downloaded from the GIS Internals site. I chose the MSVC 2017/x64 package and then downloaded both the ‘compiled binaries’ ZIP file and the ‘libraries and headers’ ZIP file. Then I just extracted those into a directory (C:\path-to-gdal).
2 Likes
Hi Guys,
I am trying to get started with this course on a Windows 10 machine equipped with the 960M NVIDIA GPU. I was able to follow steps 1 to 4 without much issues. However, I am stuck with an error that the Anaconda prompt throws at Step 5 (conda env update). Can someone please help me get past this error?
Thanks,
1 Like
I’m facing the same problem ! can anyone help?
hello, I was able to solve this by installing geopandas independently, but then got stuck with waht every body is complaining about … the Fiona thing ! Have been trying to slove it since yesterday but to no avail !
Finally, I was able to install everything without any fuss. Here is what I did:
- conda remove -n fastai --all
- conda clean --all
- Steps 1 - 4 from Jeremy’s post
- Follow Todd’s guidelines
- Follow Jeremy’s steps 5 - 8
That’s it!
4 Likes
@sameersharmadc thanks a lot … that worked and everything installed correctly and completed all the steps exactly as you mentioned. However after that when I try to launch jupyter I get this:

When I deactivate fastai and run the command on the base environment it works !
I don’t understand where the issue is?
I would also not have a clue about why it worked after deactivation :(. Anyways, enjoy the course, best of luck!
After reinstalling Anaconda and Fastai I am baffled by the following error. Everything else works ok. Any suggestions?
When running lesson1-rf.ipynb it fails when executing:
draw_tree(m.estimators_[0], df_trn, precision=3)
returning:
FileNotFoundError Traceback (most recent call last)
D:\Nand\Anaconda3\envs\fastai\lib\site-packages\graphviz\backend.py in pipe(engine, format, data, quiet)
158 stdout=subprocess.PIPE, stderr=subprocess.PIPE,
–> 159 **POPEN_KWARGS)
160 except OSError as e:
D:\Nand\Anaconda3\envs\fastai\lib\subprocess.py in init(self, args, bufsize, executable, stdin, stdout, stderr, preexec_fn, close_fds, shell, cwd, env, universal_newlines, startupinfo, creationflags, restore_signals, start_new_session, pass_fds, encoding, errors)
708 errread, errwrite,
–> 709 restore_signals, start_new_session)
710 except:
D:\Nand\Anaconda3\envs\fastai\lib\subprocess.py in _execute_child(self, args, executable, preexec_fn, close_fds, pass_fds, cwd, env, startupinfo, creationflags, shell, p2cread, p2cwrite, c2pread, c2pwrite, errread, errwrite, unused_restore_signals, unused_start_new_session)
996 os.fspath(cwd) if cwd is not None else None,
–> 997 startupinfo)
998 finally:
FileNotFoundError: [WinError 2] The system cannot find the file specified
During handling of the above exception, another exception occurred:
ExecutableNotFound Traceback (most recent call last)
D:\Nand\Anaconda3\envs\fastai\lib\site-packages\IPython\core\formatters.py in call(self, obj)
343 method = get_real_method(obj, self.print_method)
344 if method is not None:
–> 345 return method()
346 return None
347 else:
D:\Nand\Anaconda3\envs\fastai\lib\site-packages\graphviz\files.py in repr_svg(self)
104
105 def repr_svg(self):
–> 106 return self.pipe(format=‘svg’).decode(self._encoding)
107
108 def pipe(self, format=None):
D:\Nand\Anaconda3\envs\fastai\lib\site-packages\graphviz\files.py in pipe(self, format)
123 data = text_type(self.source).encode(self._encoding)
124
–> 125 outs = backend.pipe(self._engine, format, data)
126
127 return outs
D:\Nand\Anaconda3\envs\fastai\lib\site-packages\graphviz\backend.py in pipe(engine, format, data, quiet)
160 except OSError as e:
161 if e.errno == errno.ENOENT:
–> 162 raise ExecutableNotFound(args)
163 else: # pragma: no cover
164 raise
ExecutableNotFound: failed to execute [‘dot’, ‘-Tsvg’], make sure the Graphviz executables are on your systems’ PATH
<graphviz.files.Source at 0x21282fe9198>
Hi everybody,
do you happened to know should we change anything in the 8th step of Jeremy’s explanation in case we have activated fastai-cpu instead of fastai, as it is recommended on github. Particulary, i am suspicious about line mklink /d fastai …\fastai, but since i do not know fastai is for folder or environment, which is now differently named i ask you.
Thanks for your time and help 
My windows installation works just fine using Jupyter Notebook, but the exact same notebooks will throw a bcolz module not found error when launched in Jupyter Lab. Anybody know why this would be? I’ve tried a full uninstall and followed the steps here:
for what it’s worth here are my jupyter --paths:
(fastai) C:\Users\Will\fastai>jupyter --paths

config:
C:\Users\Will\.jupyter
C:\Users\Will\Anaconda3\envs\fastai\etc\jupyter
C:\ProgramData\jupyter

data:
C:\Users\Will\AppData\Roaming\jupyter
C:\Users\Will\Anaconda3\envs\fastai\share\jupyter
C:\ProgramData\jupyter

runtime:
C:\Users\Will\AppData\Roaming\jupyter\runtime@Milica: I was able to get the CPU environment built (on Windows) by changing a line in the environment-cpu.yml file. The dependency that references ‘pytorch<0.4’ should be ‘pytorch-cpu<0.4’. Otherwise, the instructions are mostly the same (including step 8) except that:
- In step 5 you use
conda env update -f environment-cpu.yml - In step 6 you use
conda activate fastai-cpu
(Also, you still have to deal with the fiona dependency as mentioned above…and you may eventually have to install mkl_fft, intel-openmp, numpy, and mkl using the command line and setting INCLUDE and LIB environment variables as mentioned above.)
@toddprater many thanks for your help. I have read and used your trick conda-forge::fiona>=1.7.13, so thank you for that as well. I will try, and sorry for slow response